User Guide Lumia 640 Issue 1.
User Guide Lumia 640 Contents For your safety 4 Clock and calendar 55 Get started 5 Browse your SIM apps 58 Keys and parts 5 Store 59 Insert the SIM and memory card 5 People & messaging 62 8 Calls 62 Switch the phone on Remove the SIM and memory card 10 Contacts 68 Lock the keys and screen 11 Social networks 73 Charge your phone 13 Messages 74 Connect the headset 14 Mail 78 Antenna locations 14 Camera 83 Your first Lumia? 16 Get to know Lumia Camera 83 Set up you
Entertainment 101 Watch and listen 101 FM radio 105 Sync music and videos between your phone and computer 106 Games 107 Lifestyle apps and services 109 Office 112 Microsoft Office Mobile 112 Write a note 115 Continue with a document on another device 115 Use the calculator 115 Use your work phone 116 Tips for business users 116 Phone management & connectivity 118 Update your phone software 118 Use a high speed connection 119 Use a secure VPN connection 119 Wi-Fi 120 NFC
For your safety Read these simple guidelines. Not following them may be dangerous or against local laws and regulations. TURN OFF IN RESTRICTED AREAS Turn the device off when mobile phone use is not allowed or when it may cause interference or danger, for example, in aircraft, in hospitals or near medical equipment, fuel, chemicals, or blasting areas. Obey all instructions in restricted areas. ROAD SAFETY COMES FIRST Obey all local laws. Always keep your hands free to operate the vehicle while driving.
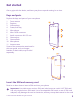
Get started Get to grips with the basics, and have your phone up and running in no time. Keys and parts Explore the keys and parts of your new phone. 1 2 3 4 5 6 Front camera Earpiece Volume keys Power/Lock key Microphone Micro-USB connector 7 8 9 10 11 Audio connector AHJ 3.5 mm Camera lens Camera flash Microphone Antenna area Some of the accessories mentioned in this user guide, such as charger, headset, or data cable, may be sold separately.
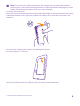
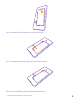
Note: Turn the device off and disconnect the charger and any other device before removing any covers. Avoid touching electronic components while changing any covers. Always store and use the device with any covers attached. 1. Switch your phone off. 2. On the corner of the phone, put the tip of your index finger in the seam between the screen frame and the back cover. Press the middle of the back cover, bend the cover open, and remove it. Do not use any sharp tools, as they may damage the screen. 3.
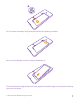
5. If you have a memory card, push the card into the memory card slot. 6. Line up the battery contacts, and put the battery in. 7. Press the bottom edge of the back cover against the bottom edge of your phone, and snap the cover into place. © 2015 Microsoft Mobile. All rights reserved.
. Switch your phone on. Remove the SIM and memory card Got a new SIM or memory card? Learn how to remove the previous card from your phone. 1. Switch your phone off. 2. On the corner of the phone, put the tip of your index finger in the seam between the screen frame and the back cover. Press the middle of the back cover, bend the cover open, and remove it. 3. If the battery is in, lift it out. © 2015 Microsoft Mobile. All rights reserved.
4. To remove the SIM card, pull it out from the slot. 5. To remove the memory card, pull it out from the slot. 6. Line up the battery contacts, and put the battery in. © 2015 Microsoft Mobile. All rights reserved.
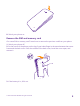
7. Press the bottom edge of the back cover against the bottom edge of your phone, and snap the cover into place. Don't press the keys while attaching the cover. 8. Switch your phone on. Switch the phone on Switch your phone on, and start exploring it. Press the power key until the phone vibrates. © 2015 Microsoft Mobile. All rights reserved.
Switch the phone off Press and hold the power key, and drag the lock screen down. Lock the keys and screen If you want to avoid accidentally making a call when your phone is in your pocket or bag, you can set your keys and screen to lock automatically. Press the power key. © 2015 Microsoft Mobile. All rights reserved.
Unlock the keys and screen Press the power key, and drag the lock screen up. Tip: Instead of pressing the power key, you can also double-tap the screen if doubletap is switched on. To switch on double-tap, on the start screen, swipe down from the top of the screen, tap ALL SETTINGS > touch, and switch Wake up to On .
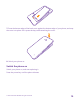
Charge your phone Learn how to charge your phone. Charge your phone with a USB charger Your battery has been partially charged at the factory, but you may need to recharge it before you can switch the phone on for the first time. Make sure you use a compatible USB charger to charge your phone. The charger may be sold separately. 1. Plug the charger into a wall outlet. If necessary, connect the USB cable to the charger. 2. Connect the micro-USB end of the charger's cable to your phone. 3.
First connect the USB cable to the computer, then to your phone. When the battery is full, first disconnect the USB cable from your phone, then from the computer. The battery can be charged and discharged hundreds of times, but it will eventually wear out. When the talk and standby times are noticeably shorter than normal, replace the battery. Connect the headset Enjoy your favorite music, or free your hands for other things when in a call. The headset may be sold separately.
© 2015 Microsoft Mobile. All rights reserved.
Your first Lumia? Let’s get started. Set up your new phone, explore your phone’s views and menus, and learn how to use the touch screen. Set up your phone Make the most out of your phone’s features from the get-go. When you turn your phone on for the first time, your phone guides you to set up your network connections, phone settings, and Microsoft account in one sitting.
Reset protection prevents a thief from resetting and reusing your phone if your phone gets stolen. Tip: You can also create a Microsoft account later. On the start screen, swipe down from the top of the screen, and tap ALL SETTINGS > email+accounts > add an account > Microsoft account. Parents must approve the account for children under the age of 13.
Tip: To go back to the start screen from any view, tap the start key . The apps menu is the home to all your apps – in neat alphabetical order. All the installed apps end up here. To look up an app in the apps menu, tap , or tap a letter. 2. To add an app shortcut to your start screen, in the apps menu, tap and hold the app, and tap pin to start. Check notifications and change settings quickly Swipe down from the top of the screen. © 2015 Microsoft Mobile. All rights reserved.
In the action center, you can quickly see notifications, such as your missed calls and unread mails and messages, open the camera, and access all phone settings. Navigate inside an app There’s more to your apps than meets the eye. To find more views in an app, swipe left. To discover more actions, use the options menu. In most apps, to go to another view, swipe left. Find more options in an app Tap . In the options menu, you can find additional settings and actions that are not shown as icons.
Use the touch screen Explore your phone with a tap, swipe, or drag. To open an app or other item, tap the app or item. Tap and hold to open further options Place your finger on an item until the menu opens. Tap and hold to drag an item Place your finger on the item for a couple of seconds, and slide your finger across the screen. © 2015 Microsoft Mobile. All rights reserved.
Swipe Place your finger on the screen, and slide your finger in the direction you want. For example, swipe left or right between the start screen and the apps menu, or between different views in the hubs. Scroll through a long list or menu Slide your finger quickly in a flicking motion up or down the screen, and lift your finger. To stop the scrolling, tap the screen. © 2015 Microsoft Mobile. All rights reserved.
Zoom in or out Place 2 fingers on an item, such as a map, photo, or web page, and slide your fingers apart or together. Lock the screen orientation The screen rotates automatically when you turn the phone 90 degrees. To lock the screen in its current orientation, on the start screen, swipe down from the top of the screen, and tap ALL SETTINGS > screen rotation. Switch Rotation lock to On . Screen rotation may not work in all apps or views. © 2015 Microsoft Mobile. All rights reserved.
Back, start, and search keys The back, start, and search keys help you navigate your phone. • • • • • • To see which apps you have open, tap and hold the back key . You can then switch to another app or close the ones you don’t need. To go back to the previous screen you were in, tap the back key . Your phone remembers all the apps and websites you've visited since the last time your screen was locked. To go to the start screen, tap the start key . The app you were in stays open in the background.
For more info, go to www.microsoft.com/mobile/switch-easy. Copy contacts Have your nearest and dearest instantly at your fingertips. Use the Transfer my Data app to easily copy your contacts, text messages, and pictures from your old phone. The app does not work with all phone models. Tip: If your old phone is a Windows Phone device, or if you have previously backed up your contacts to your Microsoft account, to import your contacts from the service, just sign in to your account on your phone.
Transfer content using your Microsoft account If your old phone is a Windows Phone, the easiest way to transfer your contacts, calendar, and text messages to your new Lumia phone is your Microsoft account. If you don't have a Microsoft account set up on your new Lumia phone yet, on the start screen, swipe down from the top of the screen, tap ALL SETTINGS > email+accounts > add an account, and create a Microsoft account following the instructions shown on the screen. 1.
Transfer content from a Symbian or S40 phone Use Nokia Suite to transfer your contacts, calendar entries, and photos from a Symbian or S40 phone to your Lumia phone. Make sure you have the latest Nokia Suite installed on your PC. You can download it from www.microsoft.com/mobile/nokiasuite. You need a Microsoft account to sign into OneDrive. 1. Use a compatible USB cable to connect your Symbian or S40 phone to your PC. 2. Open Nokia Suite on your PC. 3.
Basics Learn how to get the most out of your new phone. What’s new in this release? Check some of the key things in this release at a glance. • • • Find the settings you’re looking for easily – settings are now reorganized into groups, and you can even search them. Switch your calendar to show week numbers in the monthly view. Turn mobile data on and off easily – add a shortcut to the action center. Get to know your phone Your phone has two views, start screen and apps menu.
Switch between views and apps Not all your apps are on the start screen – swipe to the apps menu to find them. Or check what’s already running on your phone and switch between the apps. To see all the apps on your phone, on the start screen, simply swipe left. To return to the start screen, swipe right. Tip: To find an app quickly, tap any letter in the apps menu, and in the following menu, tap the first letter or character for the app you want. View, switch between, and close open apps .
Navigate the settings menu On the start screen, swipe down from the top of the screen, and tap ALL SETTINGS. To go to a settings group, tap any settings group title, and select the group you want. To search for a particular setting, tap , and start typing the name of the setting. Personalize the navigation bar All Lumia phones have 3 keys across the bottom: the back, start, and search key. You can change the way this navigation bar behaves – or even hide it from the start screen when you don’t need it.
In this screen, you can: • • • • • See your missed calls and recent unread emails and messages Check any notifications, such as available app updates in Store Open apps Check for Wi-Fi networks, and connect to them Quickly jump to settings 2. To close the menu, swipe up from the bottom of the screen. Personalize the action center On the start screen, swipe down from the top of the screen, and tap ALL SETTINGS > notifications+actions. To change a shortcut, tap the shortcut and the app you want.
By default, the volume keys control the volume of alarms and reminders. If you have connected headphones, the volume keys control both ringtone and media volume at the same time The maximum volume level is 30. Change the volume for media and apps Press a volume key, tap , and tap the volume bar for media and apps to set the volume you want. The maximum volume level is 30. Switch to silent mode Press a volume key, and tap > . To switch silent mode off, tap .
Your SIM card is locked. Airplane mode is switched on. Your phone is roaming outside your home mobile network. Mobile data connection Single letters, combinations of letters, or combinations of letters and numbers show the type of mobile network to which you're connected. Icons that show the network connection type may vary between regions and network service providers. Your phone is connected to a 2G network. Your phone is connected to a 4G network. An LTE data connection is open.
Vibrate mode is switched on. Silent mode is switched on. Cortana Cortana is handling your calls and messages. Call forwarding Your calls are forwarded to another number or your voice mailbox. Location An app or service is using your location info. Driving mode Driving mode is switched on. Accounts Learn about the different accounts on your phone and what you can do with them.
Create your Microsoft account Spice up your life and get more from your phone – create a Microsoft account. If you didn’t create a Microsoft account during the first start-up, you can always do it later. If you already have an Xbox Live.com, Hotmail.com, or Outlook.com account, or if you have created a Microsoft account on your Surface tablet or Windows PC, you don’t have to create a new one – just sign in with the username and password for that account.
Add a Microsoft account to your phone If you didn’t sign in to your Microsoft account during the first start-up, you can add the account to your phone later and get your data and settings easily on all your devices. 1. On the start screen, swipe down from the top of the screen, and tap ALL SETTINGS > email +accounts > add an account. 2. Tap Microsoft account. 3. Sign in with your existing Microsoft account username and password. 4. Select how you want to get your one-time verification code. 5.
OneDrive Learn what OneDrive is and how to use it. OneDrive cloud storage Store your stuff in the clouds. You don't need to worry about freeing memory for your favorite or new apps. OneDrive is cloud storage for all your documents and photos, so you can access, share, or restore them if needed. You can also set it to back up your stuff automatically, so when you take a photo or a video, it's copied to your cloud album.
Save an Office document to OneDrive Tap Office, swipe to places, and tap phone. Then tap and hold the file you want to save, and tap save to... > OneDrive. Tip: You can also save a document to OneDrive while working on it. Tap > save as..., and switch Save to to OneDrive. If you change the Save to location, it changes the default location for all files.
Personalize your phone Learn how to personalize the start screen, and how to change ringtones. Personalize the start screen Make your start screen yours – choose your background photo, pin your favorite apps and much more to the start screen, or change the tile size and layout as you like. To get the most out of the space on the start screen, group apps into folders. 1. To add a background photo, on the start screen, swipe down from the top of the screen, and tap ALL SETTINGS > start+theme > choose photo.
Resize or unpin a tile To resize, tap and hold the tile, and tap the arrow icon. The tiles can be either small, medium, or wide. The bigger the tile is, the more information it can show. To unpin the tile, tap and hold the tile, and tap . Group tiles into folders Tap and hold the tile, and drag and drop it on top of the tile or folder you want to group it with. To open an app from the folder, tap the folder, then tap the app you want.
Pin an app Swipe left to go to the apps menu, tap and hold the app, and tap pin to start. Pin a contact Tap People, tap and hold the contact, and tap pin to start. When you pin contacts, their feed updates are shown on the tile, and you can call them directly from the start screen. Personalize the lock screen Change the lock screen to your liking. You can, for example, have your own favorite photo in the background.
Tip: You can decide which app notifications, such as missed calls or new messages, you want to see on the lock screen. Simply tap a notification slot, and choose the app you want to add. Change the background photo Tap change photo, select a photo, adjust it to get the best possible fit, and tap . Tip: You can also choose an app to show info on your lock screen, or let Bing shuffle photos there. Just change the setting for Background to your liking.
shouldn't. Put selected apps, games, and other favorites for kids to enjoy in their own start screen. 1. On the start screen, swipe down from the top of the screen, and tap ALL SETTINGS. 2. Tap kid's corner. 3. Choose which content your kids can use. You can also set a password to keep your kids from accessing your own start screen. Tip: To let your kids make an in-app purchase, such as buy game points, define a Wallet PIN. You must type in the Wallet PIN to make each purchase.
2. Select the type of ringtone or alert you want to change, and select the sound. To listen to a ringtone so you can see if you like it, tap . Tip: Want to set a specific ringtone for a contact so you immediately know when they are calling? Edit the contact info in the People hub. Change the message tone or other notification sounds Tap manage app sounds and the app you want, and select the notification sound.
Switch the vibration off If you don’t want your phone to vibrate, tap . Cortana Let Cortana make your daily life easier. Cortana voice assistant Keep your busy life in check – Cortana is your personal assistant on your phone, only a word away.
Use Cortana If you’ve got your hands full, but need to use your phone, you can use your voice to make a call, schedule a meeting, search the web, or open an app. Tap the search key Tap . , say what you want to do, and follow the instructions shown on your phone. Tip: To open the Cortana voice assistant quickly, tap and hold the search key . Example: Say Make an appointment, and see what happens.
Use your phone with a TTY/TDD Switch TTY/TDD to full. The available TTY/TDD modes may vary depending on your network service provider. Use your phone with a hearing aid Switch Telecoil to On . To check the Hearing Aid Compatibility rating for your phone, go to aka.ms/ phoneaccessibility. Use the screen reader Narrator reads the info on your screen aloud. Not all languages are supported, and you may need to download additional language packages. 1.
Take a screenshot You can take screenshots of what’s on your phone screen and use them like any photos. 1. Press the volume up key and the power key at the same time. 2. To view or manage the screenshots you’ve taken, tap Photos > albums > Screenshots. Extend battery life Get the most out of your phone while getting the battery life you need. There are steps you can take to save power on your phone. To save power: Charge wisely Always charge the battery fully.
When your phone goes into battery saver mode, you may not be able to change the settings of all apps. Change the phone screen settings • • • Lower the screen brightness • • Stop apps from running in the background • • Use location services selectively © 2015 Microsoft Mobile. All rights reserved. Set the phone screen to switch off after a short time. On the start screen, swipe down from the top of the screen, and tap ALL SETTINGS > lock screen > Screen times out after.
Use network connections selectively • • • • • • Set your phone to check for new mail less frequently, or even by request only. In every mailbox you have, tap > settings > sync settings, and select how often to sync. Switch Bluetooth on only when needed. Turn NFC on only when needed. To switch the NFC feature off, on the start screen, swipe down from the top of the screen, tap ALL SETTINGS > NFC, and switch Tap to share to Off .
Tip: You can also follow your data usage with the Data Sense app. Stop data roaming On the start screen, swipe down from the top of the screen, tap ALL SETTINGS > cellular +SIM, and switch Data roaming options to don't roam. Tip: To save on data costs when traveling, save new maps to your phone before your journey, and browse the maps offline. If you’re running low on space, you can remove some maps from your phone. Download email less frequently > settings > sync settings, and select how often to sync.
Switch between upper and lower case characters Tap the shift key. To switch caps lock mode on, double-tap the key. To return to normal mode, tap the shift key again. Type in a number or special character Tap the numbers and symbols key. To see more special character keys, tap the shift key. Some special character keys bring up more symbols. To see more symbols, tap and hold a symbol or special character.
Add an accent to a character Tap and hold the character, and tap the accent or the accented character, if supported by your keyboard. Delete a character Tap the backspace key. Move the cursor To edit a word you just wrote, tap and hold the text until you see the cursor. Drag the cursor to the place you want. Tip: To put a period at the end of a sentence, and to start a new sentence, tap the space key twice.
Add a new word to the dictionary If the word you want isn't in the dictionary, write the word, tap it, and tap the plus sign (+) in the suggestion bar. Your phone also learns new words when you have written them a few times. Turn word suggestions off On the start screen, swipe down from the top of the screen, and tap ALL SETTINGS > keyboard. Tap your language keyboard, and clear the Suggest text check box.
Scan codes or text Use your phone camera to scan things, such as QR codes, barcodes, and book and DVD covers, and get further info on what your phone recognizes. Tap the search key , and tap If your phone has Cortana, tap . Lumia Camera > > Lenses > . 1. Point the camera at a code. 2. Tap a result for more info. Tip: Keep the camera steady, and make sure what you're scanning is completely visible in the camera viewfinder. Example: Try scanning the following code, and see what happens.
Clock and calendar Keep track of time – learn how to use your phone as a clock, as well as an alarm clock, and how to keep your appointments, tasks, and schedules up to date. Set an alarm You can use your phone as an alarm clock, and even set your favorite song as your alarm tone. Tap Alarms. 1. Tap . 2. Set the time, fill in the alarm details, and tap . Tip: Too tired to fiddle with the phone much? Tap and hold the search key Cortana when you need the alarm.
Turn an alarm off Tap Alarms, and switch the alarm to Off Delete an alarm Tap the alarm and . . Update the time and date automatically You can set your phone to update the time, date, and time zone automatically. Automatic update is a network service and may not be available depending on your region or network service provider. On the start screen, swipe down from the top of the screen, and tap ALL SETTINGS > date +time. Switch Set date and time automatically to On .
Example: You can create an event to a calendar you are sharing with other people, such as your work calendar, so they know when you are busy. Change your status for an event When you want to let others know when you’re busy or out of the office, tap more details > Status and the status you want. By default, your status is free. Delete an appointment Tap and hold the appointment, and tap delete.
Mark a task as complete Tap and hold the task, and tap complete. Use multiple calendars When you set up your mail or social networking accounts on your phone, you can sync the calendars from all your accounts in one place. 1. Tap Calendar. 2. To show or hide a calendar, tap > settings, and turn the calendar on or off. When a calendar is hidden, the calendar events and reminders are not shown in different calendar views.
Store Make your phone your own with more apps, games, and other items, some of which are free of charge. Browse Store to find the latest content for you and your phone. You can download: • • • • • Apps Games Entertainment apps and services News apps and services Books You can also: • • Get content that is relevant to your tastes and location Share recommendations with your friends The availability of Store and the selection of items available for download depend on your region.
Using services or downloading content, including free items, may cause the transfer of large amounts of data, which may result in data costs. Browse Store Check out the latest and most downloaded apps, games, and other items recommended for you and your phone. Browse different categories, or search for specific items. Tap Store. 1. Tap a category on the front page, or swipe left or right to see more categories and items. 2. Tap an item to view its details.
If the app you’ve downloaded doesn’t support your phone language, the app uses US English by default. If you’ve added more than one phone language and the app supports one of them, the app is downloaded in the supported language. Tip: You can also use your computer to browse Windows Phone Store and download content to your phone. Go to www.windowsphone.com, and browse or search for apps and games. Tip: If your kid has a Windows Phone 8.
People & messaging Contact your friends and family, and share your files, such as photos, using your phone. Stay tuned with the latest updates to your social networking services even when on the go. Calls Learn how to make calls on your new phone and talk to your friends. Call a contact Calling your friends is quick and easy when you've saved them as contacts in your phone. Tap . 1. Tap . 2. Tap the contact and the number, if the contact has several numbers.
Search your call history To search for a call record, swipe to history, tap number. , and type in the contact's name or phone Remove a call record To remove a call record, swipe to history, tap and hold the call record, and tap delete. To remove all the call records, tap > select calls > > select all > . Copy and paste a phone number On the start screen, tap People, swipe to contacts, tap a contact, tap and hold the phone number, tap copy, and in a text box, tap .
Call the last dialed number Call your friend again if you forgot to say something. In the call history view, you can see info about the calls you have made and received. 1. Tap , and swipe to history. 2. Tap the name or phone number. Use your voice to make a call You can use your voice to call a contact. 1. Tap and hold the search key . 2. Say Call and the contact's name. Tip: You can also use voice dialing with a Bluetooth headset. Cortana is not available in all regions and languages.
Reply to a call by a text message If you can’t speak right now, you can reply to the caller by a text message. 1. When someone calls you, tap TEXT REPLY. 2. Tap type a message..., and write your message. You can only reply by a text message to calls from the contacts saved in your phone. Switch text reply on or off Tap > > settings, and switch Text reply to On or Off . Edit a pre-written text message Tap > > settings > edit replies, and edit the reply you want.
Forward calls to your voice mail Besides forwarding calls to another phone number, you can also forward these calls to your voice mail and listen to them later. For availability of this feature, contact your network service provider. Do either of the following, depending on your phone: • • Tap > > settings. Switch Call forwarding to On , if needed, and type in the voice mail number given by your service provider, if needed.
Listen to a voice message Tap , and swipe right to see the list of voice mail messages. If asked, type in the password, and tap the message you want to listen to. Use call waiting Get another call while you're already in one? Call waiting helps you answer or hold one of the calls. 1. On the start screen, swipe down from the top of the screen, and tap ALL SETTINGS > network+ > set. 2. Switch Call waiting to On . Hold the first call and answer the new call Tap ANSWER.
Contacts You can save and organize your friends' phone numbers, addresses, and other contact information in the People hub. You can also get in touch with your friends through social networking services. People hub The People hub is where all your friends’ contact information is kept. It lets you stay in touch with the people who matter the most through groups. Your social networks are also here. Go to contacts to see your friends’ contact information from every account you have signed into.
You cannot save a contact to your phone only, it’s always saved to an account. 3. Add the contact details, and tap . Tip: Your contacts are backed up automatically to your Microsoft account. Edit a contact Tap the contact and Delete a contact Tap the contact and , and edit or add details, such as a ringtone or a web address. > delete. The contact is deleted both from your phone and, with some exceptions such as Facebook, Twitter, and LinkedIn, from the social networking service where it's stored.
2. Tap , and start writing a name. The list filters as you write. Tip: Pin your most important contacts or contact groups to the start screen. Tap and hold a contact, and tap pin to start. Jump to a letter or character in your contacts list Tap any letter in the contacts list on the left, and in the following menu, tap the first letter or character for the name you want. Use a voice command In any view, tap and hold the search key all languages are supported.
Tip: If your old phone is a Windows Phone device, or if you have previously backed up your contacts to your Microsoft account, to import your contacts from the service, just sign in to your account on your phone. The contacts are imported automatically. Your old phone needs to support Bluetooth. The contacts on your old phone need to be stored in the phone memory, not on the SIM. 1. On your old phone, switch Bluetooth on, and make sure the phone is visible to other devices. 2.
Rename a group Tap the group and > rename, and write the new name. Delete a contact group Tap the group and > delete. View your Rooms The rooms feature is being discontinued, but you can still view your existing chats, calendars, photos, or notes. After March 2015, the rooms feature on Windows Phone is no longer supported. You can still see your existing rooms and use your room photo albums, calendars, and notes on your phone. You can’t create new rooms or make changes to existing rooms.
Social networks Set up social networking services on your phone to keep in touch with your friends. Set up a social media account Set up your social networking service accounts. Tap the social networking app you want to sign in to, such as Facebook, and follow the instructions shown. To download more social networking apps, tap Store. Tip: When you sign in to an account, the contacts in the account are automatically imported.
Share a photo in social networking services After you take a photo, upload it to the web so all your friends can see what you're up to. 1. Tap Photos. 2. Browse your photo albums for the photo you want to share. 3. Tap and hold the photo, and tap share.... 4. Tap the social networking service where you want to upload the photo. 5. Add a caption if you want, and share or send your photo. Messages Stay in touch with your friends with text or multimedia messages.
Forward multiple messages In threads, tap a conversation and > select messages, tap the check boxes that appear next to the messages, and tap to add a recipient. Read a message You can see on the start screen when you've received a message. You can view the messages between you and a contact in one conversation thread. The thread can contain text and multimedia messages. 1. Tap Messaging. 2. To read a message, tap a conversation.
Delete a single message in a conversation In threads, tap a conversation, tap and hold the message you want to delete, and tap delete. Delete all messages in your phone Tap > > select all > . Reply to a message Don't keep your friend waiting – reply to the message straight away. 1. Tap Messaging. 2. In threads, tap the conversation containing the message. 3. Tap the message box, and write your message. 4. Tap .
Send your location in a message When you ask your friends to come and meet you, you can send them your location on a map. This feature may not be available for all regions. Your phone may ask you about using your location. You need to allow it to use this feature. 1. When writing a text message, tap > my location. Sending a message with an attachment may be more expensive than sending a normal text message. For more info, contact your service provider. 2. Tap .
Mail You can use your phone to read and reply to mail when you're on the go. On the start screen, tap . To send and receive mail, you must be connected to the internet. Add or delete a mailbox If you use different mail addresses for business and leisure, no problem – you can add several mailboxes to your phone. Add your first mailbox To set up mail in your phone, you must be connected to the internet. If you didn't sign in to your Microsoft account during the first start-up, you can do it now.
Tip: To add your Exchange work mail, contacts, and calendar to your phone, select Exchange as your account, write your work mail address and password, and tap sign in. Your new mailbox appears as a new tile on the start screen. Delete a mailbox On the start screen, swipe down from the top of the screen, and tap ALL SETTINGS > email +accounts. Tap and hold the mailbox, and tap delete. You cannot delete the first Microsoft mailbox you signed in with. You must reset your phone to do that.
You can pin several mailboxes to the start screen. For example, dedicate a tile for business mail and another for personal mail. If you link several mailboxes into a unified inbox, you can open mail from all your inboxes in one tile. To read your mail, tap the tile. Send mail Don't let your mail pile up. Use your phone to read and write mail on the go. 1. Tap . 2. Tap and an account, if you have linked inboxes. 3. To add a recipient from your contacts list, tap , or start writing a name.
Read mail If you’re waiting for important news, you don’t have to wait until you’re at your desk. Use your phone to read your mails. You can see when you have new mail on the start screen. 1. Tap . 2. In your mailbox, tap the mail. Unread mail is marked in a different color. Tip: To zoom in or out, place 2 fingers on the screen, and slide them together or apart. Tip: If a mail contains a web address, tap it to go to the website.
Forward mail Open the mail, and tap > forward. Delete mail When your mailbox is overflowing, delete some mails to free up space in your phone. 1. In your mailbox, tap to the left of the mails you want to delete. 2. Tap the check boxes that appear next to the mails, and tap . All the mails you selected are deleted. Depending on your mail account, the mail may be deleted from your mail server, too. Delete one mail Open the mail, and tap . View mails separately Mails are grouped by title in conversations.
Camera Why carry a separate camera if your phone has all you need for capturing memories? With your phone camera, you can easily take photos or record videos. Get to know Lumia Camera When you want to take outstanding photos, Lumia Camera gives you full control. With Lumia Camera, you can: • • • • • Change each setting manually to your preference Easily share your photos and videos Record high-definition videos.
Camera basics Taking a photo or recording a video is quick and easy, as is sharing it with your friends. Take a photo Shoot sharp and vibrant photos – capture the best moments in your photo album. Depending on your phone, the features of the Lumia Camera app may vary. To download the Lumia Camera app or check that you have the latest version, go to www.windowsphone.com. Lumia Camera may not be available for all phone models. 1. Tap Lumia Camera.
Tip: To avoid camera shake, tap > timer, and select a delay. 4. To reframe the selfie, slide your fingers apart or together, and tap 5. To enhance your selfie, tap . 6. To apply a filter to your selfie, tap . Tip: To remove all enhancements and filters from the selfie, tap effects. 7. To save your selfie, tap . > clear all . Record a video Besides taking photos with your phone, you can also capture your special moments as videos. 1. Tap Lumia Camera. 2. To switch from photo to video mode, tap . 3.
Tip: To quickly select all photos or videos in an album, browse to the album, and tap > > select all. Save location info to your photos and videos If you want to remember exactly where you were when you took a particular photo or video, you can set your phone to automatically record the location. On the start screen, swipe down from the top of the screen, and tap ALL SETTINGS > photos +camera > Use location info.
3. To close the settings, drag 4. To take a photo, tap . to the right. Record high-definition videos When you want to keep your memories of the important events in your life crystal clear, remember to record them in high definition. Tap Lumia Camera. 1. To switch from photo to video mode, tap . 2. To start recording, tap . The timer starts to run. 3. To stop recording, tap . The timer stops. To view the video you just recorded, tap the round thumbnail at the corner of the screen.
Save the best frame Tap CHOOSE BEST FRAME, tap the slider or swipe left or right to find the best frames in your video, and tap to save the frame as a separate photo in Camera Roll. You can save as many frames as you want. Add movement to your photos Use the Lumia Cinemagraph app to animate your still photos and make them seem almost alive. To download the Lumia Cinemagraph app or check that you have the latest version, go to www.windowsphone.com. Lumia Cinemagraph may not be available for all phone models.
Photos and videos Here's how you view, organize, share, and edit your photos and videos. Photos hub The photos you've taken or videos you've recorded with your phone are saved to the Photos hub, where you can browse and view them. To find your photos and videos easily, mark your favorites, or organize them into albums. © 2015 Microsoft Mobile. All rights reserved.
View photos Relive those important moments – view the photos on your phone. Tap Photos. 1. To view a photo you've taken, swipe to albums, and tap Camera Roll and the photo. 2. To view the next photo, swipe left. To view the previous photo, swipe right. Find photos by date and location Tap > settings > Group my photos by time and location. Zoom in or out Place 2 fingers on the screen, and slide your fingers together or apart. Tip: To quickly zoom in or zoom back out, double-tap the photo.
1. Connect your phone to a compatible computer with a compatible USB cable. 2. On your computer, open a file manager, such as Windows Explorer or Finder, and browse to the folder for photos. 3. Add a new folder, give it a name, and add photos to the folder. The folder appears as an album in the albums view on your phone. Tip: If your computer's operating system is Windows 7 or Windows 8 or later, you can also use the Windows Phone app. With Windows 7, you can download it from www.windowsphone.com.
2. On your computer, open a file manager, such as Windows Explorer or Finder, and browse to your phone. Tip: Your phone is shown under portable devices as Windows Phone. To see the folders of your phone, double-click the name of the phone. There are separate folders for documents, music, photos, ringtones, and videos. 3. Open the folder for photos, and select and copy the photos to your computer. Tip: If your computer's operating system is Windows 7 or Windows 8, you can also use the Windows Phone app.
Tip: To revert to the original photo, tap > revert to original. Show your photos on your friend's screen Want to show your best shots to your friends? Use the PhotoBeamer mobile projector, and show your photos on your friend's screen, without any cables. To download the PhotoBeamer app or check that you have the latest version, go to www.windowsphone.com/s?appid=971c41e5-3596-4a7a-ba2c-bcd7780d7db5. PhotoBeamer may not be available for all phone models. 1.
Maps & navigation Explore what’s out there and how to get there. Switch location services on Use map apps to find out where you are, and save your location to the photos you take. Apps can use your location info to offer you a wider variety of services. 1. On the start screen, swipe down from the top of the screen, and tap ALL SETTINGS. 2. Tap location, and switch Location services to On . Find a location Maps helps you find specific locations and businesses. Tap Maps. 1. Tap . 2.
Get directions for public transportation After creating your route, tap . Public transportation info is available in selected cities around the world. Download maps to your phone Save new maps to your phone before a journey, so you can browse the maps without an internet connection when traveling. To download and update maps, switch Wi-Fi networking on. Tap Maps > > settings. 1. Tap download maps > . 2. Select the country or region. Update an existing map Tap check for updates.
Internet Learn how to create wireless connections and browse the web while keeping your data costs down. Define internet connections If your network service provider charges you on a pay-as-you-use basis, you may want to change the Wi-Fi and mobile data settings to reduce your data costs. You can use different settings for roaming and at home. Important: Use encryption to increase the security of your Wi-Fi connection. Using encryption reduces the risk of others accessing your data.
2. Switch Sharing to On . 3. To change the name of your connection, tap setup > Broadcast name, and write a name. Tip: You can also type in a password for the connection. 4. Select the connection on the other device. The other device uses data from your data plan, which may result in data traffic costs. For information on availability and costs, contact your network service provider.
Tip: You can also double-tap the screen. Open a new tab When you want to visit several websites at the same time, you can open new browser tabs and switch between them. Internet Explorer. Tap Tap 6 > . Tip: To open tabs you’re browsing on other devices, tap 6 , and swipe left to other. Tip: To go back to the previous website inside a tab, swipe right. Open a tab for private browsing > new InPrivate tab.
Change the browser mode Small text on a website can be hard to read. Use your browser in mobile or desktop mode, or switch certain web pages to the reading view and set the font size to your liking. 1. To set the browser to always use the mode you want, tap settings. 2. Change the setting for Website preference. Internet Explorer > Switch to the reading view Tap on the address bar. To set the font size for the reading view, tap advanced settings > Reading view font size.
The other phone must support NFC. For more info, see the user guide of the other phone. Clear the browser history When you've finished browsing, you can delete your private data, such as your browsing history and temporary internet files. 1. Tap 2. Tap Internet Explorer. > settings > delete history. A cache is a memory location that is used to store data temporarily. If you have, or have tried to, access confidential information or a secure service, requiring passwords, clear the cache after each use.
Entertainment Learn how to watch videos, listen to your favorite music, and play games. Watch and listen You can use your phone to watch videos and listen to music and podcasts while on the move. Play music Listen to your favorite music wherever you are. Tap Music. Tap the artist, album, song, genre, or playlist you want to play. Tip: You can improve the quality of the sound by changing the equalizer settings. On the start screen, swipe down from the top of the screen, and tap ALL SETTINGS > audio.
MixRadio Discover new music with MixRadio. With MixRadio, you can: • • • • Listen to curated mixes Take your mixes offline and listen to them even without an internet connection Mark songs with thumbs up or thumbs down to get a mix that’s tailored more to your taste Create your own mixes based on your favorite artists To learn more about using MixRadio, on your phone, tap . MixRadio, swipe left, and tap This service may not be available in all regions.
Adjust the tone of music Boost the bass or adjust other bands to enhance your listening experience. Audio personalization is not enabled when listening to the FM radio or when using Bluetooth accessories. 1. On the start screen, swipe down from the top of the screen, and tap ALL SETTINGS > audio. 2. To adjust the tone of music, swipe to equalizer, and drag the bands to your liking. You can also select one of the equalizer presets.
Tip: You can also connect using Bluetooth. On the start screen, swipe down from the top of the screen, tap ALL SETTINGS > Bluetooth, and pair your phone with the speaker. Share your screen using Lumia Beamer Do you have a presentation or document on your phone that you want to show on a bigger screen? Use the Lumia Beamer app to easily share your phone's screen on any other screen with internet access. If you don’t have the Lumia Beamer app in your phone, you can download it from www.windowsphone.com. 1.
3. You can also share your phone's screen with someone far away. To send a link by text message, mail, or social media, tap Share remotely and Messaging, Email, or Social media. 4. To update the screen, shake your phone. Tip: To update the screen automatically, tap auto update in the Lumia Beamer app. 5. To stop sharing, press the lock key, or in the Lumia Beamer app, tap stop beaming. FM radio Learn how to listen to the radio on your phone. © 2015 Microsoft Mobile. All rights reserved.
Listen to FM radio Enjoy your favorite FM radio stations on the go. To listen to the radio, you need to connect a compatible headset to the device. The headset acts as an antenna. The headset may be sold separately. Tap FM Radio. Go to the next or previous station Swipe left or right on the frequency bar. Close the FM radio app Tap the back key . Save a radio station Save your favorite radio stations so you can easily listen to them later. Tap FM Radio.
Windows Phone app Windows 8 RT Windows Windows Phone app Phone app for desktop for Mac x Windows 7 Windows Explorer x x x Windows Vista/XP Mac x x Games Keep yourself entertained by downloading and playing games on your phone. Get new games Head to games store to download and install new games on your phone. 1. Tap Games > games store. 2. Browse the selection, and tap the game you want. 3. To download a free game, tap install. 4. To try a game for free, tap try. 5. To buy a game, tap buy.
Choose what your kid can download If your kid has a Windows Phone 8.1, you can use the My Family website to manage their game and app downloads and settings. To set up My Family, go to www.windowsphone.com/ family, sign in to the Microsoft account with both your and the kid’s mail address and password, and follow the instructions. You can add another parent to My Family on the My Family website. Both parents can manage the kid’s settings, but can’t change each other’s settings.
Control your Xbox One with your phone Control your Xbox One console with your phone using the Xbox SmartGlass app. If you don’t have the Xbox SmartGlass app in your phone, you can download it from www.windowsphone.com. Make sure you are signed in with the same Microsoft or Xbox Live account both on your phone and on your console. You can connect to the compatible Xbox One device using a Wi-Fi or a mobile data connection. Tap Xbox SmartGlass.
Tip: You can pin your favorite stock to the start screen for easy viewing. Tap and hold the stock, and tap pin to start. Keep up to date with the news Check the latest news from your favorite sources. Tap News. To select the news sources you want to follow, swipe to Sources, and tap . Follow topics that interest you Swipe to Topics, tap , and search for whatever interests you – for example, your favorite hobby. You can then read articles on the selected topics in the Topics view.
Tip: To see the forecast for your current location for the next ten days, tap Daily. Tip: To quickly see the weather in other places, save your important locations to your favorites. Swipe to Favorites, tap , and add a location. Get new recipes and cooking ideas Find recipes, and add the ingredients to your shopping list in just one tap. Tap Food & Drink. 1. To find a recipe, tap Browse Recipes. 2.
Office Keep yourself organized. Learn how to use the calendar and the Microsoft Office apps. Microsoft Office Mobile Microsoft Office Mobile is your office away from the office. Go to the Office hub to create and edit Word documents and Excel workbooks, open and view PowerPoint slide shows, and share documents using SharePoint. You can also save your documents to OneDrive. OneDrive is cloud storage that you can use to access your documents from your phone, tablet, computer, or Xbox.
Tip: To access an important document quickly, you can pin it to the start screen. Tap and hold the document, and tap pin to start. Create a new document Swipe to recent, and tap . Search for text in a document Tap the Word file and . Add a comment Tap > . Format text Tap the Word file and > . Highlight text Tap the Word file and > , and select the highlight color. See the document structure Tap . Send a document in a mail Tap the Word file and > share....
Find data from a workbook Tap the Excel file and . Send a workbook in a mail Tap the Excel file and > share.... Work with PowerPoint Mobile Add the finishing touches to your presentation en route to your meeting with Microsoft PowerPoint Mobile. 1. Tap Office, swipe to places, and tap the location of the PowerPoint file you want to view. 2. Tap a PowerPoint file, and turn your phone to landscape mode. 3. To browse between slides, swipe left or right. 4.
Write a note Notes on paper are easy to lose. Instead of jotting them down on paper, you can write your notes with Microsoft OneNote Mobile. This way, you always have your notes with you. You can also sync your notes to OneDrive and view and edit them with OneNote on your phone, on your computer, or online in a web browser. 1. Tap OneNote > . 2. Write your note. 3. To format the text, tap > format. 4. To add a picture, tap . 5. To record a sound clip, tap . 6. To save the changes, tap the back key .
Use the binary calculator Turn your phone to landscape mode, left edge up. Use your work phone A company account on your phone helps you do your job. If you have a work phone, your company can create a company account that keeps the info in your phone more secure, gives you access to documents or info from inside the company's network, and even provides apps or hubs that help you do your job.
You may use a virtual private network (VPN) connection to access your company resources, such as intranet or corporate mail, or you may use a VPN service for personal purposes. Contact your company IT administrator for details of your VPN configuration, or visit Store to download the app for your VPN service and check the service’s website for additional info. Be productive with Office apps Your phone has the mobile versions of Microsoft Office apps.
Phone management & connectivity Take care of your phone and its contents. Learn how to connect to accessories and networks, transfer files, create backups, lock your phone, and keep the software up to date. Update your phone software Stay in step with the beat – update your phone software and apps wirelessly to get new and enhanced features for your phone. Updating the software may also improve your phone performance.
Using services or downloading content, including free items, may cause the transfer of large amounts of data, which may result in data costs. By default, your phone automatically downloads available updates whenever the data connection settings allow it. When your phone notifies you that an update is available, just follow the instructions shown on your phone. If your phone is short on memory, you may need to move your apps, photos, and other stuff to the memory card.
Edit a VPN profile Tap and hold the profile, tap edit, and change the info as required. Delete a VPN profile Tap and hold the profile, and tap delete. Switch to manual VPN connection Tap and hold the profile, and tap switch to manual. Tap the profile to connect to the VPN. Wi-Fi Find out more about using the Wi-Fi connection. Connect to a Wi-Fi Check available Wi-Fi connections. Connecting to a Wi-Fi network is a handy way of accessing the internet.
Tip: Your phone connects back to the Wi-Fi network automatically. To change the automatic reconnection time, or to switch Wi-Fi back on manually, tap Turn WiFi back on and the option you want. Connect with Wi-Fi Sense Connect to public Wi-Fi hotspots easily with the WiFi Sense app. WiFi Sense connects your phone to public Wi-Fi hotspots and accepts the terms of use for you when required. WiFi Sense can also share your contact info if you want. 1.
On the start screen, swipe down from the top of the screen, and tap ALL SETTINGS > NFC. Switch Tap to share to On . Tip: Before using NFC, make sure the screen and keys are unlocked. Connect to a Bluetooth accessory with NFC Hands busy? Use a headset. Or why not listen to music using wireless speakers? You only need to tap the compatible accessory with your phone. Tap the NFC area of the accessory with the NFC area of your phone, and follow the instructions on the screen. Accessories are sold separately.
Bluetooth You can connect wirelessly to other compatible devices, such as phones, computers, headsets, and car kits. You can also send your photos to compatible phones or to your computer. Connect to a wireless headset With a wireless headset (sold separately), you can speak on the phone hands-free – you can continue what you're doing, such as working at your computer, during a call.
Disconnect the headset Tap the connected headset in the list. When you turn the headset on again, the connection reopens automatically. To remove the pairing, tap and hold the headset in the list of Bluetooth devices, and tap delete. Connect to your friend’s phone with Bluetooth Use Bluetooth to wirelessly connect to your friend's phone, to share photos and much more. 1. On the start screen, swipe down from the top of the screen, and tap ALL SETTINGS > Bluetooth. 2.
2. To set the phone to ignore calls, switch Ignore calls to On . To set the phone to ignore text messages, switch Ignore texts to On . 3. Tap next. 4. To send an automatic text message when someone calls or texts you, explaining why you can't answer, switch Text replies to calls, Text replies to texts, or both to On . To edit the message, tap the text box. 5. Tap next > add a device, and tap the Bluetooth device you connect your phone to when driving, such as a headset.
For info on data security in OneDrive, go to windows.microsoft.com/en-gb/onedrive/ security. To back up other content, such as music, connect your phone to your computer, and follow the instructions on the computer screen. You have 2 options: either sync content between your phone and computer using the Windows Phone app for desktop, or drag and drop content from phone to computer in your computer’s file manager, such as Windows Explorer.
Remove temporary files to free up space Tap phone > temporary files > delete. To delete temporary files and other data from just your browser, tap Internet Explorer settings > delete history. Save or move apps to a memory card Expand your phone’s memory with a memory card and save your apps to the card by default. The quality of your memory card may affect the performance of your phone greatly. To get the best out of your phone, use a fast 4–128GB card by a well-known manufacturer.
1. To navigate to a folder, tap the folder you want. 2. To search the folder you’re currently in, tap . 3. To change how the files or folders are arranged, tap . 4. To quickly jump to a previous folder, tap the folder you want on the file path at the top of the screen. Create a new folder Tap , write a name, and tap . Move or copy files to another folder Tap and hold the file you want, and select what you want to do with it.
Windows Windows Windows Phone Phone Phone app app for app for desktop Mac Windows 8 and later x Windows 8 RT x Windows 7 Lumia Photo Transfer for Mac app (photos and videos only) x Windows Explorer x x x x Windows Vista/XP Mac x x x Tip: The easiest way to access files on your phone is the Files app. You can download it from www.windowsphone.com. Security Learn how to protect your phone, and to keep your data secure. © 2015 Microsoft Mobile. All rights reserved.
Set your phone to lock automatically You can protect your phone against unauthorized use. Define a security code, and set your phone to lock itself automatically when you're not using it. 1. On the start screen, swipe down from the top of the screen, and tap ALL SETTINGS > lock screen. 2. Switch Password to On , and type in a security code (at least 4 digits). 3. Tap Require a password after, and define the length of time after which the phone locks automatically.
Change your PIN code If your SIM card came with a default PIN code, you can change it to something more secure. Not all network service providers support this feature. 1. Tap > > settings. 2. Switch SIM security to On 3. Tap change SIM PIN. , and type in your PIN code. The PIN code can be 4-8 digits. Find your lost phone If you misplaced your phone, or are afraid it's been stolen, use find my phone to locate your phone, and lock or delete all data from it remotely.
You can also choose if you want others to access your action center or settings, use the keys, or modify tiles. It may take a while for your phone to install the apps. 3. To open Apps Corner, tap . Go to your own start screen In Apps Corner, press and hold the power key, and swipe right. Manage your advertising ID To give you more relevant advertising, your phone allows apps to access an advertising ID on your phone. You can control if you want the apps to access the ID or not. 1.
Note: Payment and ticketing apps and services are provided by third parties. Microsoft Mobile does not provide any warranty or take any responsibility for any such apps or services including support, functionality, transactions, or loss of any monetary value. You may need to reinstall and activate the cards you have added as well as the payment or ticketing app after repair of your device. Access codes Learn what the different codes on your phone are for.
number to your care point services or phone dealer. To view your IMEI number, dial *#06#. © 2015 Microsoft Mobile. All rights reserved.
Troubleshooting and support When you want to learn more about your phone, or if you're unsure how your phone should work, there are several support channels for you to check. To help you get the most out of your phone, there's a user guide in your phone with additional instructions. Tap Lumia Help+Tips. You can also go to www.microsoft.
Find your model number and serial number (IMEI) If you need to contact your care point or your service provider, you may need info such as the model number and the serial number (IMEI). To see the info, tap Settings > about. You can also find the info on your phone label, which is located under the back cover.
Take care of your device Handle your device, battery, charger and accessories with care. The following suggestions help you keep your device operational. • • • • • • • • • • • • • Keep the device dry. Precipitation, humidity, and all types of liquids or moisture can contain minerals that corrode electronic circuits. If your device gets wet, remove the battery, and let the device dry. Do not use or store the device in dusty or dirty areas. Do not store the device in high temperatures.
Battery and charger information Use your device only with an original BV-T5C rechargeable battery. Charge your device with AC-20 charger. Charger plug type may vary. Third-party chargers that comply with the IEC/EN 62684 standard, and that can connect to your device micro USB connector, may be compatible. Microsoft Mobile may make additional battery or charger models available for this device. Only replace the battery with a battery that is compliant with the IEEE-std-1725 standard.
• • Turn the wireless device off if there is any reason to suspect that interference is taking place. Follow the manufacturer directions for the implanted medical device. If you have any questions about using your wireless device with an implanted medical device, consult your health care provider. Accessibility solutions Microsoft Mobile is committed to making mobile phones easy to use for all individuals, including those with disabilities. For more information, visit aka.ms/phoneaccessibility.
Vehicles Radio signals may affect improperly installed or inadequately shielded electronic systems in vehicles. For more information, check with the manufacturer of your vehicle or its equipment. Only qualified personnel should install the device in a vehicle. Faulty installation may be dangerous and invalidate your warranty. Check regularly that all wireless device equipment in your vehicle is mounted and operating properly.
Hereby, Microsoft Mobile Oy declares that this RM-1073 product is in compliance with the essential requirements and other relevant provisions of Directive 1999/5/EC. A copy of the Declaration of Conformity can be found at www.microsoft.com/mobile/declaration-of-conformity. The availability of products, features, apps and services may vary by region. Microsoft Mobile may, in its sole discretion, change, correct or discontinue any of its services in whole or in part.
This product is licensed under the MPEG-4 Visual Patent Portfolio License (i) for personal and noncommercial use in connection with information which has been encoded in compliance with the MPEG-4 Visual Standard by a consumer engaged in a personal and noncommercial activity and (ii) for use in connection with MPEG-4 video provided by a licensed video provider. No license is granted or shall be implied for any other use.