
User manual
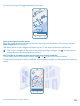
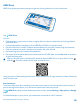
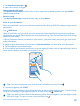

Table Of Contents
- Contents
- Safety
- Get started
- Keys and parts
- Back, start, and search key
- Antenna locations
- Insert the SIM card
- Insert the memory card
- Remove the memory card
- Charge your phone
- First start-up
- Transfer content to your Nokia Lumia
- Transfer content from your previous Nokia phone
- Transfer contacts and calendar from a Nokia Lumia with Windows Phone 7
- Transfer Office documents from a Nokia Lumia with Windows Phone 7
- Transfer your photos, videos, and music from your Nokia Lumia with Windows Phone 7
- Transfer contacts, calendar entries, and text messages from a previous Nokia Lumia with Windows Phone 8
- Transfer Office documents from a Nokia Lumia with Windows Phone 8
- Transfer your photos, videos, and music from a previous Nokia Lumia with Windows Phone 8
- Transfer content from a Symbian or S40 phone
- Transfer content from Nokia Asha
- Transfer content from an Apple Mac
- Transfer content from an Android phone
- Transfer content from an iPhone
- Transfer content from your previous Nokia phone
- Lock the keys and screen
- Connect the headset
- Change the volume
- Icons shown on your phone
- Basics
- People & messaging
- Camera
- Camera basics
- Nokia Camera
- Take a photo with Nokia Camera
- Frame your photos with ease
- Take a self-portrait with Nokia Camera
- Reframe your full-resolution photos
- Record a video with Nokia Camera
- Take photos like a pro
- Nokia Camera tips
- Take better photos with smart sequence mode
- Change a face in a group photo
- Take an action shot
- Focus on an object
- Remove moving objects in a photo
- Advanced photography
- Photos and videos
- Maps & navigation
- Internet
- Entertainment
- Office
- Phone management & connectivity
- Troubleshooting and support
- Find your model number and serial number (IMEI)
- Product and safety information

To get walking directions to your car, tap . To see your car's location through the camera viewfinder,
tap , and hold your phone upright, as if taking a photo in portrait mode.
Tip: Pin your car location to the start screen for quicker access. Swipe up from the bottom of
the screen, and tap pin to start.
Share your car's location with your friend
Swipe up from the bottom of the screen, and tap share car location.
Upgrade HERE Drive to global navigation
With HERE Drive, you can navigate in the country or region your SIM card is registered to. Upgrade
your navigation license to global, and you'll also get voice-guided turn-by-turn directions when
traveling outside your home country or region.
Tap HERE Drive, swipe up from the bottom of the screen, and tap Settings > Navigation license >
upgrade now.
After the upgrade, you can use navigation in all countries and areas where it’s available, with any SIM,
or even without a SIM.
Change the look of the Drive view
Are you using HERE Drive at night, when it's dark? With day and night modes, you can see the screen
clearly at all times. You can also change other settings to suit your needs.
Tap HERE Drive.
1. Swipe up from the bottom of the screen, and tap Settings > Map options.
2. Switch Colors to Night. To switch night mode on automatically when it's dark, tap Automatic.
Show places such as gas stations and rest areas on the map
Swipe up from the bottom of the screen, tap Settings > Map options > Show on map, and switch
place categories on or off.
Switch between remaining time or time of arrival view
In the navigation view, tap and hold the time of arrival, and tap an option.
© 2014 Microsoft Mobile. All rights reserved.
90