
User manual
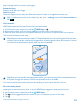
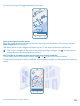
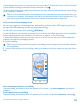
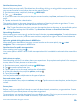
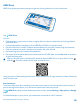

Table Of Contents
- Contents
- Safety
- Get started
- Keys and parts
- Back, start, and search key
- Antenna locations
- Insert the SIM card
- Insert the memory card
- Remove the memory card
- Charge your phone
- First start-up
- Transfer content to your Nokia Lumia
- Transfer content from your previous Nokia phone
- Transfer contacts and calendar from a Nokia Lumia with Windows Phone 7
- Transfer Office documents from a Nokia Lumia with Windows Phone 7
- Transfer your photos, videos, and music from your Nokia Lumia with Windows Phone 7
- Transfer contacts, calendar entries, and text messages from a previous Nokia Lumia with Windows Phone 8
- Transfer Office documents from a Nokia Lumia with Windows Phone 8
- Transfer your photos, videos, and music from a previous Nokia Lumia with Windows Phone 8
- Transfer content from a Symbian or S40 phone
- Transfer content from Nokia Asha
- Transfer content from an Apple Mac
- Transfer content from an Android phone
- Transfer content from an iPhone
- Transfer content from your previous Nokia phone
- Lock the keys and screen
- Connect the headset
- Change the volume
- Icons shown on your phone
- Basics
- People & messaging
- Camera
- Camera basics
- Nokia Camera
- Take a photo with Nokia Camera
- Frame your photos with ease
- Take a self-portrait with Nokia Camera
- Reframe your full-resolution photos
- Record a video with Nokia Camera
- Take photos like a pro
- Nokia Camera tips
- Take better photos with smart sequence mode
- Change a face in a group photo
- Take an action shot
- Focus on an object
- Remove moving objects in a photo
- Advanced photography
- Photos and videos
- Maps & navigation
- Internet
- Entertainment
- Office
- Phone management & connectivity
- Troubleshooting and support
- Find your model number and serial number (IMEI)
- Product and safety information

To get directions to a place, or to get more info, tap the place. To freeze the view, so you can study
a place without needing to hold your phone pointed at it, tap .
To take a quick look at where places are located on the map, hold your phone with the screen facing
up as if holding a compass.
Tip: You can find certain types of nearby places in the same way as in the normal map view. You
can also pin a category, for example, eat & drink, to the start screen in the LiveSight view. This
way you can get to the camera view of your nearest restaurants with a single tap.
Find your way inside a shopping center
No more zig-zagging in a shopping center, looking for a particular shop. HERE Maps can guide you
through maze-like shopping centers and other vast buildings.
On the start screen, swipe left, and tap HERE Maps.
To use this feature, you must be connected to the internet, and indoor map data must be available.
Indoor map data may not be available in all countries or regions, or for all buildings.
1. When the building is shown on the map, zoom in until you can see the parts of the building (for
example, the shops of a shopping center).
2. Tap the building.
Tip: To see info on a particular location in a building, such as a shop, tap the location, and then
the info bubble.
3. To see a different floor of the building, swipe up or down on the floor number to the right of the
map.
Find certain types of places in a building
Tap the building, and swipe up from the bottom of the screen. Tap show categories, and select a
category.
Find a specific place in a building
Tap the building, and swipe up from the bottom of the screen. Swipe left to directory, and tap .
© 2014 Microsoft Mobile. All rights reserved.
83