
User manual
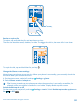
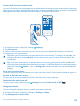
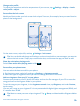

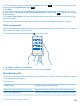
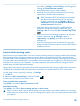

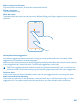
Table Of Contents
- Contents
- Safety
- Get started
- Keys and parts
- Back, start, and search key
- Antenna locations
- Insert the SIM card
- Insert the memory card
- Remove the memory card
- Charge your phone
- First start-up
- Transfer content to your Nokia Lumia
- Transfer content from your previous Nokia phone
- Transfer contacts and calendar from a Nokia Lumia with Windows Phone 7
- Transfer Office documents from a Nokia Lumia with Windows Phone 7
- Transfer your photos, videos, and music from your Nokia Lumia with Windows Phone 7
- Transfer contacts, calendar entries, and text messages from a previous Nokia Lumia with Windows Phone 8
- Transfer Office documents from a Nokia Lumia with Windows Phone 8
- Transfer your photos, videos, and music from a previous Nokia Lumia with Windows Phone 8
- Transfer content from a Symbian or S40 phone
- Transfer content from Nokia Asha
- Transfer content from an Apple Mac
- Transfer content from an Android phone
- Transfer content from an iPhone
- Transfer content from your previous Nokia phone
- Lock the keys and screen
- Connect the headset
- Change the volume
- Icons shown on your phone
- Basics
- People & messaging
- Camera
- Camera basics
- Nokia Camera
- Take a photo with Nokia Camera
- Frame your photos with ease
- Take a self-portrait with Nokia Camera
- Reframe your full-resolution photos
- Record a video with Nokia Camera
- Take photos like a pro
- Nokia Camera tips
- Take better photos with smart sequence mode
- Change a face in a group photo
- Take an action shot
- Focus on an object
- Remove moving objects in a photo
- Advanced photography
- Photos and videos
- Maps & navigation
- Internet
- Entertainment
- Office
- Phone management & connectivity
- Troubleshooting and support
- Find your model number and serial number (IMEI)
- Product and safety information

Create a safe, fun start screen for kids
You can let your kids use some apps on your phone without having to worry about them accidentally
deleting your work mail, making online purchases, or doing anything else they shouldn't. Put selected
apps, games, and other favorites for kids to enjoy in their own start screen.
1. On the start screen, swipe left, and tap Settings.
2. Tap kid's corner.
3. Choose which content your kids can use. You can also set a password to keep your kids from
accessing your own start screen.
Tip: Show your kids how they can personalize their start screen. To change, for example, the
background picture, tap customize. On the start screen, you can resize or move tiles in the
normal way.
Tip: To let your kids make an in-app purchase, such as buy game points, define a Wallet PIN.
You must enter the Wallet PIN to make each purchase. To define a Wallet PIN, on the start screen,
swipe left, and tap Wallet > > settings+pin. Some purchases may not be available for
all ages.
Go to your own start screen
Press the power key twice, and swipe up on your own lock screen. If you've set a password, type it in.
Go back to the kid's start screen
On your own lock screen, swipe left, and on the kid's lock screen, swipe up.
Switch the kid's start screen off
On your start screen, swipe left, tap Settings, and switch kid's corner to Off .
Change your theme
You can change the display colors to match your taste and mood.
1. On the start screen, swipe left, and tap Settings > theme.
2. Tap Background or Accent color.
© 2014 Microsoft Mobile. All rights reserved.
33