www.nokia.com/us www.latinoamerica.nokia.com Printed in Mexico. Impreso en México.
Nokia 3610 fold User Guide Nota: La traducción en español de este manual inicia en la página 59.
0434 DECLARATION OF CONFORMITY Hereby, NOKIA CORPORATION declares that this RM-429 product is in compliance with the essential requirements and other relevant provisions of Directive 1999/5/EC. A copy of the Declaration of Conformity can be found at http://www.nokia.com/phones/declaration_of_conformity/. ©2008 Nokia. All rights reserved. Nokia, Nokia Connecting People, Navi, and Nokia Original Enhancements logo are trademarks or registered trademarks of Nokia Corporation.
Export controls This device may contain commodities, technology or software subject to export laws and regulations from the US and other countries. Diversion contrary to law is prohibited. The third-party applications provided with your device may have been created and may be owned by persons or entities not affiliated with or related to Nokia. Nokia does not own the copyrights or intellectual property rights to the third-party applications.
Contents SAFETY.............................................. 6 General information ........................ 7 Helpful hints ...................................................... 7 About your device............................................. 8 Network services............................................... 9 Shared memory ................................................. 9 Enhancements ................................................... 9 Access codes ...................................................
10. Media ....................................... 38 14. Web .......................................... 44 Camera.............................................................. Video.................................................................. Music player.................................................... Voice recorder................................................. Equalizer........................................................... Stereo widening .............................................
SAFETY Read these simple guidelines. Not following them may be dangerous or illegal. Read the complete user guide for further information. SWITCH ON SAFELY Do not switch the device on when wireless phone use is prohibited or when it may cause interference or danger. ROAD SAFETY COMES FIRST Obey all local laws. Always keep your hands free to operate the vehicle while driving. Your first consideration while driving should be road safety.
General information ■ Helpful hints Before taking your phone to a service point Q: What can I do to resolve operation issues with my phone? A: Try the following: • Switch off the phone; and then remove and re-insert the battery. • Restore the factory settings. Select Menu > Settings > Rest. factory sett. The names and phone numbers saved in Contacts are not deleted. • Update the phone with Nokia Software Updater if available. See www.nokia.com/softwareupdate or your local Nokia website.
Messaging Q: How do I set up e-mail? A: To use the e-mail function on your phone, you need a compatible e-mail system. Check for e-mail configuration settings with your e-mail service provider. PC connectivity Q: Why do I have problems connecting the phone to my PC? A: Ensure that Nokia PC Suite is installed and running on your PC. See the Nokia PC Suite user guide or the help function in Nokia PC Suite. Also, see the support pages at www.nokia.com/support.
Warning: To use any features in this device, other than the alarm clock, the device must be switched on. Do not switch the device on when wireless device use may cause interference or danger. The availability of some features may vary by region. Please contact your operator for more details. ■ Network services To use the phone you must have service from a wireless service provider. Many of the features require special network features.
■ Access codes To set how your phone uses the access codes, select Menu > Settings > Security. • Keypad lock (keyguard) prevents accidental keypresses: 1. To lock the keypad, with the fold open, select Menu > * within 3.5 seconds. 2. To unlock the keypad, with the fold open, select Menu > * within 1.5 seconds. To answer a call when the keypad is locked, press the call key. When you end or reject the call, the keypad locks automatically.
■ Software updates Nokia may produce software updates that may offer new features, enhanced functions, or improved performance. You may be able to request these updates through the Nokia Software Updater PC application. To update the device software, you need the Nokia Software Updater application and a compatible PC with Microsoft Windows 2000 or XP operating system, broadband internet access, and a compatible data cable to connect your device to the PC.
Digital rights management (DRM) protected content comes with an associated activation key that defines your rights to use the content. If your device has OMA DRM-protected content, to back up both the activation keys and the content, use the backup feature of Nokia PC Suite. Other transfer methods may not transfer the activation keys which need to be restored with the content for you to be able to continue the use of OMA DRM-protected content after the device memory is formatted.
1. Connect the charger to a wall socket. 2. Connect the charger to your phone. 3. When the battery is fully charged, disconnect the charger from the phone, then from the wall outlet. ■ Switch the phone on and off 1. Press and hold the power key. 2. If the phone asks for a PIN code, enter the code (for example, displayed as ****), and select OK. When you switch on your phone for the first time, and the phone is in the standby mode, you are asked to get the configuration settings from your service provider.
■ Connect your phone and PC The CA-101 data cable is used for data transfer and synchronizing your phone and PC. See "Data transfer," p. 33. You must download Nokia PC Suite to use with your device. For more information, see www.nokia.com/support. 1. Connect the CA-101 data cable to the micro USB socket on the lower left side of your phone. 2. Connect the CA-101 data cable to your PC or laptop. USB data cable connected. Select mode. appears on the display of your phone. 3. Select OK and Default mode.
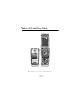
15. Camera lens 16. Mini display; analogue clock screensaver ■ microSD card The microSD card can be loaded with data such as ringing tones, themes, tones, images, and videos. If you delete, reload, or replace this card, these functions and features may not function properly. Use only compatible microSD cards approved by Nokia for use with this device. Nokia uses approved industry standards for memory cards, but some brands may not be fully compatible with this device.
Mini display 1 Network mode indicator 2 Signal strength of the cellular network 3 Battery charge status 4 Indicators 5 Network name or the operator logo 6 Clock and date or profile Main display 1 Network mode indicator 2 Signal strength of the cellular network 3 Battery charge status 4 Indicators 5 Network name or the operator logo 6 Clock 7 Main display 8 The left selection key is Go to or a shortcut to another function. See “Left or right selection key‚" p. 31. 9 The middle selection key is Menu.
Indicators You have unread messages. You have new voice mail. You have unsent, cancelled or failed messages. You have a missed call. , Your phone is connected to the instant messaging service, and the availability status is online or offline. You received one or several instant messages. The keypad is locked. The phone does not ring for an incoming call or text message. The alarm clock is activated. The countdown timer is running. The stopwatch is running.
■ Flight mode You can deactivate all radio frequency functions and still have access to offline games, calendar, and phone numbers. Use the flight mode in radio sensitive environments — on board aircraft or in hospitals. When the flight mode is active, is shown. Select Menu > Settings > Profiles > Flight > Activate or Personalize. To deactivate the flight mode, select any other profile.
1-touch dialing Assign a phone number to one of the 1-touch dialing keys, 2-9. See “1-touch dialing‚" p. 28. Call the number in either of the following ways: • Press a 1-touch dialing key, then the call key. • If 1-touch dialing is activated, press and hold a 1-touch dialing key until the call begins. See 1-touch dialing in “Call‚" p. 34. Enhanced voice dialing Voice dialing allows you to make a call by saying a name in the contact list. Voice commands are not language-dependent.
Transfer calls — to connect a call on hold to an active call and disconnect yourself Conference — to make a conference call of up to five persons Private call —to discuss privately in a conference call Warning: Do not hold the device near your ear when the loudspeaker is in use, because the volume may be extremely loud. 3. Write text You can enter text using traditional or predictive text input. With traditional input, you press a key until the correct letter appears.
■ Traditional text input Press a number key, 1-9, repeatedly until the desired character appears. The characters available depend on the selected writing language. Press 0 to create a space. The most common punctuation marks and special characters are available under the 1 key. To set traditional text input on, select Options > Prediction options >Prediction > Off. If the next letter you want is located on the same key you pressed, wait until the cursor appears before pressing the key again. 4.
A multimedia message can contain some attachments. To check availability and to subscribe to the multimedia messaging network service, contact your service provider. Write and send a multimedia message The wireless network may limit the size of MMS messages. If the inserted picture exceeds this limit, the device may resize it. 1. Select Menu > Messaging > Create message > Message > Options > Change to multim. 2. Enter one or more phone numbers or e-mail addresses in the To: field.
2. Speak your message. 3. Enter one or more phone numbers in the To: field, or select Add to retrieve a number. 4. Select Send, or press the call key. To open a received audio message, select Play. If more than one message is received, select Show > Play. To listen to the message later, select Exit. ■ Memory full When you receive this message, Memory full. Unable to receive msgs., you must delete some items. To first delete old messages, select OK > Yes and the folder.
2. If more than one e-mail account is defined, select the account from which you want to send the e-mail. 3. Enter the recipient’s e-mail address, write the subject, and enter the e-mail message. To attach a file from Gallery, select Options > Insert. 4. To send the e-mail message, select Send > Send now. Read and reply to e-mail Important: Exercise caution when opening messages. E-mail messages may contain malicious software or otherwise be harmful to your device or PC. 1.
Favorite recipient — to select the recipient to appear at the top of selection lists Font size — to select the font size used in messages Graphical smileys — to set the phone to replace character-based smileys with graphical ones Text messages The text message settings affect the sending, receiving, and viewing of text and SMS messages.
Allow MMS receptn. — to receive or block the multimedia message, select Yes or No. If you select In home network, you cannot receive multimedia messages when outside your home network. The default setting of the multimedia message service is In home network. The availability of this menu depends on your phone. Incoming MMS msgs. — to allow the reception of multimedia messages automatically, manually after being prompted, or to reject the reception.
■ Search for a contact Select Menu > Contacts > Names. Scroll through the list of contacts, or enter the first characters of the name you are searching for. ■ Save names and phone numbers Names and numbers are saved in the used memory. To save a name and phone number, select Menu > Contacts > Names > Options > Add new contact. ■ Save details In the phone memory, you can save different types of phone numbers, a tone or a video clip, and short text items for a contact.
■ Synchronize all Synchronize your calendar, contacts data, and notes with a remote internet server (network service). For details see “Synchronize from a server‚" p. 34. ■ Delete contacts To delete all the contacts and their details from the phone or SIM card memory, select Menu > Contacts > Del. all contacts > From phone memory or From SIM card. To delete a contact, search for the desired contact, and select Options > Delete contact.
Select Assign, or if a number has already been assigned to the key, select Options > Change. Select Find and locate the contact you want to assign. If the Speed dials function is off, the phone asks whether you want to activate it. See also Speed dials in “Call‚" p. 34. To make a call using the speed-dialing keys, see “1-touch dialing‚" p. 19. 6. Log Select Menu > Log > Missed calls, Received calls, or Dialed numbers.
■ Tones You can change the tone settings of the selected active profile. Select Menu > Settings > Tones. You can find the same settings in the Profiles menu. If you select the highest ringing tone level, the ringing tone reaches its highest level after a few seconds. To set the phone to ring only for calls from phone numbers that belong to a selected caller group, select Alert for. Scroll to the caller group you want or All calls, and select Mark.
Left or right selection key To assign a shortcut to the left or right selection key, select Menu > Settings > My shortcuts > Left selection key or Right selection key, and then select a function. Scroll key To assign other phone functions from a predefined list to the scroll key, select Menu > Settings > My shortcuts > Navigation key. Active standby key To assign the navigation key to access the active standby, select Menu > Settings > My shortcuts > Active standby key.
Bluetooth technology allows you to connect the phone to a compatible Bluetooth device within 10 meters (32 feet). Since devices using Bluetooth technology communicate using radio waves, your phone and the other devices do not need to be in direct line-of-sight, although the connection can be subject to interference from obstructions such as walls or from other electronic devices. Key message: • Operating the device in hidden mode is a safer way to avoid malicious software.
To define how to use the service, select Menu > Settings > Connectivity > Packet data > Packet data conn. and from the following: When needed — to set the packet data connection when an application needs it. The connection is closed when the application is terminated.
Synchronize from a server To use a remote internet server, subscribe to a synchronization service. For more information and the settings required for this service, contact your service provider. You may receive the settings as a configuration message. See “Configuration settings service‚" p. 10 and “Configuration‚" p. 36. To start the synchronization from your phone, select Menu > Settings > Connectivity > Data transfer > Server sync. Depending on the settings, select Initializing sync or Initializing copy.
Call waiting — to have the network notify you of an incoming call while you have a call in progress (network service), select Activate. See "Call waiting," p. 19. Summary after call — to briefly display the approximate duration and cost (network service) of the call after each call Send my caller ID — to show your phone number to the person you are calling (network service). To use the setting agreed upon with your service provider, select Set by network. Answ.
Select Menu > Settings > Enhancements. Select an enhancement, and depending on the enhancement, from the following: Text phone — to set the phone on or off for text phone communication Charger/Default profile — to select the profile that you want to be automatically activated when you connect to the selected enhancement Charger/Lights — to set the lights permanently On. To set the lights on for 15 seconds after a key press, select Automatic. Hearing aid > T-coil hrng.
PIN2 code request — to select whether the PIN2 code is required when using a specific phone feature which is protected by the PIN2 code. Some SIM cards do not allow the code request to be turned off. Call restriction service — to restrict incoming calls to and outgoing calls from your phone (network service). A restriction password is required. Fixed dialing — to restrict your outgoing calls to selected phone numbers if this function is supported by your SIM card.
9. Gallery In this menu, you can manage images, video clips, music files, themes, graphics, tones, recordings, and received files. Files are stored in the phone memory or an attached microSD card and may be arranged in folders. Your phone supports an activation key system to protect acquired content. Always check the delivery terms of any content and activation key before acquiring them, as they may be subject to a fee.
To capture an image, select Capture, or press the camera key. The phone saves the images on the memory card. If the lighting is dim, select Options > Night mode on. To take a sequence of images quickly, select Options > Img. sequence on. Three to eight images are taken depending on the image size. To display an image immediately after you take it, select Options > Settings > Image preview time and the preview time.
Play music Warning: Listen to music at a moderate level. Continuous exposure to high volume may damage your hearing. Do not hold the device near your ear when the loudspeaker is in use, because the volume may be extremely loud. Operate the music player with the keys on the phone or with the virtual keys on the display. When you open the Music player menu, the details of the first song on the default playlist are shown. To play, select .
To activate a set designed to enhance a type of music, scroll to one of the equalizer sets, and select Activate. ■ Stereo widening Stereo widening enhances the audio output of the phone by enabling a wider stereo sound effect. To change the setting, select Menu > Media > Stereo widening. 11. Organizer ■ Alarm clock You can set the phone to alarm at a desired time. Select Menu > Organizer > Alarm clock. To set the alarm, select Alarm time, and enter the alarm time.
Note alarm The phone displays the note, and if set, sounds a tone. With a call note on the display, to call the displayed number, press the call key. To stop the alarm and to view the note, select View. To stop the alarm for 10 minutes, select Snooze. To stop the alarm without viewing the note, select Exit. ■ To-do list To save a note for a task that you must do, select Menu > Organizer > To-do list. To make a note if no note is added, select Add. Fill in the fields, and select Save.
■ Stopwatch You can measure time, take intermediate times, or take lap times using the stopwatch. During timing, you can use the other functions of the phone. Select Menu > Organizer > Stopwatch and from the following: Split timing — to take intermediate times. To start the time observation, select Start. Select Split every time you want to take an intermediate time. To stop the time observation, select Stop. To start the time observation again, select Options > Start.
Important: Only install and use applications and other software from trusted sources, such as applications that are Symbian Signed or have passed the Java VerifiedTM testing. You can download new Java applications and games in different ways. Use the Nokia Application Installer from PC Suite to download the applications to your phone, or select Menu > Apps. > Options > Downloads > App. downloads; the list of available bookmarks is shown. See “Bookmarks‚" p. 45.
3. Select Account and a browsing service account contained in the active configuration settings. 4. Select Displ. term. window > Yes to perform manual user authentication for intranet connections. Make a connection to the service in one of the following ways: • Select Menu > Web > Home; or in the standby mode, press and hold 0. • To select a bookmark of the service, select Menu > Web > Bookmarks. • To select the last URL, select Menu > Web > Last web addr.
Scripts over secure connection You can select whether to allow the running of scripts from a secure page. The phone supports WML scripts. While browsing, to allow the scripts, select Options > Other options > Security > WMLScript sett. ■ Service inbox The phone is able to receive service messages sent by your service provider (network service). Service messages are notifications (for example, news headlines), and they may contain a text message or an address of a service.
Certificates Important: Even if the use of certificates makes the risks involved in remote connections and software installation considerably smaller, they must be used correctly in order to benefit from increased security. The existence of a certificate does not offer any protection by itself; the certificate manager must contain correct, authentic, or trusted certificates for increased security to be available. Certificates have a restricted lifetime.
15. PC connectivity You can send and receive e-mail, and access the internet when your phone is connected to a compatible PC through a Bluetooth or data cable connection. You can use your phone with a variety of PC connectivity and data communications applications. ■ Nokia PC Suite With Nokia PC Suite, you can synchronize contacts, calendar, notes, and to-do notes between your phone and a compatible PC or a remote internet server (network service).
16. Battery and charger information Your device is powered by a rechargeable battery. The battery intended for use with this device is the BL-5C. This device is intended for use when supplied with power from the following chargers: AC-3U, AC-4U, or AC-5U. The battery can be charged and discharged hundreds of times, but it will eventually wear out. When the talk and standby times are noticeably shorter than normal, replace the battery.
■ Nokia battery authentication guidelines Always use original Nokia batteries for your safety. To check that you are getting an original Nokia battery, purchase it from an authorized Nokia dealer, and inspect the hologram label using the following steps: Successful completion of the steps is not a total assurance of the authenticity of the battery.
Care and maintenance Your device is a product of superior design and craftsmanship and should be treated with care. The following suggestions will help you protect your warranty coverage. • Keep the device dry. Precipitation, humidity, and all types of liquids or moisture can contain minerals that will corrode electronic circuits. If your device does get wet, remove the battery, and allow the device to dry completely before replacing it. • Do not use or store the device in dusty, dirty areas.
Disposal The crossed-out wheeled-bin symbol on your product, literature, or packaging reminds you that in the European Union all electrical and electronic products, batteries, and accumulators must be taken to separate collection at the end of their working life. Do not dispose of these products as unsorted municipal waste. By returning the products to collection you help prevent uncontrolled waste disposal and promote the reuse of material resources.
• Always keep the wireless device more than 15.3 centimeters (6 inches) from the medical device when the wireless device is turned on. • Not carry the wireless device in a breast pocket. • Hold the wireless device to the ear opposite the medical device to minimize the potential for interference. • Turn the wireless device off immediately if there is any reason to suspect that interference is taking place. • Read and follow the directions from the manufacturer of their implanted medical device.
Using your device while flying in aircraft is prohibited. Switch off your device before boarding an aircraft. The use of wireless teledevices in an aircraft may be dangerous to the operation of the aircraft, disrupt the wireless telephone network, and may be illegal. ■ Potentially explosive environments Switch off your device when in any area with a potentially explosive atmosphere, and obey all signs and instructions.
■ Certification information (SAR) This mobile device meets guidelines for exposure to radio waves Your mobile device is a radio transmitter and receiver. It is designed not to exceed the limits for exposure to radio waves recommended by international guidelines. These guidelines were developed by the independent scientific organization ICNIRP and include safety margins designed to assure the protection of all persons, regardless of age and health.
Index A access codes 10 active standby 16, 30 alarm clock 41 antenna 13 applications audio messages 22 B battery 12 Bluetooth 31, 48 bookmarks 45 browser 45 business cards 28 C calculator 42 calendar 41 call key 14 log 29 options 19 settings 34 waiting 19 call register. See call log.
M message settings 24, 25, 26 messages audio messages 22 flash messages 22 length indicator 21 message settings 24 voice message 24 mini display 30 MMS. See multimedia messages.
Notes 58
Manual del Usuario Nokia 3610 fold 9209385 ES Edición 1 59
0434 DECLARACIÓN DE CONFORMIDAD Mediante la presente, NOKIA CORPORATION declara que el producto RM-429 cumple con los requisitos esenciales y otras disposiciones pertinentes de la Directiva 1999/5/EC. Se puede consultar una copia de la Declaración de Conformidad, en inglés, en http://www.nokia.com/phones/declaration_of_conformity/. ©2008 Nokia. Todos los derechos reservados.
EL CONTENIDO DE ESTE DOCUMENTO SE PROVEE “TAL COMO ESTÁ”. A MENOS QUE LO REQUIERA LA LEGISLACIÓN VIGENTE, NO SE OTORGARÁ NINGUNA GARANTÍA, SEA EXPRESA O IMPLÍCITA, EN RELACIÓN CON LA PRECISIÓN, LA CONFIABILIDAD O EL CONTENIDO DE ESTE DOCUMENTO, INCLUIDAS, CON MERO CARÁCTER ENUNCIATIVO, LAS GARANTÍAS IMPLÍCITAS DE COMERCIALIZACIÓN Y DE IDONEIDAD PARA UN FIN DETERMINADO. NOKIA SE RESERVA EL DERECHO DE MODIFICAR ESTE DOCUMENTO O DISCONTINUAR SU USO EN CUALQUIER MOMENTO SIN PREVIO AVISO.
Contenido SEGURIDAD .................................... 64 Informaciones generales................ 65 Sugerencias útiles.......................................... Acerca de su dispositivo .............................. Servicios de red .............................................. Memoria compartida .................................... Accesorios........................................................ Códigos de acceso ......................................... Servicio de ajustes de configuración .......
9. Galería ...................................... 98 14. Web ........................................ 105 Imprimir imágenes ........................................ 98 Conectarse a un servicio ........................... Favoritos ........................................................ Configuraciones de apariencia................ Configuraciones de seguridad ................. Buzón de servicio ........................................ Seguridad del explorador .......................... 10. Multimedia..
SEGURIDAD Lea estas sencillas indicaciones. Su incumplimiento puede ser peligroso o ilegal. Lea todo el manual del usuario para obtener más información. ENCIENDA EL TELÉFONO EN FORMA SEGURA No encienda el dispositivo donde el uso de teléfonos móviles esté prohibido o pueda causar interferencia o peligro. LA SEGURIDAD VIAL ANTE TODO Obedezca las leyes locales. Mantenga siempre las manos libres para maniobrar el vehículo mientras conduce. La seguridad vial debe ser su prioridad cuando conduce.
Informaciones generales ■ Sugerencias útiles Antes de llevar el teléfono a un punto de servicio P: ¿Qué puedo hacer para solucionar problemas de funcionamiento de mi teléfono? R: Intente hacer lo siguiente: • Apague el teléfono y luego retire y vuelva a colocar la batería. • Restaure las configuraciones de fábrica. Seleccione Menú > Config. > Restaurar config. fáb. Los nombres y números de teléfono guardados en Contactos no se eliminan. • Actualice el teléfono con Nokia Software Updater, si está disponible.
Mensajería P: ¿Cómo se configura el e-mail? R: Para utilizar la función de e-mail en su teléfono, necesita un sistema de e-mail compatible. Compruebe los ajustes de configuración de e-mail con el proveedor de servicios de e-mail. Conectividad con PC P: ¿Por qué tengo problemas para conectar el teléfono a mi PC? R: Asegúrese de que Nokia PC Suite esté instalado y ejecutándose en su PC. Consulte el Manual del usuario de Nokia PC Suite o la función de ayuda de Nokia PC Suite.
Antes de conectar el teléfono a otro dispositivo, lea el manual del usuario para ver las instrucciones de seguridad detalladas. No conecte productos incompatibles. Advertencia: Para usar cualquier función de este dispositivo, excepto la alarma, es necesario que el dispositivo esté encendido. No encienda el dispositivo cuando el uso de dispositivos móviles pueda causar interferencia o peligro. La disponibilidad de algunas funciones puede variar de una región a otra.
■ Accesorios Advertencia: Utilice sólo baterías, cargadores y accesorios aprobados por Nokia para este modelo en particular. El uso de otros accesorios puede anular toda aprobación o garantía aplicables y puede resultar peligroso. Comuníquese con su distribuidor para obtener información acerca de la disponibilidad de accesorios aprobados. Cuando desconecte el cable de alimentación de cualquier accesorio, sujételo y tírelo del enchufe, no del cable.
• La contraseña de restricción (cuatro dígitos) se requiere para restringir llamadas hacia y desde el teléfono. • Para ver o cambiar las configuraciones del módulo de seguridad, si está instalado, seleccione Menú > Config. > Seguridad > Configuraciones módulo seguridad.
■ Descargar contenido Puede descargar contenido nuevo (por ejemplo, temas) al teléfono (servicio de red). Comuníquese con el proveedor de servicios para conocer la disponibilidad y los precios de distintos servicios. Importante: Use solamente servicios confiables y que ofrecen niveles adecuados de seguridad y protección contra software perjudicial.
1. Iniciar ■ Instalar la tarjeta SIM y la batería Apague siempre el dispositivo y desconecte el cargador antes de retirar la batería. La tarjeta SIM y sus contactos se pueden dañar fácilmente al rayarse o doblarse, por lo que debe tener cuidado al manipular, instalar o extraer la tarjeta. Coloque la tarjeta SIM con el área de contacto de color dorado hacia abajo. ■ Cargar la batería La batería está cargada previamente, pero los niveles de carga pueden variar. 1.
■ Configurar hora, zona y fecha Cuando encienda el teléfono por primera vez y éste se encuentre en el modo en espera, se le solicitará que configure la hora y la fecha. Complete los campos y seleccione Guardar. Para cambiar las configuraciones de hora y fecha, seleccione Menú > Config. > Fecha y hora > Configuraciones de fecha y hora, Config. de formato de fecha y hora o Actualización auto. de fecha y hora (servicio de red). ■ Antena Su dispositivo puede tener una antena interna y una externa.
■ Teclas y partes 1. Audífono 2. Pantalla principal 3. Tecla de selección central 4. Tecla de selección izquierda 5. Tecla de selección derecha 6. Rueda Navi™ , de aquí en adelante tecla de desplazamiento 7. Tecla Llamar 8. Tecla Finalizar/Tecla Encender/Apagar; finaliza las llamadas (pulsar rápidamente) y enciende y apaga el teléfono (mantener pulsada) 9. Teclado 10. Conector del auricular 11. Conector del cargador 12. Tecla de la cámara o tecla PTT, si PTT está activado 13.
■ Tarjeta microSD La tarjeta microSD se puede cargar con datos como tonos de timbre, temas, tonos, imágenes y videos. Si elimina, reemplaza o vuelve a cargar esta tarjeta, es posible que estas funciones y características no funcionen correctamente. Utilice sólo tarjetas microSD aprobadas por Nokia con este dispositivo. Nokia utiliza estándares industriales aprobados para las tarjetas de memoria, pero algunas marcas podrían no ser totalmente compatibles con este dispositivo.
Pantalla principal 1 Indicador de modo de red 2 Intensidad de la señal de la red celular 3 Estado de carga de la batería 4 Indicadores 5 Nombre de la red o logotipo del operador 6 Reloj 7 Pantalla principal 8 La tecla de selección izquierda es Ir a o un acceso directo a otra función. Consulte “Tecla de selección izquierda o derecha”, pág. 90. 9 La tecla de selección central es Menú. 10 La tecla de selección derecha puede ser Nombr.
Usted ha recibido uno o varios mensajes instantáneos. El teclado está bloqueado. El teléfono no timbra para una llamada entrante o mensaje de texto. La alarma está activada. El temporizador está funcionando. El cronómetro está funcionando. El teléfono está registrado en la red GPRS o EGPRS. Se estableció una conexión GPRS o EGPRS. La conexión GPRS o EGPRS está suspendida (retenida). La conectividad Bluetooth está activada. , La conexión push to talk está activa o suspendida.
2. Llamadas ■ Realizar una llamada 1. Ingrese el número de teléfono, incluyendo el código de área. Para realizar llamadas internacionales, pulse dos veces la tecla * para indicar el prefijo internacional (el carácter + reemplaza el código de acceso internacional) y luego ingrese el código del país, el código de área sin anteponer el número 0, si es necesario, y el número de teléfono. Puede que el carácter + como reemplazo del código de acceso internacional no funcione en todas las regiones.
Marcación por voz mejorada La marcación por voz le permite realizar una llamada al pronunciar un nombre que está en la lista de contactos. Los comandos de voz no dependen del idioma. Para configurar el idioma, consulte Idioma de reconocimiento de voz en “Teléfono”, pág. 95. Nota: El uso de etiquetas de voz puede resultar difícil en un entorno ruidoso o durante una situación de emergencia, por lo que no se debe depender sólo de la marcación por voz en todas las circunstancias. 1.
3. Escribir texto Puede escribir con el ingreso de texto tradicional o predictivo . Con el ingreso de texto tradicional, pulsa la tecla hasta que aparezca la letra correcta. Con el ingreso de texto predictivo activado, pulsa la tecla una vez por cada letra y deja que el teléfono adivine la palabra. Cuando escriba texto, mantenga pulsada Opc. para alternar entre los métodos de ingreso de texto. El ingreso de texto predictivo no es compatible con todos los idiomas.
Para activar el ingreso de texto tradicional, seleccione Opc. > Config. t. predic. > Texto predictivo > Desactivar. Si la siguiente letra que desea ingresar está localizada en la misma tecla que pulsó, espere hasta que aparezca el cursor antes de volver a pulsar la tecla. 4. Mensajería Puede leer, escribir, enviar y guardar mensajes de texto, multimedia, e-mail, audio y flash. Su dispositivo puede enviar mensajes de texto que excedan el límite de caracteres para un único mensaje.
Un mensaje multimedia puede tener algunos archivos adjuntos. Para verificar la disponibilidad y suscribirse al servicio de red de mensajería multimedia, comuníquese con su proveedor de servicios. Escribir y enviar un mensaje multimedia La red celular puede limitar el tamaño de los mensajes MMS. Si la imagen insertada excede ese límite, el dispositivo podrá ajustar su tamaño. 1. Seleccione Menú > Mensajería > Crear mensaje > Mensaje > Opc. > A multimedia. 2.
■ Mensajería de voz Nokia Xpress Puede utilizar MMS para crear y enviar un mensaje de voz. MMS debe estar activado para poder usar mensajes de voz. 1. Seleccione Menú > Mensajería > Crear mensaje > Mensaje de voz. El grabador se abre. 2. Diga su mensaje. 3. Ingrese uno o varios números de teléfono en el campo Para: o seleccione Agregar para recuperar un número. 4. Seleccione Enviar o pulse la tecla Llamar. Para abrir un mensaje de voz recibido, seleccione Reprod.
Para ver sin conexión mensajes de e-mail ya recuperados, seleccione No. Cuando ve mensajes de e-mail sin conexión, su dispositivo no está conectado al buzón remoto. Escribir y enviar un e-mail Puede escribir un mensaje de e-mail antes de conectarse al servicio de e-mail o puede conectarse primero al servicio y luego escribir y enviar su e-mail. 1. Seleccione Menú > Mensajería > Crear mensaje > E-mail. 2. Si hay más de una cuenta de e-mail definida, seleccione la cuenta con la cual desea enviar el e-mail.
■ Configuraciones de mensajes Configuraciones generales Las configuraciones generales son comunes para los mensajes de texto y los mensajes multimedia. Seleccione Menú > Mensajería > Config. mensajes > Config. generales y alguna de las siguientes opciones: Guardar mensajes enviados: para que el teléfono guarde los mensajes enviados en la carpeta Elementos enviados. Sobrescritura en Elem.
Responder por mismo centro: para permitir que el destinatario de su mensaje le envíe una respuesta usando su centro de mensajes (servicio de red). Mensajes multimedia Las configuraciones de los mensajes afectan el envío, la recepción y la visualización de los mensajes multimedia. Puede recibir los ajustes de configuración para la mensajería multimedia como un mensaje de configuración. Consulte “Servicio de ajustes de configuración”, pág. 69. También puede ingresarlos manualmente.
Seleccione Menú > Mensajería > Config. mensajes > Mensajes e-mail y alguna de las siguientes opciones: Notificación de nuevo e-mail: para activar o desactivar la notificación de nuevos e-mail. Permitir recepción de e-mail: para permitir siempre los mensajes o sólo en la red doméstica. Resp. con mensaje de texto original: para responder con el texto original de un e-mail. Tamaño imagen en e-mail: para definir el tamaño predeterminado de una imagen en un e-mail.
Busque el contacto al cual desea agregar un detalle y seleccione Detalles > Opc. > Agregar detalles. ■ Copiar o mover contactos Puede mover y copiar contactos entre el teléfono y la memoria de la tarjeta SIM. La tarjeta SIM puede guardar nombres con un número de teléfono adjunto. Para mover o copiar contactos uno por uno, seleccione Menú > Contactos > Nombres. Desplácese hasta el contacto y seleccione Opc. > Mover contacto o Copiar contacto.
■ Configuraciones Seleccione Menú > Contactos > Configuraciones y una de las siguientes opciones: Memoria en uso: para seleccionar la memoria de la tarjeta SIM o del teléfono para sus contactos. Seleccione Teléfono y SIM para recuperar nombres y números de ambas memorias. De ser así, cuando guarde nombres y números, éstos se guardarán en la memoria del teléfono. Vista Contactos: para seleccionar cómo se muestran los nombres y números en Contactos.
7. Configuraciones ■ Perfiles El teléfono tiene diversos grupos de configuraciones denominados perfiles, para los cuales puede personalizar los tonos del teléfono para distintos eventos y entornos. Seleccione Menú > Config. > Perfiles, el perfil que desea y alguna de las siguientes opciones: Activar: para activar el perfil seleccionado. Personalizar: para modificar el perfil. Programado: para que el perfil esté activado durante un período determinado de hasta 24 horas, y configurar la hora de finalización.
Espera activa: para activar o desactivar el modo en espera activa y para organizar y personalizar el modo en espera activa. Color de fuente en modo en espera: para seleccionar el color para los textos en el modo en espera. Iconos de tecla de navegación: para mostrar los iconos de los accesos directos actuales para la tecla de navegación en el modo en espera cuando el modo en espera activa esté desactivado.
Comandos de voz Los comandos de voz le permiten decir comandos para realizar funciones en lugar de pulsar las teclas. Los comandos de voz no dependen del idioma. Para configurar el idioma, consulte Idioma de reconocimiento de voz en “Teléfono”, pág. 95. Para seleccionar las funciones del teléfono que se activan con un comando de voz, seleccione Menú > Config. > Mis acc. directos > Comandos de voz y una carpeta. Desplácese a una función. indica que la etiqueta de voz está activada.
• De manera alternativa, puede apagar la función Bluetooth; esto no afectará las otras funciones del teléfono. Configurar una conexión Bluetooth Seleccione Menú > Config. > Conectividad > Bluetooth y alguna de las siguientes opciones: Bluetooth: para activar o desactivar la función Bluetooth. indica que la conectividad Bluetooth está activada. Cuando se activa la tecnología Bluetooth por primera vez, se le solicita darle un nombre al teléfono. Use un nombre único que sea fácil de recordar para los demás.
Transferencia de datos Sincronice su agenda, datos de contactos y notas con otro dispositivo compatible (por ejemplo, un teléfono móvil), una PC compatible o un servidor de Internet remoto (servicio de red). Su teléfono permite la transferencia de datos con una PC compatible u otro dispositivo compatible cuando el teléfono se utiliza sin una tarjeta SIM.
Para iniciar la sincronización desde el teléfono, seleccione Menú > Config. > Conectividad > Transf. de datos > Sinc. de servidor. Dependiendo de las configuraciones, seleccione Iniciando sincronización o Iniciando copia. La sincronización por primera vez o después de una sincronización interrumpida puede tomar hasta 30 minutos para completarse. Cable de datos USB Puede utilizar el cable de datos USB para transferir datos entre el teléfono y una PC compatible.
Resumen tras llamada: para mostrar brevemente la duración y costo aproximado (servicio de red) después de cada llamada. Enviar mi ID: para mostrar el número de teléfono a la persona a la que está llamando (servicio de red). Para utilizar la configuración acordada con el proveedor de servicios, seleccione Definido por la red. Contestar al abrir la tapa: para contestar una llamada entrante al abrir la tapa. ■ Teléfono Seleccione Menú > Config.
Seleccione Menú > Config. > Accesorios. Seleccione un accesorio y, según el accesorio, alguna de las siguientes opciones: Teléfono de texto: para activar o desactivar el teléfono para comunicación de teléfono de texto. Perfil predeterminado: para seleccionar el perfil que desea que se active automáticamente cuando conecta el accesorio seleccionado. Luces: para que las luces estén siempre encendidas, seleccione Activar.
Seleccione Menú > Config. > Seguridad y alguna de las siguientes opciones: Solicitud de código PIN: para que el teléfono solicite el código PIN cada vez que lo encienda. Algunas tarjetas SIM no permiten desactivar la función de solicitud del código. Solicitud de código PIN2: para seleccionar si se necesita el código PIN2 al utilizar una función específica del teléfono que está protegida por el código PIN2. Algunas tarjetas SIM no permiten desactivar la función de solicitud del código.
Seleccione Menú > Mensajería > Mensajes de información para recibir mensajes del proveedor de servicios sobre diferentes temas (servicio de red). Comuníquese con su proveedor de servicios para obtener más información. Seleccione Menú > Mensajería > Comandos de servicio para escribir y enviar solicitudes de servicio (comandos USSD) al proveedor de servicios, como comandos de activación para servicios de red. 9.
Puede capturar imágenes o grabar videoclips en vivo con la cámara de 1,3 megapíxeles incorporada. ■ Cámara La cámara produce imágenes en formato JPEG y videoclips en formato 3GPP. El lente de la cámara está ubicado en la parte frontal del teléfono. La pantalla a color funciona como visor. Capturar una imagen Para abrir el visor de la cámara, seleccione Menú > Multimedia > Cámara. Para acercar o alejar la imagen en el modo cámara, pulse las teclas para subir o bajar el volumen.
Grabar un videoclip Seleccione Menú > Multimedia > Video > Grabar. También puede mantener pulsada la tecla de la cámara. Para hacer una pausa en la grabación, seleccione Pausa; para reanudar la grabación, seleccione Contin. Para detener la grabación, seleccione Parar. El teléfono guarda la grabación en Galería > Videoclips. Para aumentar o disminuir el zoom, pulse la tecla de volumen hacia arriba o hacia abajo, o desplácese a la izquierda o a la derecha.
No se puede utilizar la grabadora cuando haya una llamada de datos o una conexión GPRS activa. Grabar sonido 1. Seleccione Menú > Multimedia > Grabad. voz. Para utilizar las teclas gráficas , o en la pantalla, desplácese hacia la izquierda o hacia la derecha, hasta la tecla deseada y selecciónela. 2. Para iniciar la grabación, seleccione . Para iniciar la grabación durante una llamada, seleccione Opc. > Grabar. Mientras graba una llamada, todos los participantes escuchan un sonido discreto.
Puede escoger cualquier melodía de timbre en su teléfono como su tono de alarma. Para seleccionar el tono de alarma, seleccione Tono de alarma:. Para programar el límite de tiempo de la pausa entre la alarma, seleccione Límite de tiempo de pausa y el tiempo. Detener la alarma El teléfono emite un tono de alerta aunque esté apagado. Para detener la alarma, seleccione Parar.
Para ver una nota, desplácese a ésta y seleccione Ver. Mientras ve una nota, puede editar sus propiedades. También puede eliminar la nota seleccionada y puede eliminar todas las notas marcadas como hechas. ■ Notas Para escribir y enviar notas, seleccione Menú > Organizador > Notas. Para crear una nota si no ha agregado ninguna, seleccione Agregar. Escriba la nota y seleccione Guardar. ■ Calculadora La calculadora del teléfono puede realizar funciones básicas.
Para comenzar a medir el tiempo de nuevo, seleccione Opc. > Iniciar. El tiempo nuevo se agrega al tiempo anterior. Para reiniciar el tiempo sin guardarlo, seleccione Reiniciar. Para guardar el tiempo registrado, seleccione Guardar. Duración de vuelta: para registrar el tiempo de las vueltas. Para programar el cronómetro para que funcione en segundo plano, pulse la tecla Finalizar. Seleccione Continuar para ver la medición en segundo plano. 12.
13. Servicios SIM La tarjeta SIM puede ofrecer servicios adicionales. Puede acceder a este menú sólo si la tarjeta SIM lo admite. El nombre y el contenido del menú dependen de los servicios disponibles. Para acceder a estos servicios, es posible que deba enviar mensajes o realizar una llamada telefónica, lo que puede implicar un costo. 14. Web Puede acceder a diversos servicios de Internet móvil con el explorador de su teléfono.
• Para seleccionar un favorito del servicio, seleccione Menú > Web > Favoritos. • Para seleccionar la última URL, seleccione Menú > Web > Última dir. Web. • Para ingresar la dirección del servicio, seleccione Menú > Web > Ir a dirección. Ingrese la dirección del servicio y seleccione OK. ■ Favoritos Puede guardar direcciones Web como favoritos en la memoria del teléfono. 1. Mientras explora, seleccione Opc. > Favoritos. 2.
■ Buzón de servicio El teléfono puede recibir mensajes de servicio enviados por el proveedor de servicios (servicio de red). Los mensajes de servicio son notificaciones (por ejemplo, noticias de última hora) y pueden contener un mensaje de texto o la dirección de un servicio. Para acceder al Buzón de servicio, en el modo en espera, cuando reciba un mensaje de servicio, seleccione Mostrar. Si selecciona Salir, el mensaje se traslada al Buzón de servicio.
Certificados Importante: Si bien el uso de certificados reduce considerablemente los riesgos implícitos relacionados con las conexiones remotas y la instalación de software, es necesario usarlos de manera correcta para obtener los beneficios derivados de la seguridad mejorada. La existencia de un certificado no proporciona ninguna protección por sí sola; el administrador de certificados debe contar con certificados correctos, auténticos y confiables como medida de seguridad adicional.
15. Conectividad con PC Puede enviar y recibir e-mail y acceder a Internet cuando el teléfono esté conectado a una PC compatible mediante una conexión Bluetooth o de cable de datos. Puede usar el teléfono con una variedad de aplicaciones de comunicación de datos y conectividad con PC. ■ Nokia PC Suite Con Nokia PC Suite, puede sincronizar contactos, agenda, notas y notas de tareas entre el teléfono y la PC compatible o un servidor de Internet remoto (servicio de red).
16. Información sobre baterías y cargadores Su dispositivo recibe alimentación eléctrica a través de una batería recargable. La batería indicada para este dispositivo es BL-5C. Este dispositivo está diseñado para su uso con los siguientes cargadores: AC-3U, AC-4U o AC-5U. La batería se puede cargar y descargar cientos de veces, pero con el tiempo se gastará. Cuando los tiempos de conversación y de standby sean notablemente más cortos que lo normal, reemplace la batería.
Utilice la batería solamente para el propósito para el que fue diseñada. No utilice nunca el cargador o la batería si están dañados. Mantenga la batería fuera del alcance de los niños. ■ Normas de autenticación de baterías Nokia Siempre use baterías Nokia originales para su seguridad.
Cuidado y mantenimiento Su dispositivo es un producto de diseño y fabricación superiores, y se lo debe tratar con cuidado. Las siguientes sugerencias lo ayudarán a mantener la cobertura de su garantía. • Mantenga el dispositivo seco. Las precipitaciones, la humedad y todos los tipos de líquidos o humedad contienen minerales que corroen los circuitos electrónicos. Si su dispositivo se moja, retire la batería y espere a que el dispositivo esté completamente seco para volver a colocarla.
Eliminación El símbolo del contenedor con ruedas tachado en su producto, documentación o embalaje, le recuerda que todos los productos eléctricos y electrónicos, las baterías y los acumuladores deben ser entregados por separado para su eliminación luego de finalizada su vida útil. No deseche estos productos junto con los demás desperdicios domésticos.
Dispositivos médicos implantados Los fabricantes de dispositivos médicos recomiendan que se mantenga una separación mínima de 15,3 cm (6 pulgadas) entre un teléfono móvil y el dispositivo médico implantado, por ejemplo, marcapaso o desfibrilador cardioversor implantado, a fin de evitar interferencias potenciales con el dispositivo médico.
garantía que se aplique al dispositivo. Compruebe con regularidad que el equipo completo del dispositivo móvil de su vehículo esté correctamente montado y funcionando debidamente. No almacene ni transporte líquidos inflamables, gases o materiales explosivos en el mismo compartimiento destinado al dispositivo, sus piezas o accesorios. Para los automóviles equipados con bolsas de aire, recuerde que se inflan con mucha fuerza.
• Eliminar ciertas restricciones de llamadas que haya activado en su dispositivo. • Cambiar el perfil desconectado o de vuelo a un perfil activo. 2. Pulsar la tecla Finalizar tantas veces como sea necesario para borrar la pantalla y preparar el dispositivo para las llamadas. 3. Ingrese el número de emergencia oficial de la localidad en la que se encuentre. Los números de emergencia pueden variar de una localidad a otra. 4. Pulse la tecla Llamar.
Índice A accesos directos 90 actualizaciones de software 69 agenda 102 alarma 101 altavoz 78 antena 72 aplicación de e-mail 82 aplicaciones B batería 71 bloqueo de teclado 68 bloqueo del teclado 68 Bluetooth 91, 109 C cable de datos 94 calculadora 103 cámara configuraciones 99 efectos 99 filtro 99 códigos 68 códigos de acceso 68 configuración 96 servicio de ajustes 69 configuración de fábrica 97 configuraciones buzón de servicio 107 cable de datos USB 94 cámara 99 conectividad 91 configuración 96 GPRS, EG
información de contacto 70 información de seguridad 113 ingreso de texto predictivo 79 ingreso de texto tradicional 79 intensidad de la señal 74 Internet 105 pantalla mini 90 paquete de datos 92 PC Suite 109 perfiles 89 PictBridge 94 protección del teclado 68 J R juegos 104 registro 88 registro de llamadas. Consulte registro de llamadas.
Notas 119
Notas 120