
User manual
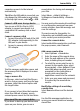
Table Of Contents
- Nokia C7–00 User Guide
- Contents
- Safety
- Get started
- Keys and parts
- Insert the SIM card and battery
- Insert or remove a memory card
- Charging
- Switch the device on or off
- Use your device for the first time
- Device set-up
- Copy contacts or pictures from your old device
- Lock or unlock the keys and screen
- Antenna locations
- Change the volume of a call, song, or video
- Attach the wrist strap
- Headset
- Use the in-device user guide
- Install Nokia Ovi Suite on your PC
- Basic use
- Touch screen actions
- Interactive home screen elements
- Switch between open applications
- Write text
- Display indicators
- Set the notification light to blink for missed calls or messages
- Flashlight
- Search in your device and on the internet
- Use your device offline
- Prolong battery life
- Restore original settings
- View your account
- Personalization
- Telephone
- Call a phone number
- Answer a call
- Reject a call
- Call a contact
- Mute a call
- Answer a waiting call
- Call the numbers you use the most
- Use your voice to call a contact
- Make calls over the internet
- Call the last dialed number
- Record a phone conversation
- Turn to silence
- View your missed calls
- Call your voice mailbox
- Forward calls to your voice mailbox or to another phone number
- Prevent making or receiving calls
- Allow calls only to certain numbers
- Video sharing
- Wi-Fi calling
- Contacts
- About Contacts
- Save phone numbers and mail addresses
- Save a number from a received call or message
- Contact your most important people quickly
- Add a picture for a contact
- Set a ringtone for a specific contact
- Send your contact information using My Card
- Create a contact group
- Send a message to a group of people
- Copy contacts from the SIM card to your device
- Messaging
- View your voice mail
- Internet
- Social networks
- About Social
- See your friends' status updates in one view
- Post your status to social networking services
- Link your online friends to their contact information
- See your friends' status updates on the home screen
- Upload a picture or video to a service
- Share your location in your status update
- Contact a friend from a social networking service
- Add an event to your device calendar
- Camera
- Your pictures and videos
- Videos and TV
- Music and audio
- Maps
- Office
- Time management
- Device management
- Connectivity
- Find more help
- Access codes
- Troubleshooting
- Protect the environment
- Product and safety information
- Copyright and other notices
- Index

computer connects to the internet
automatically.
Tip: When the USB cable is connected, you
can change the USB mode in most views.
In the top right corner, select
> USB.
Connect a USB mass storage device
You can use a USB On-The-Go (OTG)
adapter to connect your device to a
compatible USB memory stick or hard
drive.
Connect a memory stick
1 Connect the micro USB end of the USB
OTG adapter (sold separately) to the
USB port in your device.
2 Connect a memory stick to the USB
OTG adapter.
The File manager application opens, and
the memory stick is displayed as a mass
memory.
Copy or move a file
In File mgr., select and hold the file you
want to copy or move, and from the pop-
up menu, select the desired option and
the target folder.
If you connect a hard drive that requires
more than 200 mA of power, use an
external power source for the hard drive.
Store your files on a remote drive
If you want to back up your data or save
space on your device, you can use a
remote drive for storing and managing
your files.
Select Menu > Help & Settings >
Settings and Connectivity > Remote
drives.
You may receive the remote drive settings
as a configuration message from your
service provider. Open the message, and
save the settings.
The service may be chargeable. For
information on availability and possible
costs, contact your service provider.
Connect to a remote drive
Select and hold the remote drive, and from
the pop-up menu, select Connect.
Add a new remote drive
1 Select Options > New drive.
2 Enter the name of the remote drive.
3 Enter the web address of the remote
drive, including the port number.
4 To select the access point to use to
connect to the remote drive, select
Access point > User defined. If you
select Ask when needed, you are
prompted for the destination or
access point every time the
application connects to the network.
5 Enter your user name and password,
if required by the remote drive
service.
Modify the settings of an existing
remote drive
Select Remote drives and the desired
drive.
Use the File manager application to
access your remote drives and manage
stored files.
Connectivity 73