Nokia C7–00 User Guide Issue 2.
Contents Contents Safety 5 Get started 6 Keys and parts 6 Insert the SIM card and battery 7 Insert or remove a memory card 8 Charging 8 Switch the device on or off 9 Use your device for the first time 9 Device set-up 10 Copy contacts or pictures from your old device 10 Lock or unlock the keys and screen 11 Antenna locations 11 Change the volume of a call, song, or video 11 Attach the wrist strap 11 Headset 11 Use the in-device user guide 12 Install Nokia Ovi Suite on your PC 12 Basic use Touch scree
Contents Copy contacts from the SIM card to your device 32 Messaging About Messaging Send a message Send a message to a contact Send an audio message Receive messages View a conversation Listen to a text message Change language 33 33 33 33 33 33 34 34 35 View your voice mail 35 Mail Mail 35 35 Internet About the web browser Browse the web Add a bookmark Subscribe to a web feed Discover nearby events Access your company intranet 37 37 37 37 37 38 38 Social networks 38 About Social 38 See your friends
Contents Translate words from one language to another 60 Open or create zip files 60 Time management Clock Calendar 60 60 61 Device management Keep your device software and applications up to date Manage files Increase available memory for more content Manage applications Synchronize content Copy contacts or pictures between devices Protect your device 63 Connectivity Internet connections Wi-Fi Bluetooth USB data cable Store your files on a remote drive Close a network connection 68 68 69 70 72 73
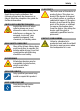
Safety Safety Read these simple guidelines. Not following them may be dangerous or illegal. Read the complete user guide for further information. SWITCH OFF IN RESTRICTED AREAS Switch the device off when cellular phone use is not allowed or when it may cause interference or danger, for example, in aircraft, near medical equipment, fuel, chemicals, or blasting areas. ROAD SAFETY COMES FIRST Obey all local laws. Always keep your hands free to operate the vehicle while driving.
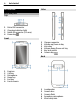
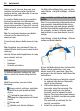
Get started Get started Sides Keys and parts Top 1 2 3 4 Micro USB connector Charging indicator light Nokia AV connector (3.
Get started 7 Touch screen To control your device, lightly touch the screen with your fingertips. The screen does not respond when you use your fingernails. If your fingertips are cold, the screen may not respond to your touch. To avoid scratching the touch screen, never use a pen, pencil, or other sharp object to write on the touch screen.
Get started first and then press down until the cover locks into place. Insert or remove a memory card Use only compatible microSD cards approved by Nokia for use with this device. Incompatible cards may damage the card and the device and corrupt data stored on the card. Keep all memory cards out of the reach of small children. Insert a memory card 1 Switch the device off. 2 Remove the back cover of the device. 3 If the battery is inserted, lift the battery out.
Get started 9 To avoid breaking the charger connector, be careful when connecting or disconnecting the charger cable. 1 2 You do not need to charge the battery for a specific length of time, and you can use the device while it is charging. If the battery is completely discharged, it may take several minutes before the charging indicator appears on the display or before any calls can be made. Only connect your device to products that have USB-IF logo.
Get started Nokia account. You can also copy your contacts and other content from your previous device, and subscribe to receive helpful tips and tricks. To create a Nokia account, you need an internet connection. For information about data transmission charges, contact your service provider. If you can't connect to the internet , you can create an account later. Tip: To create and manage your Nokia account on the internet, go to www.ovi.com. If you already have a Nokia account, sign in.
Get started 11 Lock or unlock the keys and screen To avoid accidentally making a call when your device is in your pocket or bag, lock the keys and screen of your device. Slide the key lock switch. Change the volume of a call, song, or video Use the volume keys. Tip: If the key lock switch is out of reach, to unlock the device, press the menu key, and select Unlock. Set the keys and screen to lock automatically 1 Select Menu > Help & Settings > Settings and Phone > Display > Screen/keylock time-out.
Install Nokia Ovi Suite on your PC If your computer can't connect to the internet, to install Nokia Ovi Suite from your device memory: 1 Use a compatible USB data cable to connect your device to your computer. If you are using Windows XP or Windows Vista on your computer, set the USB mode of your device to Mass storage. To set the USB mode on your device, select the notification area in > the top right corner, and select Mass storage.
Basic use folder to view files, and double-click Install_Nokia_Ovi_Suite.exe. 3 4 Follow the displayed instructions. When the installation is complete, if you are using Windows XP or Windows Vista on your computer, check that the USB mode of your device is set to Nokia Ovi Suite. To learn more about Nokia Ovi Suite, go to www.ovi.com/suite. To check which operating systems Nokia Ovi Suite supports, go to www.nokia.com/ support.
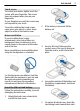
Basic use Drag an item Tap and hold the item, and slide your finger across the screen. The item follows your finger. You can drag items in the home screen or the main menu, when you have activated editing mode. Zoom in Place two fingers on an item, such as a picture or web page, and slide your fingers apart. Swipe Zoom out Place two fingers on the item, and slide your fingers together. Place a finger on the screen, and steadily slide your finger in the desired direction.
Basic use 15 Set an alarm Select the clock (1). Activate or edit profiles Select the profile (2). View or edit your schedule Select the date (3). View missed calls and received messages Select the notification area (4). View available Wi-Fi networks or manage Bluetooth connectivity Select the notification area (4). Edit the connectivity settings Select the notification area (4) and Applications running in the background increase the demand on battery power and use memory.
4 5 6 7 8 9 Basic use Character range - Select the desired character range, such as numbers or special characters. Arrows keys - Move the cursor left or right. Space bar - Insert a space. Input menu - Activate predictive text input, or change the writing language. Enter key - Move the cursor to the next row or text input field. Additional functions are based on the current context. For example, in the web address field of the web browser, it acts as the Go icon. Backspace key - Delete a character.
Basic use 4 5 6 7 8 and number modes, select and hold the key. Close key - Close the virtual keypad. Arrow keys - Move the cursor left or right. Input menu - Activate predictive text input, change the writing language, or switch to the virtual keyboard. Backspace key - Delete a character. Text input indicator (if available) Indicates the character case, and if letter or number mode or predictive text input mode is activated.
Basic use Display indicators General indicators The touch screen and keys are locked. The device alerts silently for incoming calls or messages. An alarm is set. A timed profile is activated. You have a missed calendar event. Call indicators Someone has tried to call you. Incoming calls are forwarded to another number (network service). Your device is ready for an internet call. A data call is active (network service). Messaging indicators You have unread messages.
Basic use off, slide and hold the lock switch for two seconds. The flashlight can only be used when you are in the home screen. You can switch the flashlight on also when you are in the home screen and the keys and screen or the device is locked. Do not shine the flashlight in anyone's eyes. Search in your device and on the internet With the Search application, you can find any item in your device. 1 2 Select Menu > Apps & Games > Search.
• • • • • • • • View your account Settings and Themes > General. To change the wallpaper, on the home screen, select Options > Change wallpaper Deactivate background animation effects. Select Menu > Help & Settings > Settings and Themes > General > Options > Theme effects > Off. Deactivate the Big clock screen saver. Select Menu > Help & Settings > Settings and Themes > Screen saver > None. Change the length of the time-out period after which the device display switches off.
Personalization MyAccount allows you to view details about monthly usage, your plan, and additional services. If you have questions about billing or about using this service, contact T-Mobile. Personalization Profiles About profiles Select Menu > Help & Settings > Settings and Tone profiles. Waiting for a call but can't let your phone ring? Your device has various settings groups called profiles, which you can customize for different events and environments. You can also create your own profiles.
Personalization select General > Options > Theme effects > Off. Home screen About the home screen In the home screen, you can quickly access your most frequently used applications and create shortcuts for different features. You can view your favorite contacts, and quickly call, start conversations, or send messages to them. You can also control applications, such as Music. You can have more than one home screen page, for example, separate home screens for work and private life.
Personalization 3 Select Done. Using the service or downloading content may cause transfer of large amounts of data, which may result in data traffic costs. Some home screen widgets may connect to the internet automatically. To prevent this, select Options > Widgets to offline mode. 23 Add your important contacts to the home screen Add your most important contacts to the home screen, so you can quickly call or send messages to them. The contacts need to be stored in your device memory.
Telephone Download a game, application, or other item You can buy games, applications, videos, and other content from Ovi Store. There are also free items that you can download. Select Menu > Store, and sign in to your Nokia account. 1 2 3 4 5 6 Select the item. If the item has a price, select Buy. If the item is free, select Download. You can pay with a credit or debit card, or, if available, on your phone bill.
Telephone calls > If busy > Activate > To voice mailbox or To other number. Call a contact Select Menu > Contacts. 1 2 3 4 To search for a contact, enter the first letters or characters of the first or second name in the search field. Select the contact. In the contact card, select Voice call. If the contact has more than one phone number, select and hold Voice call, and select the desired number. Mute a call You can mute the microphone in your device during a call. Press the voice key.
Telephone When entering contacts or editing voice commands, do not use very short or similar names for different contacts or commands. Make calls over the internet About internet calls With the internet call network service, you can make and receive calls over the internet. Internet call services may support calls between computers, between cellular phones, and between a VoIP device and a traditional telephone.
Telephone 27 Make an internet call to a phone number or SIP address 1 2 Select Options > Call > Internet call. Call the last dialed number Trying to call someone, but they are not answering? It is easy to call them again. In the call log, you can see information about the calls you have made and received. In the home screen, select Call to open the dialer, and select . To call the last dialed number, select the number from the list.
Telephone Change the phone number of your voice mailbox 1 Select Menu > Help & Settings > Settings and Calling > Call mailbox. 2 Select and hold a mailbox, and from the pop-up menu, select Change number. 3 Enter the number (obtained from your network service provider), and select OK. Forward calls to your voice mailbox or to another phone number If you cannot answer your calls, you can forward incoming calls to your voice mailbox or another phone number.
Telephone 29 Allow calls only to certain numbers With the fixed dialing service, you can restrict calls, and only allow calls to certain phone numbers. For example, you can allow your children to call only family members or other key numbers. Video sharing requirements To share video, both you and the recipient must: Select Menu > Contacts and Options > SIM numbers > Fixed dial contacts. • Not all SIM cards support the fixed dialing service. You need your PIN2 code from your service provider.
Wi-Fi calling Use a 3G connection For details about networks, contact your service provider. Add a SIP address to a contact 1 Select Menu > Contacts. 2 Select a contact or create a new contact. 3 Select Options > Edit. 4 Select Options > Add detail > Share video. 5 Enter the SIP address in the format username@domainname (you can use an IP address instead of a domain name).
Contacts Save phone numbers and mail addresses You can save your friends' phone numbers, mail addresses, and other information to your contacts list. Select Menu > Contacts. Add a contact to the contacts list 1 Select Options > New contact. 2 Select a field, and enter the details. Edit contact information 1 Select a contact. 2 Open the contact card tab 3 Select a contact detail. . Add details about a contact Select a contact and Options > Edit > Options > Add detail.
Contacts Set a ringtone for a specific contact Want to be able to hear that a particular person is calling you? You can set a ringtone specifically for that person. Select Menu > Contacts. Set a ringtone for a contact 1 Select a contact and Options > Edit. 2 Select the Ringtone field and a ringtone. Set a ringtone for a contact group 1 Open the Groups tab. 2 Select and hold the title of a group, and from the pop-up menu, select Ringtone. 3 Select a ringtone from the list.
Messaging Messaging About Messaging Select Menu > Messaging > Messaging. You can send and receive various kinds of messages: • • • • Text messages Audio messages Multimedia messages that contain pictures and videos Group messages Messaging requires network support. Send a message With text and multimedia messages, you can quickly contact your friends and family. In a multimedia message, you can attach pictures, videos, and sound clips that you want to share. Select Menu > Messaging > Messaging.
Messaging Later, you can find the message in the Conversations folder or in the Inbox folder in Messaging. Select Menu > Messaging > Messaging. and 1 When you receive a message, new message are displayed in the home screen. To open the message, select Show. By default, the message is opened in the Conversations view. Reply to a received message in the Conversations view Select the text input field at the bottom of the display, write a message, and select .
View your voice mail Change language You can change the device language and the language in which you write your messages and mails. You can also activate predictive text input. • Call the sender of a voice mail You can save messages to the device memory or an inserted memory card, and later use the QuickTime or RealPlayer applications to play them. Select Menu > Help & Settings > Settings and Phone > Language. Mail Change the device language Select Phone language.
Mail Using the service or downloading content may cause transfer of large amounts of data, which may result in data traffic costs. Add a mailbox You can add several mailboxes to your device. Select Menu > Messaging > Mail. Add a mailbox Select New mailbox, and follow the instructions. Add a mail widget to the home screen 1 In the home screen, tap and hold an empty area. 2 Select and the desired widget from the list. Delete a mailbox 1 Select Menu > Messaging > Mail.
Internet Add a mail widget to the home screen In the home screen, select New mailbox, and follow the instructions. Add another mail widget to the home screen Tap and hold the home screen, and select , and the desired widget from the list. Open mail In the mail widget, select mail. Internet About the web browser Select Menu > Web. Catch up on the news and visit your favorite websites. You can use your device web browser to view web pages on the internet.
Social networks Set a feed to automatically update In the Web feeds view, select and hold the feed, and from the pop-up menu, select Edit > Automatic updates. Discover nearby events Are you looking for interesting things to do near your current location? With Here and now, you can get information about, for example, the weather, events, cinema times, or restaurants nearby. Select Menu > Web. 1 2 Select Here and now. Browse the available services, and for more information, select the service.
Social networks networking service apply to sharing information on that service. Familiarize yourself with the terms of use and the privacy practices of that service. See your friends' status updates in one view When you are signed in to social networking services through the Social netw. application, you can see your friends' status updates from all those services in a single view. You do not have to switch between different applications to see what everyone is up to. Select Menu > Social networks.
Camera networking service, and you need to use a Wi-Fi connection. Take a picture and upload it 1 Select . 2 Select the option for uploading a picture from the camera. 3 Take a picture. 4 Add a caption and a tag with a comment to a particular section of the picture. Share your location in your status update With the Social application, you can let your friends know where you are, so they can find you. Select Menu > Social networks. 1 2 3 Select the text input field at the top of the display.
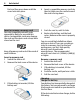
Camera easily take pictures or record videos. You can later use your device to view or edit the pictures and videos, share them on the internet, or send them to compatible devices. Take a picture Press and hold the camera key. 1 2 To activate the face tracking feature, > Face detect.. The face select tracker detects and draws rectangles around faces, even when they are moving. Press the camera key. Do not move the device before the picture is saved and the final picture displayed.
• Your pictures and videos select Set as default scene mode > Yes. Keep a safe distance when using the flash. Do not use the flash on people or animals at close range. Do not cover the flash while taking a picture. To record high quality HD video: • • • Close any open applications before recording. Record to your device mass memory, if possible. If recording to a microSD memory card, use a class 4 card (32 Mbit/s (4 MB/s)), or higher, from a well-known manufacturer.
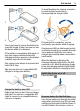
Your pictures and videos Browse the pictures and videos Swipe up or down. Browse pictures in full screen mode Swipe left or right. View a picture in full screen mode Select the picture, and turn your device to landscape mode. Zoom in or out. Place two fingers on the screen, and to zoom in, slide your fingers apart. To zoom out, slide your fingers together. 2 43 To save the edited picture, select Options > Save. The edited picture does not replace the original picture.
5 6 7 Your pictures and videos can cut the length of the video or define how long a picture is displayed. Select the sounds to play in the background. To add text or subtitles to your movie, select Add text. Save your movie. Create a slideshow The Video Editor application contains templates for different occasions. You can use them to create slideshows of events, such as anniversaries or parties. Select Menu > Videos & TV > Video Editor. 1 2 3 4 5 6 Select Make a stylish slideshow from your photos.
Videos and TV Videos and TV Videos About the video player Select Menu > Videos & TV > Videos. You can watch videos on your device when out and about. Tip: Get new videos from Ovi Store. To learn more about Ovi Store, go to www.ovi.com. Using a packet data access point to download a video may involve the transmission of large amounts of data through your service provider's network. For information about data transmission charges, contact your service provider.
Music and audio Music and audio Music player About Music player Select Menu > Music > Music player. With the Music player application, you can listen to music and podcasts while on the move. Play music Select Menu > Music > Music player. 1 Select Options and the desired view. You can browse songs by song or album. In the album view, to browse the album covers, turn your device so it is horizontal, and swipe left or right.
Music and audio Play a playlist Select Options > Playlists and the playlist. Tip: Music player automatically creates a playlist for the most played songs, recently played songs, and recently added songs. Copy music from your PC Do you have music on your PC that you want to listen on your device? Nokia Ovi Player is the fastest way to transfer music on your device, and you can use it to manage and synchronize your music collection.
Music and audio With the FM transmitter, you can play songs stored in your device through any compatible FM radio, such as a car radio or a home stereo system. Example: If the frequency 107.8 MHz is free in your area and you tune your FM radio to that frequency, also tune the FM transmitter to 107.8 MHz. The operating distance of the FM transmitter is approximately 2 meters (6 feet).
Maps Scan for all available stations 1 From the toolbar, select . 2 To save all found stations, from the toolbar, select . To save a single station, select and hold the station title, and from the pop-up menu, select Save. Set a frequency manually 1 From the toolbar, select Tune manually. 2 Use the up and down arrow icons to enter a frequency. 49 The quality of the radio broadcast depends on the coverage of the radio station in the area.
Maps Almost all digital cartography is inaccurate and incomplete to some extent. Never rely solely on the cartography that you download for use in this device. If you browse to an area not covered by the street maps that are stored on your device, and you have an active data connection, new street maps are automatically downloaded. Some content is generated by third parties and not Nokia. The content may be inaccurate and is subject to availability.
Maps Map view — In the standard map view, details such as location names or highway numbers, are easy to read. Satellite view — For a detailed view, use satellite images. Terrain view — View at a glance the ground type, for example, when you are traveling off-road. 3D view — For a more realistic view, change the perspective of the map. Landmarks — Display prominent buildings and attractions on the map. Night mode — Dim the colors of the map. When traveling at night, the map is easier to read in this mode.
Maps other external circumstances may also affect the accuracy of the compass. The compass should always be properly calibrated. About positioning methods Maps displays your location on the map using GPS, A-GPS, Wi-Fi, or network (cell ID) based positioning. The global positioning system (GPS) is a satellite-based navigation system used for calculating your location. Assisted GPS (A-GPS) is a network service that sends you GPS data, improving the speed and accuracy of the positioning.
Maps connection may also affect results when searching online. If you have maps of the searched area stored on your device, you can also get search results without an active internet connection, to avoid data transfer costs, but the search results may be limited. View location details Find more information about a specific location or place, such as a hotel or restaurant, if available. The available options may vary by region. To view all the available place details, you need an active internet connection.
Maps Create a collection Select Create new collection, and enter a collection name. Synchronize saved places and routes Select Favorites > Synchronize with Ovi. If you do not have a Nokia account, you are prompted to create one. Add a saved place to a collection 1 Select Places and the place. 2 Select Organize collections. 3 Select New collection or an existing collection. Set the device to synchronize Favorites automatically > Synchronization > Select Synchronization > At start-up and shut-d..
Maps 3 4 5 use. To later set up accounts, select . Select your current location. Write your status update. You can post only to selected services that you have set up. To exclude a service, select the service logo. To exclude all the services, keeping your location and status update private, clear the and post on check box. Select Check in. You may also be able to attach a picture to your post, depending on the social networking service.
Maps You can start driving without a set destination. The map follows your location, and traffic information is automatically displayed, if available. To set the destination later, select Destination. Navigation view By default, the map rotates to your driving direction. Orient the map to north Select . To rotate the map back to your driving direction, select . When you select Drive home or Walk home for the first time, you are prompted to define your home location.
Maps Avoid traffic events > In the main view, select Navigation > Reroute due to traffic. The location of speed cameras may be shown on your route during navigation, if this feature is enabled. Some jurisdictions prohibit or regulate the use of speed camera location data. Nokia is not responsible for the accuracy, or the consequences of using speed camera location data.
2 3 Office planner view from the navigation view, select Options > Route pts. or Route points list. Set the transportation mode to Drive or Walk. If you select Walk, one-way streets are regarded as normal streets, and pathways and routes through, for example, parks and shopping centers, can be used. Select the desired option. Select the walking mode Open the Settings tab, and select Walk > Preferred route > Streets or Straight line.
Office Not all file formats or features are supported. To buy the editor version of Quickoffice, select Updates and upgrades. Read Microsoft Word, Excel, and PowerPoint documents With Quickoffice, you can view Microsoft Office documents, such as Word documents, Excel worksheets, or PowerPoint presentations. Select Menu > Apps & Games > Office > Quickoffice. Open a file Select the memory where the file is stored, browse to the correct folder, and select the file. Sort files Select Options > Sort by.
Time management Translate words from one language to another Set and manage alarms, and check local times in different countries and cities. You can translate words from one language to another. Not all languages may be supported. Set the time and date On the home screen, select the clock and Options > Settings > Time or Date. Select Menu > Apps & Games > Office > Dictionary. 1 2 Enter text in the search field. Suggestions of words to translate are displayed. Select the word from the list.
Time management Tip: You can snooze alarms also by turning your device display down. 61 Check the time in different cities To view the time in different locations, add them to your world clock tab. You can also add pictures for the locations, for example, a picture of your friend who lives in the city in question, or a view from your favorite tourist attraction. On the home screen, select the clock, and open the world clock tab. Add a location Select Options > Add location and a location.
2 3 4 Time management Fill in the fields. To repeat the calendar entry at regular intervals, select and the time interval. Select Repeat until, and enter the end date. Select Done. Tip: You can also add a calendar entry in the day view. Select and hold the starting time, and drag the arrows to set the duration. Select Options > Change view and the desired view. Tip: To go to the previous or next day, week, or month, in the appropriate view, swipe left or right.
Device management Remember a birthday You can add a reminder for birthdays and other special dates. The reminders are repeated annually. On the home screen, select the date. 1 2 3 Go to the desired date, and select (Tap to create entry), or if there are existing entries, tap the area below an entry. , and Select the entry type field select Anniversary as the entry type. Fill in the fields, and select Done. Use separate calendars for work and free time You can have more than one calendar.
Device management If there are available updates, select which updates to download and install, and select . Set your device to automatically check for updates Select Options > Settings > Auto-check for updates. It is recommended that you back up your personal data before updating your device software. Warning: If you install a software update, you cannot use the device, even to make emergency calls, until the installation is completed and the device is restarted.
Device management Create a new folder In the folder where you want to create a sub-folder, select Options > New folder. Copy or move a file to a folder Select and hold the file, and from the popup menu, select the appropriate option. Tip: You can also copy or move several files at the same time. Select Options > Mark multiple items. Back up files Want to make sure that you will not lose any important files? You can back up the device memory to a compatible computer or memory card.
Device management Keep the password secret and in a safe place, separate from the memory card. Increase available memory for more content Do you need to increase the available device memory, so you can install more applications, and add more content? Transfer data to the mass memory, a compatible memory card (if available), or to a compatible computer.
Device management Synchronize content About Sync Select Menu > Help & Settings > Settings and Connectivity > Data transfer > Sync. With the Sync application, you can synchronize your contacts, notes, and other content between your device and a remote server. After the synchronization, you have a backup of your important data on the server. 67 Include or exclude content types Select a content type. Synchronize data Select Options > Synchronize.
Connectivity Protect your device Set your device to lock automatically Want to protect your device against unauthorized use? Define a lock code, and set your device to lock itself automatically when you're not using it. 1 2 3 Select Menu > Help & Settings > Settings and Phone > Phone management > Security settings > Phone and SIM card. Select Lock code, and enter a lock code. A minimum of 4 characters is required, and numbers, symbols, and upper and lower case letters can be used.
Connectivity Only use a Wi-Fi connection For Wi-Fi connections when in your home network, select Data use in home country > Wi-Fi network only. For Wi-Fi connections when outside your home network, select Data use when abroad > Wi-Fi network only. Automatically use a packet data connection when in your home network Select Data use in home country > Automatic. To set the device to request confirmation before connecting, select Data use in home country > Always ask.
Connectivity Close the Wi-Fi connection Select and hold the connection, and from the pop-up menu, select Disconnect WiFi netw.. Connect to a Wi-Fi network on the move Connecting to a Wi-Fi is a handy way of accessing the internet when not at home. Connect to public Wi-Fi networks in public places, such as a library or internet café. 1 2 Select Menu > Help & Settings > Settings and Connectivity > Wi-Fi. Select and hold the desired Wi-Fi connection, and from the pop-up menu, select Start web browsing.
Connectivity 71 You can have several Bluetooth connections active at a time. For example, if you are connected to a compatible headset, you can also send files to another compatible device at the same time. 2 1 When remote SIM mode is activated, Remote SIM mode is displayed in the home screen. The connection to the wireless network is closed, and you cannot use SIM card services or features that require cellular network coverage. 2 3 4 Select and hold the item, for example, a picture.
Connectivity to add the device to the list of blocked devices. 3 Protect your device When Bluetooth is activated in your device, you can control who can find and connect to your device. Change the USB mode For best results when copying content or synchronizing your device with your computer, activate the appropriate USB mode when using a USB data cable to connect to various devices. Select Menu > Help & Settings > Settings and Connectivity > Bluetooth.
Connectivity 73 computer connects to the internet automatically. remote drive for storing and managing your files. Tip: When the USB cable is connected, you can change the USB mode in most views. > USB. In the top right corner, select Select Menu > Help & Settings > Settings and Connectivity > Remote drives. Connect a USB mass storage device You can use a USB On-The-Go (OTG) adapter to connect your device to a compatible USB memory stick or hard drive.
Find more help Close a network connection If several applications are using an internet connection, you can use the Connection manager application to close some or all network connections. Select Menu > Help & Settings > Settings and Connectivity > Connection mgr.. Select and hold the connection, and from the pop-up menu, select Disconnect. In the active data connections view, you can see your current network indicates a packet data connections. indicates a Wi-Fi connection, and connection.
Troubleshooting separate from your device. If you forget the code and your device is locked, your device will require service and additional charges may apply. Additional charges may apply, and all the personal data in your device may be deleted. For more information, contact a Nokia Care Point or your device dealer. Troubleshooting Restore original settings If your device is not working properly, you can reset some settings to their original values. 1 2 3 End all active calls and connections.
Protect the environment Remove all content and restore settings to the default values 1 Back up the content you want to keep to a compatible memory card (if available) or to a compatible computer. 2 Close all active connections and calls. 3 Select Menu > Help & Settings > Settings and Phone > Phone management > Factory settings > Delete data and restore. 4 Your device switches off and then on again.
Product and safety information • • • • • • Do not drop, knock, or shake the device. Rough handling can break internal circuit boards and mechanics. 2 77 Angle the hologram left, right, down, and up. You should see 1, 2, 3 and 4 dots on each side respectively. Only use a soft, clean, dry cloth to clean the surface of the device. Do not paint the device. Paint can clog the moving parts and prevent proper operation. Switch off the device and remove the battery from time to time for optimum performance.
Product and safety information Accidental short-circuiting can happen when a metallic object touches the metal strips on the battery, for example, if you carry a spare battery in your pocket. Short-circuiting may damage the battery or the connecting object. Do not dispose of batteries in a fire as they may explode. Dispose of batteries according to local regulations. Recycle when possible. Do not dispose as household garbage.
Product and safety information Nickel Note: The surface of this device does not contain nickel in the platings. The surface of this device contains stainless steel. Protect your device from harmful content Your device may be exposed to viruses and other harmful content. Take the following precautions: • • • • • Be cautious when opening messages. They may contain malicious software or otherwise be harmful to your device or computer.
Copyright and other notices Your cellular device is a radio transmitter and receiver. It is designed not to exceed the limits for exposure to radio waves recommended by international guidelines. These guidelines were developed by the independent scientific organization ICNIRP and include safety margins designed to assure the protection of all persons, regardless of age and health. The exposure guidelines for cellular devices employ a unit of measurement known as the Specific Absorption Rate or SAR.
Copyright and other notices representations, provide a warranty, or take any responsibility for the functionality, content, or end-user support of third-party applications provided with your device. FCC/INDUSTRY CANADA NOTICE Your device may cause TV or radio interference (for example, when using a telephone in close proximity to receiving equipment). The FCC or Industry Canada can require you to stop using your telephone if such interference cannot be eliminated.
Index Index A Access codes accounts alarm clock anniversary entries antennas applications audio messages B backing up data battery — charging — inserting — saving power birthday entries blocking — device blogs Bluetooth bookmarks browser See web browser business cards C cable connection cache memory Calculator Calendar calendar call waiting calls — answering — forwarding — internet calls — last dialed — making — muting — rejecting — restricting 74 20 60 63 11 15, 23, 64, 66 33 65 8, 9 7 19 63 71 37 70
Index F factory settings, restoring favorites feeds, news file management flashlight FM radio FM transmitter forwarding calls H headset help home screen I icons images See pictures IMEI number inbox, messages indicators installing applications Internet — bookmarks internet See web browser internet calls internet connection intranet 20, 75 31 37 64, 65 18 48, 49 47, 48 28 11 12 14, 22, 23, 36 18 74 33 18, 75 66 38 26 68 38 J Java applications 66 K key lock keyboard keyguard keypad keys and parts 11 15 1
Index — traffic information 56 — viewing saved places 53 — viewing saved routes 53 — voice guidance 55 — walking routes 57 mass memory 65 meeting entries 61, 62 memory 64, 75 — clearing 66, 75 memory card 8, 65 menus 23 message reader 34 messages 33, 75 — audio 33 — conversations 34 — sending 33 MMS (multimedia message service) 33 movies 43 multimedia messages 33 multitasking 15 music 46, 47, 48 — playlists 46 My Card 32 MyAccount 20 N news feeds noise cancellation Nokia Ovi Suite Nokia support informa
Index ringtones S searching — radio stations security code sensor settings settings — access points — language — restoring sharing, online shortcuts silent profile SIM card — inserting slideshow SMS (short message service) social networks software software updates speakerphone status updates support switching device on and off synchronization 27, 32 19 48 68, 74 27 68 35 20, 75 39, 40 14, 23 21 7 44 33 38, 39, 40 66 63, 64 11 39, 40 12, 74 9 67 T taking pictures See Camera tasks 62 text input 15, 16, 17 t
Index Z Zip manager 60