9206315 Ver. 1.0 07/08 Guía del usuario Some of the contents in this manual may differ from your phone depending on the software of the phone or your service provider. AT&T marks contained herein are trademarks of AT&T Intellectual Property and/or AT&T affiliated companies. © 2008 AT&T Intellectual Property. All rights reserved. Nokia is a registered trademark of Nokia Corporation. Product color may vary. Printed in Mexico.
6650 User Guide 9206315 Issue 1.
0434 DECLARATION OF CONFORMITY Hereby, NOKIA CORPORATION declares that this RM-324 product is in compliance with the essential requirements and other relevant provisions of Directive 1999/5/EC. A copy of the Declaration of Conformity can be found at http://www.nokia.com/phones/declaration_of_conformity/. © 2008 Nokia. All rights reserved. Nokia, Nokia Connecting People, and Navi are trademarks or registered trademarks of Nokia Corporation. Nokia tune is a sound mark of Nokia Corporation.
BY USING THE APPLICATIONS YOU ACKNOWLEDGE THAT THE APPLICATIONS ARE PROVIDED AS IS WITHOUT WARRANTY OF ANY KIND, EXPRESS OR IMPLIED, TO THE MAXIMUM EXTENT PERMITTED BY APPLICABLE LAW.
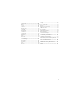
Contents SAFETY.............................................. 6 Support ............................................. 8 Help ...................................................................... 8 Nokia support and contact information .... 8 1. Get started ................................. 9 Insert a SmartChip card and battery........... 9 microSD card slot .......................................... 10 Charge the battery ........................................ 11 Optimize battery use ....................
15. Tools ......................................... 44 Notes ................................................................. Clock.................................................................. Camera.............................................................. Recent Calls..................................................... Calendar ........................................................... Flash Player ..................................................... Calculator................................
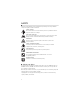
SAFETY Read these simple guidelines. Not following them may be dangerous or illegal. Read the complete user guide for further information. SWITCH ON SAFELY Do not switch the device on when wireless phone use is prohibited or when it may cause interference or danger. ROAD SAFETY COMES FIRST Obey all local laws. Always keep your hands free to operate the vehicle while driving. Your first consideration while driving should be road safety.
Your device supports several methods of connectivity. Like computers, your device may be exposed to viruses and other harmful content. Exercise caution with messages, connectivity requests, browsing, and downloads. Only install and use services and other software from trustworthy sources that offer adequate security and protection against harmful software, such as applications that are Symbian Signed or have passed the Java Verified™testing.
■ Shared memory The following features in this device may share memory: tones, graphics, contacts, text messages, multimedia, and instant messages, e-mail, calendar, To-Do Notes, JavaTM games, applications, and the Note application. Use of one or more of these features may reduce the memory available for the remaining features sharing memory. Your device may display a message that the memory is full when you try to use a shared memory feature.
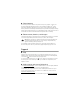
1. Get started ■ Insert a SmartChip card and battery Note: Always switch the device off and disconnect the charger before removing the battery. This phone uses BP-4L batteries. For availability and information on using SmartChip card services, contact your SmartChip card vendor. This may be the service provider or other vendor. 1. To open the back cover, press the black button on the lower part of the back cover (1), slide the cover forward and lift it (2). 2. Remove the battery as shown. 3.
4. Insert the SmartChip card in the SmartChip card holder (5). Make sure that the gold-colored contact area on the card is facing downwards, and the beveled corner faces upwards. Close the SmartChip card holder, and slide the SIM door to lock as indicated on the door. 5. Replace the battery and the back cover. ■ microSD card slot Use only compatible microSDHC and microSD cards approved by Nokia for use with this device.
Important: The microSD card must be inserted in the slot with the gold-colored area facing up. Remove a microSD card Open the side door. Push the card gently to release it. Remove memory card and press 'OK' is displayed. Pull the card out, and select OK. Close the side door. Important: Do not remove the memory card in the middle of an operation when the card is being accessed.
Select > Settings > Config. > General > Personalization > Display > Power saver time-out. Scroll left or right to set the time-out, and select OK. • Reduce Notification time-out. Select > Settings > Config. > General > Personalization > Keypad lights > Notification time-out. Scroll left or right in increments of 10 minutes. • Reduce Display light time-out. Select > Settings > Config. > General > Personalization > Display > Light time-out. Scroll left or right in 5 second increments.
Lock code The lock code helps to protect your phone against unauthorized use. You can create and change the code, and set the phone to request the code. Keep the code secret and in a safe place separate from your phone. If you forget the code and your phone is locked, your phone will require service and additional charges may apply. For more information, contact a Nokia Care point or your phone dealer.
Digital rights management (DRM) protected content comes with an associated activation key that defines your rights to use the content. If your device has WMDRM protected content, both the activation keys and the content will be lost if the device memory is formatted. You may also lose the activation keys and the content in case the files on your device get corrupted. Losing the activation keys or the content may limit your ability to use the same content on your device again.
2.
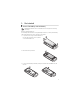
■ Cover and touch keys Left cover touch key (1) Center cover touch key and menu key (2) Right cover touch key (3) Camera lens (4) Camera flash (5) ■ Cover display Use the cover display by sliding your finger lightly over the cover touch keys on the lower end of the display, instead of pressing the cover touch keys. To access phone menus with the cover closed, slide your finger lightly over the center cover touch key with the menu symbol above.
Answer if fold opened — to answer a call when you open the fold Sleep mode — to set whether the cover display is switched off when the power saver time-out is reached Backlight time-out To change the backlight time-out for the cover display or the main display, select > Settings > Config. > General > Personalization > Display > Light time-out. See "General," p. 49.
To change the profile, press the power key, and select a profile. To start a connection to the web, press and hold 0. Active standby Active standby provides fast access to frequently used applications shown across the top of the main display. To select an application or event, scroll to it, and select it. To turn active standby off (Idle scr. theme) or choose different applications (Shortcuts), select > Settings > Config. > General > Personalization > Idle screen mode.
The loudspeaker is activated. All calls to the phone are forwarded to another number. or A headset or a loopset is connected to the phone. or or A GPRS or EGPRS packet data connection is active, the connection is on hold, or a connection is available. or or A UMTS packet data connection is active, the connection is on hold, or a connection is available. or Bluetooth connectivity is switched on, or data is being transmitted using Bluetooth technology. A USB data cable connection is active.
■ Keypad lock (keyguard) The phone automatically locks the keypad in one minute. To change the time the phone automatically locks the keypad, select > Settings > Config. > General > Security > Phone and SIM card > Keypad autolock period > User defined and the desired time. To manually lock the keypad in the phone mode, press the left selection key and * within 1.5 seconds. To unlock the keypad in the phone mode, select Unlock, and press * within 1.5 seconds.
■ Connect a compatible headset Do not connect products that create an output signal as this may cause damage to the device. Do not connect any voltage source to the Nokia Connector. When connecting any external device or any headset, other than those approved by Nokia for use with this device, to the universal headset connector, pay special attention to volume levels. ■ Connect a USB data cable To set the default USB connection mode, select > Settings > Data Cbl. > Data Cable Mode and the desired mode.
To call a recently dialed number, press the call key in the standby mode to see a list numbers. Scroll left to see calls received or missed calls. Select a number, and press the call key. Voice dialing A voice tag is added automatically to all entries in Addr. Book. Use long names, and avoid similar names for different numbers. Make a voice dialing call Before using voice tags, note the following: • Voice tags are not language-dependent. They are dependent on the speaker's voice.
To send a text message as a reply to the caller instead of answering the call, select Silence > Send msg. To edit and save the text message reply, select > Settings > Config. > Phone > Call > Message text. Keep your device away from magnets or magnetic fields. Silence or decline a call with the cover closed To decline a call when the cover is closed, press the volume key to silence. Slide your finger lightly over the right cover touch key Decline or the left cover touch key Send to send a text message.
Additional features may be available. If you have questions about billing or Video Share, contact your service provider. For more information, see www.wireless.att.com. 4. Cellular Video In the standby mode, to access to the AT&T wireless internet, select > Cellular Video. Cellular Video (CV) provides links to a variety of content such as video clips from TV shows, news, sports, and weather.
If the ? character is shown after the word, the word you intended to write is not in the dictionary. To add a word to the dictionary, select Spell. Enter the word (up to 32 letters), and select OK. The word is added to the dictionary. When the dictionary becomes full, a new word replaces the oldest added word. Common functions in traditional and predictive text input To insert a number, press and hold the number key. To enter punctuation marks and special characters, press and hold *.
2. In the To: field, enter the phone numbers or e-mail addresses of the recipients, or to select recipients from Address Book, press the scroll key. Separate recipients with a semicolon (;). 3. To enter the subject for a multimedia, or e-mail message, scroll down to the subject field. If the subject field is not visible for a multimedia message, select Options > Message header fields, mark Subject, and select OK. 4. Scroll down to the message field and enter the message content.
IMAP4 and POP3 mailboxes Select > Messaging > Messages and the mailbox. Connect to mailbox? is displayed. Select Yes to connect to your mailbox (network service) or No to view previously retrieved e-mail messages offline. To connect to the mailbox afterwards, select Options > Connect. When you are online, to end the data connection to the remote mailbox, select Options > Disconnect. Retrieve and read e-mail messages Important: Exercise caution when opening messages.
■ Service commands To enter and send service commands (also known as USSD commands) such as activation commands for network services to your service provider, select > Messaging > Messages > Options > Service commands. To send the command, select Options > Send. ■ Messaging settings Text message settings To define text message settings, such as the message center and character encoding used, select > Messaging > Messages > Options > Settings > Text message.
7. Yellow Pages In the standby mode, to access to the AT&T Yellow Pages website, select > Yellow Pages. Yellow Pages provides a directory of local and national businesses, search options, maps, and directions. If you have questions about billing or accessing this website, contact your service provider. 8. MEdia Net You can access various mobile internet services with your phone browser. Important: Use only services that you trust and that offer adequate security and protection against harmful software.
Connection security If the security indicator is displayed during a connection, the data transmission between the phone and the internet gateway or server is encrypted. The security icon does not indicate that the data transmission between the gateway and the content server (or place where the requested resource is stored) is secure. The service provider secures the data transmission between the gateway and the content server.
Direct calling While browsing, you can make a phone call, and save a name and a phone number from a page. Receive a bookmark When you have received a bookmark a message is displayed. To view the bookmark, select Show. ■ Security settings Cookies A cookie is data that a site saves in the cache memory of your phone. Cookies are saved until you clear the cache memory. See "Cache memory," p. 31. In the standby mode, select > MEdia Net > Options > Settings > Privacy > Cookies.
Certificates Important: Even if the use of certificates makes the risks involved in remote connections and software installation considerably smaller, they must be used correctly in order to benefit from increased security. The existence of a certificate does not offer any protection by itself; the certificate manager must contain correct, authentic, or trusted certificates for increased security to be available. Certificates have a restricted lifetime.
Use only compatible microSD cards approved by Nokia for use with this device. Nokia uses approved industry standards for memory cards, but some brands may not be fully compatible with this device. Incompatible cards may damage the card and the device and corrupt data stored on the card. ■ Music player Warning: Listen to music at a moderate level. Continuous exposure to high volume may damage your hearing.
To refresh the library after you have updated or moved files in the song selection, select Options > Refresh library. After moving files, if a song has "!" in front of the title, use the refresh option to update the music player. Playlists In the Music menu, select Playlists. Create a playlist 1. Select Options > Create playlist. 2. Enter a name for the playlist, and select OK. 3. To add songs now, select Yes. To show the song list under an artist title, scroll to the artist, and scroll right.
The requirements of the PC for music purchase and transfer: • Microsoft Windows XP operating system (or later) • Compatible version of Windows Media Player application • Compatible version of Nokia PC Suite Transfer music from PC You can use three different methods to transfer music: • To use Nokia Music Manager in Nokia PC Suite, connect the compatible USB cable or activate Bluetooth connection, and select PC Suite as the connection mode.
11. My Stuff Select > My Stuff. Use My Stuff to save and organize your images, video clips, music, tones, streaming links, and presentations. To copy files to phone memory or to the memory card, select the folder (such as Images), scroll to the file or mark the files, and select Options > Organize > Copy to phone mem. or Copy to memory card. To set an image as a wallpaper or to be shown during a call, select Images, and scroll to the image.
■ Print images You can use the phone with a PictBridge-compatible printer using a data cable. To print images in My Stuff, scroll to the image, and select Options > Print. ■ Transfer videos from PC To transfer videos from a compatible PC, use a compatible USB cable or Bluetooth connectivity.
12. Address Book ■ Save and manage contact information To save and manage contact information, such as names, phone numbers, and addresses, select > Addr. Book, or press the right selection key. To add a new contact, select Options > New contact. Fill in the fields you want, and select Done. To view names and numbers from a SmartChip card, phone memory, and service numbers, select Options > Settings >Contacts to display and mark Phone memory, SIM memory, or Service numbers.
13. Games & Apps In the standby mode, select > Games&Apps to manage applications and games. These files are stored in the phone memory or an attached microSD memory card and may be arranged in folders. For options to format or lock and unlock the memory card, see "Format a memory card," p. 54 and "Lock or unlock a memory card," p. 54. ■ Launch a game or application Your phone software includes some games. Select ■ > Games&Apps. Scroll to the desired game or application, and select Open.
You can use PTT to have a conversation with one person or with a group of people having compatible devices and service. While you are connected to the PTT service, you can use the other functions of the phone. To check availability and costs, and to subscribe to the service, contact your network operator. Service availability may differ from that for normal calls. Visit wireless.att.com/ptt for additional information. Before you can use the PTT service, you must define the required PTT service settings.
Add Contacts You can add individual contacts or create contact groups to call several people at once. Add a one-to-one contact To add a contact to the PTT contacts list, select > Games&Apps > PTT > Add contact. Enter the name and telephone number of the new contact. An invitation is sent to the person. Add a contact group You can save a group of contacts so you can call them collectively. To add a PTT contact group, select > Games&Apps > PTT > Add group and name the group.
To start a one-to-one call from the list of PTT groups, select PTT Contacts, scroll to the desired group, and select View. Scroll to the desired contact, and press and hold the PTT key while talking. Make a group call To make a call to a group, select PTT Contacts in the PTT menu, scroll to the desired group, and press and hold the PTT key while talking. Make a PTT call to multiple recipients To select multiple PTT contacts from the contact list, create a Quick Group.
To send a Call Me Alert from the group list in the PTT menu, select PTT Contacts, and scroll to the desired group. Select Options > Call me alert. The alert is sent only to members logged in to PTT. Respond to a Call Me Alert When someone sends you a Call Me Alert, Please call is displayed with the caller’s name in the standby mode. To call the sender, press and hold the PTT key. To send a Call Me Alert to the sender, select Options > Call me alert.
The trip meter has limited accuracy, and rounding errors may occur. Accuracy can also be affected by availability and quality of GPS signals. Assisted GPS (A-GPS) is used to retrieve assistance data over a packet data connection, which assists in calculating the coordinates of your current location when your device is receiving signals from satellites. 15. Tools ■ Notes Select > Tools > Notes. To write a new note, start writing. To save the note, select Done. You can save plain text files (.
■ Camera To activate the camera, press the Camera/Video key, or select > Tools > Camera. To take a self portrait, use the cover touch keys to activate the camera with the fold closed. The display functions as a viewfinder. on the upper left of the display indicates the still image mode. Capture an image and record a video To capture an image, press the center selection key. Hold the phone still while taking a picture. The image is saved to Images in My Stuff. To return to the viewfinder, select Back.
■ Recent Calls In the standby mode, press the call key as a shortcut to the recent calls log (a network service). Use the left and right scroll keys to scroll between missed calls, calls received, and calls made, or select > Tools > Recent calls. Note: The actual invoice for calls and services from your service provider may vary, depending on network features, rounding off for billing, taxes, and so forth. Note: Some timers, including the life timer, may be reset during service or software upgrades.
■ RealPlayer Select > Tools > RealPlayer. With RealPlayer, you can play media files such as video clips saved in the phone memory or memory card, or stream media files over the air by opening a streaming link. RealPlayer does not support all file formats or all the variations of file formats. To play, select a media file or a streaming link in Video clips, Download videos, or Recently played. To stream live content, you must first configure your default access point.
To set Speed dialing to On, select > Settings > Config. > Phone > Call > Speed dialing > On. To call a speed dialing number, press and hold the speed dialing key until the call begins. ■ Voicemail To call your voice mailbox (network service), press and hold 1 in the standby mode. To define the voicemail number if no number is set, select > Settings > Voice Mail. Scroll to Voice mailbox and select Define number, and enter the corresponding mailbox number.
■ Config. General Select > Settings > Config. > General and from the following: Personalization — to adjust the display, keypad lights, idle screen mode, tones, themes, language, and voice command settings. • Display — to adjust the display brightness, font size, power saver time-out, the welcome screen note or logo, and light time-out. The light time-out sets the backlight time-out for the cover display and the main display.
Speed dialing — See "Speed dial," p. 47. Anykey answer — to answer an incoming call by briefly pressing any key, except the left and right selection keys, volume keys, power key, and end key. Call forward 1. Select > Settings > Config. > Phone > Call forwarding (network service). 2. Select which calls you want to forward, for example, Voice calls. 3. Select the desired option. For example, to forward voice calls when your number is busy or when you reject an incoming call, select If busy. 4.
Camera — to set camera image quality, show captured image, resolution, date or text, and memory in use. Also, to set video length, resolution, date or text, and memory in use. Voice recorder — to set recording quality and memory in use. App. manager — to set signed software installation, online certificate checks, and default web address. Recent calls — to set the log duration of recent calls. ■ Voice commands To select the functions to use by voice command, select > Settings > Voice comm.
There may be restrictions on using Bluetooth technology in some locations. Check with your local authorities or service provider. Features using Bluetooth technology increase the demand on battery power and reduce the battery life. Do not accept Bluetooth connections from sources you do not trust. A Bluetooth connection is disconnected automatically after sending or receiving data. Bluetooth connection settings Select > Settings > Bluetooth.
To block connections from a device, in the paired devices view, select the device and Block. To view a list of blocked devices, scroll right to the tab Blocked devices. To unblock a device, scroll to the device, and select Delete. Important: If you are unable to connect to PC Suite through Bluetooth, refer to the Nokia 6650 FAQ Product Information at www.nokiausa.com. Send data 1. Open the application where the item you wish to send is saved. 2.
Format a memory card When a memory card is formatted, all data on the card is permanently lost. Some memory cards are supplied preformatted and others require formatting. 1. In the File manager view, select the memory card. 2. Select Options > Memory card options > Format. 3. When formatting is complete, enter a name for the memory card. Lock or unlock a memory card To set a password to help prevent unauthorized use, in the File manager view, select the memory card and Options > Memory card password > Set.
2. Select Options > Install. Alternatively, search the phone memory or the memory card, select the application, and press the scroll key to start the installation. During the installation, the phone shows information about the progress of the installation. If you are installing an application without a digital signature or certification, the phone displays a warning. Continue installation only if you are sure of the origins and contents of the application.
2. After a successful download, to install the update, select Now. To start the installation later, select Later. To start the installation process later, select Options > Install update. If no server profile has been defined, the phone asks you to create one, or if there are several, to select from a list of servers. Contact your service provider for server profile settings. Configure your phone You may receive configuration settings from your service provider or company information management department.
Always switch the device off and disconnect the charger before removing the battery. Unplug the charger from the electrical plug and the device when not in use. Do not leave fully charged battery connected to a charger, since overcharging may shorten its lifetime. If left unused, a fully charged battery will lose its charge over time. Always try to keep the battery between 15ºC and 25ºC (59ºF and 77ºF). Extreme temperatures reduce the capacity and lifetime of the battery.
Authenticate hologram 1. When you look at the hologram on the label, you should see the Nokia connecting hands symbol from one angle and the Nokia Original Enhancements logo when looking from another angle. 2. When you angle the hologram left, right, down and up, you should see 1, 2, 3 and 4 dots on each side respectively. What if your battery is not authentic? If you cannot confirm that your Nokia battery with the hologram on the label is an authentic Nokia battery, please do not use the battery.
• Do not use harsh chemicals, cleaning solvents, or strong detergents to clean the device. • Do not paint the device. Paint can clog the moving parts and prevent proper operation. • Use a soft, clean, dry cloth to clean any lenses, such as camera, proximity sensor, and light sensor lenses. • Use only the supplied or an approved replacement antenna. Unauthorized antennas, modifications, or attachments could damage the device and may violate regulations governing radio devices. • Use chargers indoors.
Ensure the above separation distance instructions are followed until the transmission is completed. Parts of the device are magnetic. Metallic materials may be attracted to the device. Do not place credit cards or other magnetic storage media near the device, because information stored on them may be erased. ■ Medical devices Operation of any radio transmitting equipment, including wireless phones, may interfere with the functionality of inadequately protected medical devices.
with an air bag, remember that air bags inflate with great force. Do not place objects, including installed or portable wireless equipment in the area over the air bag or in the air bag deployment area. If in-vehicle wireless equipment is improperly installed and the air bag inflates, serious injury could result. Using your device while flying in aircraft is prohibited. Switch off your device before boarding an aircraft.
When making an emergency call, give all the necessary information as accurately as possible. Your wireless device may be the only means of communication at the scene of an accident. Do not end the call until given permission to do so. ■ Hearing aids Some digital wireless devices may interfere with some hearing aids. If interference occurs, consult your service provider. Your mobile device model complies with FCC rules governing hearing aid compatibility (HAC).
Index A access codes lock code 12, 13 module PIN 13 PIN 12, 13 PIN2 13 PUK 13 PUK2 13 restriction password 13 signing PIN 13 UPIN 13 UPUK 13 active standby 18 Address Book. See contacts.
L light settings 17 listening to music 33 lock and unlock the cover display 16 M MEdia Net 29 media player. See RealPlayer. menu 19 messages outbox 27 service commands 28 service messages 26 SmartChip messages 27 music player downloading music 34 playlists 34 shop music 34 transferring music 34 music.See music player.