MS-Connect 210 User’s Manual P/N 83-210210 Rev B
Copyright and Disclaimer Copyright ©2007 Microscan Systems, Inc. 1201 S.W. 7th Street, Renton, WA, U.S.A. 98057 (425) 226-5700 FAX: (425) 226-8682 ISO 9001:2000 Certified Quality Management System Issued by TUV USA Inc., Member of TUV NORD Group, Cert. No. 06-1080 All rights reserved.
Introduction Microscan Limited Warranty Statement and Exclusions What Is Covered? Microscan Systems Inc. warrants to the original purchaser that products manufactured by it will be free from defects in material and workmanship under normal use and service for a period of one year from the date of shipment. This warranty is specifically limited to, at Microscan’s sole option, repair or replacement with a functionally equivalent unit and return without charge for service or return freight.
Table of Contents Table of Contents Chapter 1 Setting Up the Device Check Required Hardware ...................................................................... 1-2 Configure the Display .............................................................................. 1-4 Connect the System ................................................................................ 1-5 Configure Output Settings .....................................................................
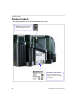
Introduction About the MS-Connect 210 The key features of the MS-Connect 210 are: • Easy Ethernet configuration with ESP® Software • Ethernet TCP/IP and EtherNet/IP™ • Trigger and New Master controls on external button panel • Output indicator LEDs • Easy-to-access ports, Micro-Change connectors, and cabling routes • Clearly labeled terminal blocks • Spacious interior for easy wiring access • Convenient quick-reference insert with default settings and output options • Easy mounting, with available DIN rail
Product Labels Product Labels The following labels are located on the MS-Connect 210: WEEE (Waste Electronic and Electrical Equipment) label. Product ID, serial number, date of manufacture, FIS number, electrical and safety information.
Introduction Statement of Agency Compliance The MS-Connect 210 has been tested for compliance with FCC (Federal Communications Commission) regulations and has been found to conform to all applicable FCC Rules and Regulations. To comply with FCC RF exposure compliance requirements, this device must not be co-located or operate in conjunction with any other antenna or transmitter.
Statement of Agency Compliance viii MS-Connect 210 User’s Manual
1 Setting Up the Device Contents Check Required Hardware............................................................................................................ 1-2 Configure the Display.................................................................................................................... 1-4 Connect the System...................................................................................................................... 1-5 Configure Output Settings...................................
Check Required Hardware Check Required Hardware Stand-Alone Configuration Item 1 2 3 Description Part Number MS-Connect 210 Connectivity Box with Display FIS-0210-0001G MS-Connect 210 Connectivity Box FIS-0210-0002G MS-Connect 210 Connectivity Box with Display and Ethernet FIS-0210-0003G Microscan Reader (10-28V or 5V) FIS-XXXX-XXXXG Power Supply (10-28V) 97-100004-15 Reader Cable, 19-pin to 25-pin, Host RS-422/485 Reader Cable, 19-pin to 25-pin, Host RS-232, Aux RS-232 Reader Cable, 19-pin t
Setup and Operation Check Required Hardware (cont.
Configure the Display Configure the Display If you are using a version of the MS-Connect 210 with an alphanumeric character display (FIS-0210-0001G or FIS-0210-0003G), you must configure the display before applying power to the system. For the MS-Connect 210’s display to operate correctly, all communication settings must match those of the reader. Settings can be matched using the dip switches located on the board at SW3.
Setup and Operation Connect the System There are a number of different ways to connect a reader, the MS-Connect 210, and a host. The 19-pin reader connector; the Micro-Change connectors for the power supply, optional Ethernet, and optional object detector; and three CGBs are located at the back of the unit.
Connect the System Connecting a 5-Volt Reader to the MS-Connect 210 If you are using an MS-3, MS-3 CCD, MS-4, Quadrus MINI, or Quadrus MINI 3: 1. Attach the 19-pin to 15-pin Reader Cable (P/N 61-000127-01) to the MS-Connect 210 via the 19-pin reader connector, shown in the illustration below. 2. Tighten the cable housing at the 19-pin reader connector on the back of the MS-Connect 210 unit. 3.
Setup and Operation Connecting an MS-Q Imager to the MS-Connect 210 Once you have a reader connected to the MS-Connect 210 by RS-232, you can simultaneously connect an MS-Q by wiring it directly to the MS-Q terminal block inside the box (J15). 1. Unscrew one of the three CGB caps at the back of the unit. 2. Clear the CGB’s access hole to create a cabling route into the box. 3.
Connect the System Connecting the MS-Connect 210 to a Host Once you have a reader connected to the MS-Connect 210 by RS-232, you have the option of connecting the MS-Connect 210 to a host computer. 1. Unscrew one of the three CGB caps at the back of the unit. 2. Clear the CGB’s access hole to create a cabling route into the box. 3. Pass a pre-stripped RS-232 Host Cable (P/N 61-000105-01) through the access hole so that the 9-pin connector is outside the box, and the end to be wired is inside the box. 4.
Setup and Operation Connecting the MS-Connect 210 to a Multidrop Network Once you have a reader connected to the MS-Connect 210 by RS-232, you have the option of connecting the MS-Connect 210 and reader to a Multidrop network. Important: Before connecting to a Multidrop network, be sure that all four switches at SW7 are in the UP position. This closes the circuits to allow Multidrop communication. Multiple MS-Connect 210s and readers can be added to a Multidrop network (one reader per MS-Connect 210).
Connect the System Connecting the MS-Connect 210 to Ethernet Once you have a reader connected to the MS-Connect 210 by RS-232, you have the option of connecting the MS-Connect 210 and reader to Ethernet. The Optional Ethernet Module converts RS-232 to Ethernet for readers without embedded Ethernet. Important: Before connecting to Ethernet using the Reader Ethernet port, be sure that all four switches at SW7 are in the DOWN position. This opens the circuits to create a pass through condition.
Setup and Operation Using Input 1 The Input 1 terminal block (J11) allows you to wire buttons or other external devices for resetting counters, unlatching outputs, or other application requirements. Wire the external device to the Input 1 terminal block at J11. The Input 1 LED will illuminate to signal a switching event.
Connect the System Powering Additional Readers from the Terminal Blocks The MS-Connect 210 can power up to three additional readers during active operation. This is accomplished by wiring the additional readers to terminal blocks J2 through J5 inside the box, as shown below. Note: If you are using MS-890s or Quadrus EZs, the MS-Connect 210 can power up to two additional readers, due to the greater power demands of those models.
Setup and Operation Configure Output Settings Outputs are configured by manipulating the dip switches and jumpers on the board. Switches at SW5 Configuring the Outputs and Beeper The switches for controlling outputs 1, 2, and 3 and the beeper are located at SW5.
Configure Output Settings Beeper Characteristics at Power-On The MS-Connect 210 will beep at power-on for most readers. The duration of the beep depends upon which reader is connected. The table below shows which readers cause the MS-Connect 210 to beep at which durations.
Setup and Operation Configuring the Relays The MS-Connect 210’s three pluggable relay modules and three jumpers for controlling the relays are outlined below. Relay Module Options K1 - K3 The two possible jumper configurations for JP1, JP2, and JP3 are shown below. Config A passes through the reader’s opto-isolated relays to the terminal block. Config B inserts the relay module between the reader’s output and the terminal block.
Configure Output Settings Using the 9-pin Configuration Port In applications without a communication cable wired to the host connector, you can use the 9-pin configuration port at J26 on the board to program the connected reader. Configuration port pinouts are clearly marked next to the connector on the board.
Setup and Operation Using the Trigger and New Master Lockouts The Trigger and New Master lockouts allow you to disable the buttons on the front panel of the MS-Connect 210. When JP10 (New Master Lockout) and JP11 (Trigger Lockout) are in their Config B positions, the Trigger and New Master buttons on the front panel will be disabled. The two possible jumper configurations for JP10 and JP11 are shown below.
Cycle Power to the MS-Connect 210 Cycle Power to the MS-Connect 210 Once your reader is connected to the MS-Connect 210 and all other cabling is connected and secured, it is safe to turn on the system. Note: If the polarity of your power connection is incorrect when you cycle power, the Power LED will illuminate as RED. If polarity is correct, the Power LED will illuminate as GREEN.
Setup and Operation Install ESP Easy Setup Program (ESP) is Microscan’s proprietary setup and testing application. The purpose of ESP is to provide a quick and easy way to set up and configure Microscan products. When the MS-Connect 210 is connected to a host computer (Windows Vista, XP, or 2000), ESP can be used to configure Ethernet settings and to set up communications between the MS-Connect 210 and a host or network. If installing from the Microscan Tools CD: 1.
Select and Identify the MS-Connect 210 Select and Identify the MS-Connect 210 When you start ESP, you will see this menu: Click the button showing the MS-Connect 210. The following view will appear: Click Search to find the MS-Connect 210, then configure Ethernet and serial port settings in the interface shown below. See Chapter 2, Using Ethernet, for information about getting the MS-Connect 210 ready for Ethernet TCP/IP or EtherNet/IP operation.
2 Using Ethernet Contents Power-On the System................................................................................................................... 2-2 Select and Identify the MS-Connect 210 ...................................................................................... 2-3 Set Network Parameters............................................................................................................... 2-4 Set COM Port Parameters .......................................................
Power-On the System Power-On the System When your reader is connected to the MS-Connect 210 and all other cabling is connected and secured, it is safe to turn on the system. Power supply cable (97-100004-15) Set the Power switch to ON to cycle power.
Using Ethernet Select and Identify the MS-Connect 210 When you run ESP, you will see the model menu shown below. Select the MS-Connect 210 by double-clicking on the MS-Connect 210 button, or by clicking it once and then clicking OK. Click the button showing the MS-Connect 210. The MS-Connect 210 view (shown below) will then appear. Click Search to locate your MS-Connect 210. The MS-Connect 210’s IP address and MAC address will appear in this field.
Set Network Parameters Set Network Parameters You can use ESP to change Ethernet settings. Clicking Send and Save updates the settings in the MS-Connect 210’s Ethernet module. The firmware version, MAC address, and IP address will automatically populate the fields shown at left. Select the appropriate Subnet Mask, Gateway address, and TCP port. Send and Save network parameters. Configuring Network Parameters The following example is based on a default IP address of 169.254.33.
Using Ethernet Configuring Network Parameters (cont.) 4. Look for the default IP address in the Network Destination column. If it does not appear there, contact your IT department. 5. At the command prompt, type telnet [MS-Connect 210 IP address] 9999 and type Enter. 6. At the Telnet prompt, type Enter. 7. To configure the IP address in the Telnet session, type 0 and Enter. Note: “Netmask: Number of Bits for Host Port” will appear in the command prompt.
Set COM Port Parameters Set COM Port Parameters The serial port settings of the MS-Connect 210 must match those of the reader for Ethernet communication to be successful. Click here to communicate with readers via TCP/IP connection. Note: This option can also be configured in the ESP Preferences dialog. Set Baud Rate, Parity, Stop Bits, and Data Bits to match the corresponding settings in the connected reader. Send and Save COM port parameters.
Using Ethernet Select Reader Model and Connect Once the MS-Connect 210’s Ethernet and serial port settings are configured, click the Switch Model button and select your reader model from the dropdown menu. If your reader model does not appear on the dropdown menu, select New Model to bring up the model menu shown below. When your reader is selected, select Settings from the Connect dropdown menu in ESP’s menu toolbar.
Configure the Connected Reader Configure the Connected Reader Each Microscan reader has different configuration requirements. Refer to the User’s Manual for the Microscan reader or readers being used in your application. Once the reader is configured, you can begin communicating via Ethernet. Important: If the reader’s settings for baud rate, parity, stop bits, or data bits are changed, you must reconfigure those settings in the MS-Connect 210 to match the new settings in the reader.
Using Ethernet Configuring the Ethernet Port The MS-Connect 210’s Ethernet Port behaves as an EtherNet/IP or TCP server device capable of communicating with one or more serial devices. The port is identified as an EtherNet/IP communication adapter. The interface is designed to support remote serial transmit and receive using Explicit and I/O messaging. The port converts EtherNet/IP communication from TCP/IP and UDP to the serial interface.
Configuring the Ethernet Port Ethernet Port Configuration Tools The following tools are necessary for configuring the MS-Connect 210’s Ethernet Port: • BOOTP Server — The Ethernet Port initially powers on and attempts to obtain an IP address using BOOTP. If no BOOTP server responds, the Ethernet Port will revert to a default IP address. Note: To configure an IP address using a PC as a DHCP/BOOTP server, download the free Allen-Bradley DHCP/BOOTP Utility from this location: http://www.ab.com/networks/bootp.
Using Ethernet Ethernet Port Custom Features Serial Configuration Menu The MS-Connect 210 Ethernet Port’s custom firmware allows the user to access the Serial Configuration Menu from Telnet at port 9999 (see Ethernet Port Operation), or from the RS-232 serial port. To access the Serial Configuration Menu via the serial port: At power-on, if the module receives a series of three “x” characters at 9600-8-N-1, the menu is activated.
Ethernet Port Custom Features EtherNet/IP Customization Postamble Processing The Postamble is useful when a series of unknown bytes defines the end of a packet. Parameter Status Postamble String Send Postamble Default Setting N/A CR LF (0x0D 0x0A) N/A Optional Setting Disabled, One to four characters, with the Disabled, Enabled Enabled exception of NUL (0x00) Status When enabled, all received serial data is buffered and is not transmitted to Ethernet until the Postamble sequence is detected.
Using Ethernet Receive Length Receive Length is useful for: • Defining a data packet as a known number of bytes. • Allowing the host to limit the amount of data transferred per communication cycle. Receive Length is configurable for 1 to 470 bytes in 1 byte increments.
Ethernet Port Operation Ethernet Port Operation Serial Configuration To enter configuration via the Ethernet Port’s serial port, the Ethernet Port must be reset or power must be cycled. In the first 1.5 seconds after reset, the Ethernet Port will look for a series of three “x” characters using a default setting of 9600 baud, 8 data bits, no parity and 1 stop bit (9600,8,N,1). You will then be prompted to enter the configuration menu.
Using Ethernet EtherNet/IP Serial Interface (Class 0x68) Data is sent and received on the serial port using explicit messaging. The host should send Get_Attribute_Single (0x0E), Set_Attribute_Single (0x10) or vendor-specific service Send_with_Response (0x45) to vendor-specific Object Class 104 (0x68), Instance 1, Attribute 106 (0x6A). The Set_Attribute_Single and Send_with_Response services include a 16 byte header that specifies parameters for control of the serial interface.
EtherNet/IP Serial Interface (Class 0x68) Send Length This parameter specifies the length of the send data. The maximum number of bytes that can be sent in one message is 470 bytes. Receive Length This parameter specifies the largest amount of receive data the host can accept. It is only effective in the Send_with_Response service. In a Send_with_Response or Get_Attribute_Single reply it indicates the number of data bytes actually included in the message.
Using Ethernet Frame Trailer (Postamble) Flags The Frame Trailer (Postamble) Flags field describes the trailer portion of the serial frame and the processing options. It is only effective in the Send_with_Response service when Framing is enabled in the Receive Flags.
Input (T –>O) Assembly Object (Class 0x04, Instance 0x64) Input (T –>O) Assembly Object (Class 0x04, Instance 0x64) The EtherNet/IP Assembly Object Instance 0x64 defines the Input data message that will be sent from the Ethernet Port to the EtherNet/IP connection originator via an I/O message. the input data buffer is 32 bytes (16 words) and is organized as follows: 16 bits Number of bytes in Serial Output Queue 16 bits Number of bytes in Serial Input Queue 16 bits Time since last byte received (ms) ...
Using Ethernet RSLogix Examples 1. Right-click the 1756-ENBT/A ENBT module under I/O Configuration. 2. Select New Module. 3. From the list of module types, select ETHERNET-MODULE, Generic Ethernet Module. 4. Enter the data as shown below, but with the appropriate IP address and a unique name of your choice. Be sure to select Data - INT in the Comm. Format selection box. This cannot be modified once the module is added.
RSLogix Examples (cont.) RSLogix Examples (cont.) 5. Fill in the Requested Packet Interval field. It is not recommended that you enter a value below 10 ms with the Ethernet Port of NET232/485. An example of I/O data logic is shown below. Rung 6 checks if the number of received bytes is greater than 5 before sending a Get_Attribute explicit message.
Using Ethernet EIPScan Examples In the example below, an “h” is send, followed by a wait of 100 ms for up to 5 bytes of data with an idle timeout of 50 ms. The following settings are for a Class 1 connection. Other screens can be left at default.
TFTP Services TFTP Services The Ethernet Port contains an embedded TFTP server that can be used to update the Ethernet Port firmware. The TFTP server only supports standard TFTP, not Extended TFTP. Free TFTP client software is available at http://www.weird-solutions.com/. When the server requests transmission of a packet, the TFTP client transmits the next packet’s data using the block number of the packet requested for re-transmission.
Appendices Contents Appendix A General Specifications .............................................................................................. A-2 Appendix B Electrical Specifications ............................................................................................ A-4 Appendix C Data Flow Between Ports ......................................................................................... A-6 Appendix D Star Network Topology ...............................................................
General Specifications Appendix A — General Specifications Mechanical Mounting Hole Dimensions: 6.6” (168 mm) x 2.5” (63.5 mm) Full Length: 7.3” (184 mm) Width: 6.3” (160 mm) Height: 2.8” (71 mm) Weight: 1.6 lb. (726 g) Environmental Enclosure: IP65 Humidity: Up to 90% (non-condensing) Operating Tempurature: 0° to 50°C (32° to 122°F) Storage Tempurature: -30° to 70°C (-22° to 158°F) Electrical Power Requirements: 5.1 Watts (max.) w/ Display and Ethernet, 10-28VDC, 200mV p-p max.
Appendices FIS Options MS-Connect 210 with Display: FIS-0210-0001G MS-Connect 210 without Display: FIS-0210-0002G MS-Connect 210 with Ethernet + Display: FIS-0210-0003G CE Mark General Immunity for Light Industry: EN 55024:1998 ITE Immunity Standard EN 61000-6-2:2001 Safety Certifications FCC, UL/cUL, CE, CB, RoHS/WEEE ISO Certification ISO 9001:2000 Certified Quality Management System Issued by TUV USA Inc., Member of TUV NORD Group, Cert. No. 06-1080 © 2007 Microscan Systems, Inc. All rights reserved.
Electrical Specifications Appendix B — Electrical Specifications Power: 55 Watts (max.
Appendices 19-pin Reader Connector Pin + CTS/RTS 1 2 3 4 5 6 7 8 9 10 11 12 13 14 15 16 17 18 19 RTS CTS MS-Connect 210 User’s Manual MS-Connect 210 Host RS-232 + Aux RS-232 + Aux RS-422/485 Output 1 (+) Output 2 (+) Output 3 (+) TX232 RX232 Power/Signal GND Trigger New Master RxD (–) Aux TxD TxD (+) Aux RxD RxD (+) Trigger/New Master/Input Common Output 2 (–) Output 3 (–) Default Input 1 TxD (–) Output 1 (–) Power (+) + Ethernet Rx – Tx + Tx – Rx + A-5
Data Flow Between Ports Appendix C — Data Flow Between Ports The following diagrams demonstrate how data moves between an MS-Connect 210 display, an RS-232 cabled reader, a handheld, a host computer, and the Ethernet gateway.
Appendices Appendix D — Star Network Topology A star network is a local area network (LAN) that directly connects multiple workstations, or nodes, to a central computer. All workstations on the network are indirectly connected to each other through the central computer. Star networks allow multiple workstations to communicate from scattered locations throughout a large physical area. The illustration below shows a simplified model of a star topology.
Interface Standards Appendix E — Interface Standards RS-232 RS-232 defines an interface between two devices such as, for example, the wiring box and a host computer. It differs from the other interfaces by dedicating individual pins to specific functions and by requiring both devices to share a common ground line. Since both device chassis are connected to a common ground, a ground loop potential and the possibility of noise interference exists.
Appendices Appendix F — DIN Rail Mounting The MS-Connect 210 can be mounted on a wall or other vertical surface using Microscan’s DIN Rail Mounting Kit (P/N 98-000093-01). DIN Rail Mounting Kit Includes: Item 1 2 3 4 Qty. 2 2 4 4 Description Mount, Adapter, DIN Rail, MS-Connect 210 Adapter, DIN Rail Screw, 6-32 x 3/8”, Thread Cutting, FH, PHIL, SS Screw, 10-32 x 9/16”, PH, PHIL, SS 3 Part Number 10-000247-01 12-000298-01 12-000303-01 12-000302-01 4X 1 2 2X 2X 1.
Glossary of Terms Appendix G — Glossary of Terms Aux RS-232—The connection between a reader’s auxiliary port and a host. The MS-Connect 210 passes the RS-232 signal through, creating a condition in which the host’s RX/TX is connected directly to the reader. Baud Rate—The number of discrete signal events per second. Bits per second. Connector—Physical device (plug or socket) on a device or cable to provide in/out connectivity for various circuits and pins.
Appendices Opto-isolation—The transfer of signals between elements of a circuit (typically a transmitter and receiver) while keeping the elements electrically isolated. An example of opto-isolation is the relationship of an LED and a light sensor, separated from each other so that light can travel across a barrier but electrical current cannot. Output—A channel or communications line. The data or discrete signals that are transmitted or displayed by a device.
Glossary of Terms A-12 MS-Connect 210 User’s Manual
Hyperlink Index A About This Manual Accessories Appendices Aux RS-232 B Baud Rate Beeper Characteristics at Power-On C CE Mark CGBs Check Required Hardware COM Port Communicating with Readers via TCP/IP Communication Protocols Configurable Ethernet Port Parameters Configuration Assembly Object Configure Output Settings Configure the Connected Reader Configure the Display Configuring the Ethernet Port Configuring the Outputs and Beeper Configuring the Relays Connect the System Connecting a 10-28 Volt Reade
D D Data Bits Data Field Data Flow Between Ports Data Initiated from an MS-Q Data Initiated from Ethernet Data Initiated from Host Data Initiated from Reader Decode Dimensions DIN Rail Mounting DIN Rail Mounting Kit Disclaimer Discrete I/O Display Communication Dip Switches Downloading ESP from the Web E EIPScan Examples Electrical Specifications Environmental Specifications Ethernet Interface Standard Ethernet Port Configuration Tools Ethernet Port Custom Features Ethernet Port Operation EtherNet/IP Cust
H Index H Hardware Required for Multidrop or Daisy Chain Configuration Hardware Required for Stand-Alone Configuration Host Host Cable Host RS-232 Host RS-422 I Indicators Input Input Assembly Object Inputs / Outputs Install ESP Installing ESP from the Microscan Tools CD Interface Standards IP Address J Jumpers K Key Features of the MS-Connect 210 L LED Limitation of Liability M MAC Address Master Symbol Matchcode Mechanical Specifications Micro-Change MS-3 MS-3 CCD MS-4 MS-820 MS-860 MS-890 MS-Conne
N MS-9 MS-Connect 210 Multidrop and Daisy Chain Configurations N Network Parameters New Master New Model No Read Normally Closed Normally Open O Opto-isolation Output Output 1 Output 2 Output 3 Output Assembly Object P Parity Pluggable Relay Modules Port Postamble Processing Postamble Status Postamble String Power Requirements Power Supply Cable Powering Additional Readers from the Terminal Blocks Power-On the System Product Labels Protocol Q Quadrus EZ Quadrus MINI Quadrus MINI 3 Quadrus Verifier 4 M
R Index R Read Cycle Reader Connector (19-Pin) Receive Flags Receive Idle Timeout Receive Idle Timeout (Intercharacter Receive Timeout) Receive Length Receive Timeout (Total Receive Timeout) Relay Module Options K1 - K3 RoHS RS-232 Interface Standard RS-422 Interface Standard RS-485 Interface Standard RSLogix Examples S Safety Certifications Select and Identify the MS-Connect 210 Select Reader Model and Connect Send Flags Send Length Send Postamble Serial Configuration Serial Port Parameters Serial UART
T T Table of Contents TCP Port TCP/IP Telnet Configuration Terminal Block Terminal Blocks J2 - J5 Terminal Blocks Max.