
User's Manual


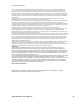
Table Of Contents

Helios Installation Guide
© 2012 MicroPower Technologies, Inc. 32
VI. Adjusting the Camera Image
Camera Lens Close-up View
1. While viewing the camera image through the Video Management System (VMS)
camera image window, adjustments can be made to the camera’s zoom, iris or
focus.
2. Open the camera housing using the safety latch at the rear of the unit. The
camera imager is located just behind the glass housing window.
2.1 To adjust focal length (zoom), loosen the focal length locking knob counter-
clockwise. Rotate the focal length adjustment ring at the rear of the lens (the
ring, not the knob) to adjust.
2.2 To adjust iris, turn the iris lock knob counter-clockwise to release. Slide the
iris locking knob to the right or left to set. (The “O” open setting is best for
achieving good low light camera performance.)
2.3 To focus, turn the focus lock knob counter-clockwise to unlock. Rotate the
focus adjustment ring at the front of the lens to adjust.
Typically both focus and zoom will need to be adjusted at the same time to
achieve the desired field of view. Lock knobs need only be lightly tightened
to hold the lens settings in place.
2.4 After the imager adjustments have been completed, close the camera
housing and lock the latch into place.
After this step, setup is complete and the wireless camera is ready for use.
Iris Lock/adjustment
Focus Lock
Focal Length
(zoom) Lock
Focal Length
(zoom) Adjustment
Focus
Adjustment
Ring