
User's Manual


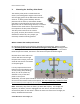
Table Of Contents

Helios Installation Guide
© 2012 MicroPower Technologies, Inc. 30
V. Mounting the Auxiliary Solar Panel
The auxiliary solar panel is included with the
camera, and is designed to augment the built-in
solar charging system of the MicroPower wireless
cameras. It offers greater flexibility with the
placement of the camera, and enables reliable
operation in install locations that may have lower
light levels such as: North facing cameras, or northern
climates where snow and ice may impact the long-
term operation of solar powered devices.
The solar panel connects to the camera
very easily, and may be secured to a variety
of different surfaces by a very simple, yet
extremely versatile mounting bracket.
Where to Mount the Auxiliary Solar Panel:
For mounting locations in the Northern Hemisphere (United States, Mexico, Canada,
etc.) The Solar panel should be mounted with the glass facing SOUTH, and angled such
that it will capture the most winter sun possible during the daylight hours. The farther
North the panel is located, the lower in the horizon the panel should be angled.
Climates where snow and ice are
a factor will also need to angle
the panel more sharply, such that
snow will not tend to accumulate
on the panel glass.
It is very important that care is
taken to ensure that objects such
as trees, utility poles, buildings,
wires, etc. do not create any
shadows on any of the solar
panels in the system.
Additionally, the solar panel should be mounted such that shadows created by the panel
do not cover the camera’s built-in solar panels, but most importantly, shadows created
by the camera (or other objects) do not impact the larger auxiliary solar panel.
Note: The battery ships from the factory at about 40% capacity. For storage and
shipment, the battery remains unplugged from the camera, and will need to be
connected to power on the camera. When the camera is stored out of sunlight, the
battery should be disconnected.