
User's Manual

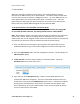


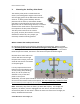
Table Of Contents

Helios Installation Guide
© 2012 MicroPower Technologies, Inc. 29
IV. Mounting the Camera
When mounting the camera, it should be placed in an area which receives an
adequate amount of direct sunlight throughout the day. Ideally the camera should
be placed on the south side of the mounting location, and pointed in the desired
direction. Next best choices are mounting to the east or west sides, with a North
facing mount orientation considered last. This practice will maximize the benefit of
the built-in solar panels. The included auxiliary external solar panel will provide
most of the charge, with the built-in panels assisting. It is critical that the external
solar panel be mounted correctly, facing the right direction for the camera to run
successfully, long-term.
(Instructions for mounting the panel are covered in the next section)
For easiest mounting of the camera, we suggest the following steps.
1. Remove the rotating/pivoting camera hinge from the bracket, by removing
the single center Phillips screw that holds it in place.
2. Attach the rotating/pivoting bracket to the camera housing, and position it
such that the camera is weight balanced and the bracket is tightened.
3. Mount the arm bracket to the desired location. Self-tapping screws, or
stainless steel “worm drive hose clamps” work very well for this purpose.
4. Place the camera housing on the secured bracket. If the camera is balanced,
and the bracket tightened, it will take very little effort to hold it in place
while attaching the center screw that holds the camera in place.
5. Aim the camera and tighten the screw, securing the rotating/pivoting bracket
to the camera arm bracket.
6. Make final adjustments to the angle and rotation position of the camera,
zoom and focus if required.
After securely tightening the screws, the locking ridges in the mounting bracket will
hold the camera securely in position after it is installed.