User’s Manual 11n Wireless LAN USB Adapter Model No.: SP907NL http://www.micronet.
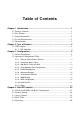
Table of Contents Chapter 1 Introduction................................................................................. 1 1.1 Package Contents .......................................................................................... 1 1.2 Key Features ................................................................................................. 1 1.3 Safety Information ........................................................................................ 2 1.4 System Requirements....................
4.6 Statistics ...................................................................................................... 40 4.7 About........................................................................................................... 41 Chapter 5 Troubleshooting ....................................................................... 43 Chapter 6 Glossary ....................................................................................
Chapter 1 Introduction Micronet SP907NL, 11N Wireless LAN USB Adapter, delivers next generation high speed at a more economical and affordable price tag. It is easily implemented for medium-sized business to allow immediate access to high speed wireless experience. It is compliant with IEEE 802.11n and backward compatible with IEEE 802.11b/g. The USB adapter supports MIMO (Multi-In, Multi-Out) technology, which uses 1T1R (1 transceiver, 1 receiver) to enhance data rate and wireless coverage.
y WPS configuration for easier connection between adapter and AP/router. Enable connection via pushing a button or entering an 8-digit code. y Support the commonly available interface USB 2.0 to allow convenient installation. 1.3 Safety Information In order to keep the safety of users, please read through the following safety instructions: y This USB Adapter is designed for indoor use only. y Do not put this device at or near hot or humid places.
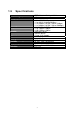
1.5 Specifications Standards Interface Frequency Band Data Rate Output Power Security LED Indicators Antenna MIMO Technology Humidity Temperature Operating System Emission IEEE802.11b/ 802.11g / 802.11n USB 2.0/1.1 2.4000 ~ 2.4835GHz z 11b: 1/2/5.5/11Mbps z 11g: 6/9/12/24/36/48/54Mbps z 11n (20MHz): MCS0-7 (up to 72Mbps) z 11n (40MHz): MCS0-7 (up to 150Mbps) z 11n: 14dBm±1.5dBm z 11g: 14dBm±1.5dBm z 11b: 17dBm±1.
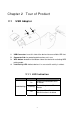
Chapter 2 Tour of Product 2.1 USB Adapter 1. USB Connector: insert this side of the device into an available USB slot. 2. Connector Cab: for protecting device when not in use. 3. WPS button: located on the bottom side of the device for activating WPS pairing mode. 4. Link/Activity LED: indicate device is in use or traffic activity is evident. 2.1.
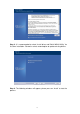
Chapter 3 Configuration 3.1 Drivers Installation Step 1. Gently insert the USB adapter into an available USB slot. The following message will appear, please press . Step 2. Insert driver CD into the CD/DVD ROM drive of the computer, and execute ‘Setup.exe’ program in ‘Utility’ folder. Read through the License Agreement and select ‘I accept the terms of the license agreement’ then press to proceed.
Step 3. It is recommended to select ‘Install driver and Ralink WALN Utility’ for first-time installation. Otherwise select second option to update existing drivers. Step 4. The following windows will appear, please press on ‘Install’ to start the process.
Step 5. Click to complete the driver installation process. 3.2 Operating Configuration Utility After installation is complete, wireless configuration utility will be shown as an icon at the lower-right corner of the windows desktop. Click on the icon using right mouse key and select .
Step 1. Configuration utility will scan for available wireless access points automatically. Please select an access point to connect, and click . If the AP you wish to connect is not in the list, please press to renew the interface. Some function includes more information, and can not be fitted in setup area.
3.2.1 Scan for Other Wireless Devices There are two kinds of wireless connection mode: Infrastructure and Ad-Hoc. Infrastructure mode is used by wireless access points, which is able to establish wireless connection for you and other wireless/wired network clients.
y If the wireless device uses encryption, the user must know its encryption key in order to connect. Please launch utility and it will scan for wireless access points near by: Parameter SSID Description The SSID of the wireless access point or wireless device selected by user will be displayed here. When the SSID of access point or wireless device is not available, users have to input it here manually.
If users cannot see the access point, please click ‘Rescan’ button to scan for access point again, until the one preferred is displayed on the interface. Users may have to click ‘Rescan’ for more than two times before the access point wish to connect appears. If user still cannot see the access point after clicking ‘Rescan’ for more than five times, please move the computer closer to the wireless access point.
Step 1. Click the wireless access point or network device to connect, it will be highlighted, then click on ‘Connect’. If the access point selected does not use encryption, it will connect to this device within one minute. If the access point selected uses encryption, please proceed to step 3. Step 2. If the wireless access point does not have SSID, user will be prompted to input it in the field provided.
Step 4. Please ask the owner of the wireless access point for the security information, and input the correct key here and then click on ‘OK’. By checking ‘Show Password’ box, the encryption key inputted here will be displayed. Authentication type will be selected by the access point automatically, please do not change it. However, if the user connecting to an access point uses 802.1x authentication, they will be required to check ‘802.1x’ box and input related information. Step 5.
3.2.3 Add Access Point to Profile If users connect to some specific wireless access point frequently, they can add their information to the profile. Just like the telephone directory, the profile saves all information of access points, and user can recall them anytime. User can add an access point in the ‘Network’ tab to profile, or input all information of an access point manually.
Parameter Profile Name SSID Network Type Tx Power Preamble Channel Power Save Mode RTS Threshold Fragment Threshold Description User can give this profile a name. Every profile needs a unique name. Please input the SSID of this access point. If user selected an access point from the list, and SSID is not hidden, it will be filled automatically. However, user can modify the SSID if necessary. Please select the network type: Ad hoc or Infrastructure.
Parameter Authentication Encryption WPA Preshared Key Show Password Use 802.1x Description Select the authentication type of the wireless access point or wireless device in this field. When users are adding a profile from an existing access point or wireless device, authentication type will be selected automatically. Select the encryption type of the wireless access point or wireless device in this field.
Parameter EAP Method Tunnel Authentication ID \ Password Tab Client Certification Tab Server Certification Tab Description Select ‘802.1x EAP method’ from dropdown menu. Please ask the administrator of the access point for the correct EAP method. Select 802.1x tunnel authentication type from dropdown menu. Please ask the administrator of the access point for correct tunnel authentication method. This pull down menu is only available when authentication type is 'PEAP', ‘TLS / Smart Card', or 'TTLS'.
3.2.4 Using Windows Zero Configuration Windows XP and Vista has a built-in wireless network configuration utility, called ‘Windows Zero Configuration’ (WZC). Users can also use WZC to configure the wireless network parameter. Step 1. Right-click on configuration utility icon and select
Step 3. Click . Step 4. Right-click ‘Wireless Network Connection’ (it may have a number as suffix if you have more than one wireless network card, please make sure you right-click the ‘802.11n Wireless LAN Card), then select ‘View Available Wireless Networks’. Step 5. All wireless access points within proximity will be displayed here.
to the access point. Otherwise, users can press refresh button to rescan access points. Select the access point if it’s shown, then click . Step 6. If the wireless access point uses encryption, users will have to input the correct WEP passphrase or WPA pre-shared key. Ensure both the AP and PC is set with the same WEP passphrase/WPA pre-shared key. Otherwise the wireless connection will fail to establish.
3.2.5 Profile Management If users need to connect to different wireless access points at different time, they can store the connection parameters (encryption, passphrase, security etc, etc.) as a profile for every access point. Click the ‘Profile’ menu and all profiles will be listed in ‘Profile List’. Users can select a profile from the list and all information about selected profile will be listed.
Add a Profile If users want to create new profile, click ‘Profile’ menu, then press ‘Add’ button. The interface will prompt the user to input detailed information of access point.
If users have added a profile before, and they wish to change the content of the profile, they can use this function. Please select a profile from the list, and then click on ‘Edit’ button. The interface will provide contents of selected profile for editing. Click on ‘OK’ to save changes, or click ‘Cancel’ to discard changes. Delete an Existing Profile If users no longer need a profile, they can delete it via this function.
Activate a Profile When users want to connect to a specific wireless device in the profile list, they can select it and click ‘Activate’ button to establish connection.
When a profile is selected and click on ‘Activate’ button, an icon will be displayed in front of the profile to show that the connection has failed. When the connection is successfully established, an icon will be displayed. 3.2.6 Advanced Settings This wireless network card provides several advanced settings for experienced wireless users. Users can change these settings to increase data transfer performance or change operation mode.
Enable Cisco Compatible eXtensions. CCX is a wireless feature developed by Cisco used to improve the wireless performance with CCX compatible wireless devices. Check this box if the users need to connect to CCX-compatible wireless devices. When CCX is enabled, the following setup items will become available: ¾ Enable CCX ¾ ¾ Turn on CCKM: Check this box to enable CCKM (Cisco Centralized Key Management), which enables wireless clients to roam between CCKM-enabled access points in very short time.
3.2.8 WMM Setting This wireless network card provides WMM (Wi-Fi Multimedia) function, which can improve the performance of certain network applications, like audio/video streaming, network telephony (VoIP), and others. When the users enable the WMM function of this network card, they can define the priority of different kinds of data to give higher priority to applications which require instant response.
3.2.9 WPS Configuration Wi-Fi Protected Setup (WPS) is the latest wireless network technology, which makes wireless network setup become very simple. The user doesn’t have to configure the wireless access point and setup data encryption when devices support WPS. This wireless network card is compatible with WPS. To use this function, the wireless access point must also support WPS function. Please follow the following instructions to establish secure connection between WPS-enabled devices.
All access points with WPS function enabled will be displayed here. Please make sure the access point users wish to connect is displayed. If not, please click ‘Rescan’ few more times. The user can also click ‘Information’ button to see the detailed information about selected access point. Step 3.
Users can click ‘PBC’ button few more times to try again. When an access point is connected, users can click ‘Disconnect’ to disconnect your wireless network card from a connected access point. Users can also click ‘Rotate’ button, and next access point on the list will be selected to establish connection. WPS Setup – PIN The PIN code of the wireless network card is an eight-digit number located at the upper-right position of configuration utility.
Parameter WPS associate IE WPS probe IE Auto Description Check this box to send the association request with WPS IE during WPS setup. Check this box to send the WPS probe request with WPS IE during WPS setup. When in PIN mode, wireless access point to be connected will be selected automatically if this box is checked. 3.2.
3.2.11 About The ‘About’ tab provides the information about version number of the configuration utility, driver, and other important information about the wireless network card.
Chapter 4 Soft-AP Function Besides becoming a wireless client of other wireless access points, this wireless card can also act as a wireless service provider. Users can switch this wireless card’s operating mode to ‘AP’ to simulate the function of a real wireless access point by software and even sharing the internet connection. Please follow the instructions in following chapters to use the AP function of the wireless card. 4.
If the computer has another network card which is connected to Internet, please select it from ‘Name’ dropdown menu, and click ‘Enable ICS’. If your computer does not have another network card with Internet connection, please click ‘Not enable ICS’. After clicking on ‘Enable ICS’ or ‘Not enable ICS’, the user will see the basic configuration menu of the AP function.
Parameter SSID Channel Wireless Mode Use Mac Address Security Setting Description Please input the SSID (the name used to identify this wireless access point) in this field. Up to 32 numerical characters can be accepted here excepting space. Please select the wireless channel to use for the environment. The number of channels available here will vary depending on the setting of ‘Country Region Code’. Select the operation mode of the access point in this field.
Please select the country code of the country or region.
Parameter Authentication Type Encryption Type WPA Pre-shared Key Group Rekey Interval Description Please select a wireless authentication type to use. Available options are ‘Open’, ‘Shared’, WPA-PSK’, ‘WPA2-PSK’, and ‘WPA-PSK / WPA2-PSK’. If users want to disable wireless data encryption, please select ‘Open’. Please select an encryption mode. The available options in this setting item will vary depending on the authentication type selected.
Please input the WEP encryption key in this field when ‘WEP’ is selected. There are 2 types of WEP key: Hex (number 0 to 9, and ASCII characters A to F) and ASCII (all alphanumerical characters plus symbols). Please select the type of WEP key first, and then input the WEP key according to the type of WEP key selected. WEP Key Show Password If users want to use WEP 64 bits encryption, please input 10 characters for HEX and 5 characters for ASCII.
Parameter Description Select the policy type of your access rule. ¾ Access Policy MAC address Add Delete Remove All Disable: Allow any wireless client with proper authentication settings to connect to this access point. ¾ Allow All: Only allow wireless clients with MAC address listed here to connect to this access point. ¾ Reject All: Reject wireless clients with MAC address listed here to be connected to this access point. Input the MAC address of the wireless client you wish to allow or reject here.
Parameter MAC Address AID Power Saving Mode Status 4.5 Description Displays the MAC address of this wireless client. The serial number of this wireless connection. Displays the capability of power-saving function of this wireless client. Displays additional information of this wireless Connection, like current wireless operating mode and data transfer rate. Event Log This software access point will log all wireless-related activities as a log.
4.7 About The ‘About’ tab provides the information about version number of the configuration utility, driver, and other important information about the wireless access point.
42
Chapter 5 Troubleshooting If users encounter any problem when using this wireless network card, consult this section for possible solutions. Before calling the dealer of purchase for help, please check this troubleshooting table, the solution towards the problem could be very simple. Scenario Solution 1. I can’t find any wireless access point / wireless device in ‘Site Survey’ function. 2. 3. 4. 1. Nothing happens when I click ‘Launch config utilities’. 2. 3. 4. 1. 2. 3.
Chapter 6 Glossary 1. What is the IEEE 802.11g standard? 802.11g is the new IEEE standard for high-speed wireless LAN communications that provides up to 54 Mbps data rate in the 2.4 GHz band. 802.11g is quickly becoming the next mainstream wireless LAN technology for the home, office and public networks. 802.11g defines the use of the same OFDM modulation technique specified in IEEE 802.11a for the 5 GHz frequency band and applies it in the same 2.4 GHz frequency band as IEEE 802.11b. The 802.
z RTS/CTS Feature z Fragmentation z Power Management 4. What is Ad-hoc? An Ad-hoc integrated wireless LAN is a group of computers with their own Wireless LAN Card connecting as an independent wireless LAN. Ad hoc wireless LAN is applicable at a departmental scale for a branch or SOHO operation. 5. What is Infrastructure? An integrated wireless and wired LAN is called an Infrastructure configuration.
9. What is AES? AES (Advanced Encryption Standard), a chip-based security, has been developed to ensure the highest degree of security and authenticity for digital information, while making more efficient use of hardware and/or software than previous encryption standards. It is also included in IEEE 802.11i standard. Compare with AES, TKIP is a temporary protocol for replacing WEP security until manufacturers implement AES at the hardware level. 10.
13. What is Spread Spectrum? Spread Spectrum technology is a wideband radio frequency technique developed by the military for use in reliable, secure, mission-critical communication systems. It is designed to trade off bandwidth efficiency for reliability, integrity, and security.
16. What is GI? GI stands for Guard Interval. It’s a measure to protect wireless devices from crossinterference. If there are two wireless devices using the same or near channel, and they are close enough, radio interference will occur and reduce the radio resource usability. 17. What is STBC? STBC stands for Space-Time Block Coding, which is a technique used to transfer multiple copies of data by multiple antenna, to improve data transfer performance.