
Manual

EP1000A E-Port Instruction Manual
16 Installation
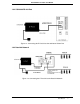
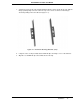
4. Use the remaining two screws to attach the second clip to the flange of the second bracket.
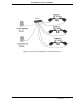
These assemblies should appear as illustrated in Figure 2-2.
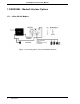
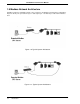
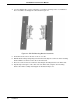
5. On the E-Port unit, remove the two screws on one side.
6. With the bracket flange facing away from the E-Port unit, align the screw holes in the mounting
bracket with the screw holes in the side of the E-Port unit.
7. Place the screws in the holes and fasten, attaching the mounting bracket to the E-Port unit.
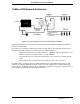
8. Repeat Steps 5 through 7 on the other side of the E-Port unit, using the other mounting
bracket. The final assembly should appear as illustrated in Figure 2-3.
Figure 2-2. DIN Rail Mounting Bracket Assemblies