INSTRUCTION MANUAL Single Loop Controller 53SL6000 53SL6000 CONTROLLER PN24991A Rev.
MicroMod Automation, Inc. The Company MicroMod Automation is dedicated to improving customer efficiency by providing the most ost-effective, application-specific process solutions available. We are a highly responsive, application-focused company with years of expertise in control systems design and implementation. We are committed to teamwork, high quality manufacturing, advanced technology and unrivaled service and support.
Table of Contents 53SL6000 Instruction Manual Table of Contents Safety Summary I Read First II 1.0 Introduction 1-1 1.1 53SL6000 Controller Overview . . . . . . . . . . . . . . . . . . . . . . . . . 1-1 1.2 Controller Model Numbers . . . . . . . . . . . . . . . . . . . . . . . . . . . 1-3 1.3 Product Specifications . . . . . . . . . . . . . . . . . . . . . . . . . . . . . 1-3 2.0 Installation and Power-Up Procedures 2-1 2.1 Inspection . . . . . . . . . . . . . . . . . . . . . . . . 2.
53SL6000 Instruction Manual Table of Contents 3.5 Engineer Mode . . . . . . . . . . . . . . . . . 3.5.1 Engineer Mode Display Panel . . . . . . . 3.5.2 Engineer Mode Hierarchical Structure . . . . 3.5.2.1 Editing a Parameter . . . . . . . 3.5.2.2 Deselecting and Scrolling Backward 3.5.2.3 Editing a Numeric Value . . . . . 3.5.2.4 Editing the Tag Parameter . . . . 3.6 Entering a Pass-Key . . . . . . . . . . . . . . . 3.6.1 Configuring a Pass-Key . . . . . . . . . . 3.7 Offline Display Pattern . . . . . . .
Table of Contents 53SL6000 Instruction Manual 7.0 Control Scheme Block 7.1 7.2 7.3 7.4 7.5 7.6 7.7 7.8 7-1 Control Scheme Block . . . . . . . . . . . . . . . . . . . . . . . . Control Scheme Inputs . . . . . . . . . . . . . . . . . . . . . . . . Control Scheme Control Signals . . . . . . . . . . . . . . . . . . . . Signal Paths for the SnGL, cASc, L.LiM, and h.LiM Control Schemes . . . . 7.4.1 Setpoint (SP-PV) Paths for the SnGL, cASc, L.LiM, and h.LiM Control 7.4.2 PID Paths for the SnGL, cASc, L.
53SL6000 Instruction Manual Table of Contents 8.5 Single Station Cascade Control . . . . . . . . . . . . . 8.5.1 AI1 - Secondary PV Input . . . . . . . . . . . . 8.5.2 AI2 - Primary PV Input . . . . . . . . . . . . . 8.5.3 DO1 - Secondary PV High Alarm Contact Out . . . 8.5.4 DO2 - Secondary PV Low Alarm Contact Out . . . 8.5.5 DI1 - Force Control Output Contact Input . . . . . 8.5.6 DI2 - Cascade Enable Contact Input . . . . . . . 8.5.7 Primary Output (the Setpoint into the Secondary Loop) 8.5.
Table of Contents 9.8.3.11 9.8.3.12 9.8.3.13 9.8.3.14 53SL6000 Instruction Manual PidL Response cM Response . cASc Response oVr Response . . . . . . . . . . . . . . . . . . . . . . . . . . . . . . . . . . . . . . . . . . . . . . . . . . . . . . . . . . . . . . . . . . . . . . . . . . . . . . . . . . . . . . . . . . . . . 9-8 9-8 9-8 9-8 Appendix A: Glossary A-1 Appendix B: Maintenance and Parts List B-1 B.1 B.2 B.3 B.4 Overview . . . . . . . . . . . . . . . . . . . . . . . .
53SL6000 Instruction Manual Table of Contents List of Tables Table 1-1. 53SL6000 Model Numbers . . . . . . . . . . . . . . . . . . . . . . . . 1-3 Table 2-1. Controller Status Codes . . . . . . . . . . . . . . . . . . . . . . . . . 2-8 Table Table Table Table 3-1. 3-2. 3-3. 3-4. Operator Mode Display Items . Setpoint Up/Down Push Buttons oPEr Menu Selections . . . . Operator Enable (oPr) Prompts . . . . . . . . . . . . . . . . . . . . . . . . . . . . . . . . . . . . . . . . . . . . . . .
Table of Contents 53SL6000 Instruction Manual List of Figures Figure 1-1. 53SL6000 Controller . . . . . . . . . . . . . . . . . . . . . . . . . . . 1-2 Figure Figure Figure Figure Figure Figure Figure Figure Figure Figure Figure Figure Figure Figure 2-1. Panel Cutout and Installation . 2-2. Power Plug . . . . . . . . 2-3. 24 V DC Power Connections . 2-4. AC Power Connections . . . 2-5. Signal Plug . . . . . . . . 2-6. Signal Plug Connections . . . 2-7. Universal Analog Input Module 2-8.
53SL6000 Instruction Manual Table of Contents Figure Figure Figure Figure Figure Figure 7-16. 7-17. 7-18. 7-19. 7-20. 7-21. Auto Digital Output Path . . . . . . . . . . . . in.Ld Control Scheme Alarmed Variable Input . . . in.Ld Control Scheme Auto Input with Digital Output in.Ld Control Scheme Output Tracking . . . . . . in.Ld Control Scheme Manual Operation . . . . .
Safety Summary GENERAL WARNINGS Electric Shock Hazard During Maintenance Disconnect power or take precautions to ensure that contact with energized parts is avoided when servicing. Input Connector Shock Hazard Instruments powered from an ac line source may cause input connectors to have power even though the controller is powered off. Safety Hazard Substitution of or modification with improper replacement components may impair the safety of this device.
53SL6000 INSTRUCTION MANUAL READ FIRST WARNING INSTRUCTION MANUALS Do not install, maintain, or operate this equipment without reading, understanding and following the proper MicroMod Automation Inc. instructions and manuals, otherwise injury or damage may result. Read these instructions before starting installation; save these instructions for future reference. Contacting MicroMod Automation Inc. Should assistance be required with any MicroMod Automation Inc.
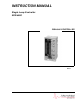
Section 1. Introduction 53SL6000 Instruction Manual 1.0 Introduction • • 1.1 53SL6000 Controller Overview The 53SL6000 controller is a functionally robust instrument capable of performing any one of many control strategies.
53SL6000 Instruction Manual Section 1. Introduction Figure 1-1.
Section 1. Introduction 53SL6000 Instruction Manual 1.2 Controller Model Numbers Physical Characteristics The 53SL6000 controller model numbers are described in Table 1-1. Weight < 1.5 kg (3 lb 5 oz) Front Dimension 72 x 144 mm (2 53/64 x 5 43/64 in) Overall Length With Option Modules - 130.8 mm (5.15 in) Table 1-1.
53SL6000 Instruction Manual Section 1. Introduction Thermal Shock (storage/transport) ± 66°C/hr ( ± 150.8° F /hr) Physical Shock (operation) 15 g 1/2 sine, 11 ms Physical Shock (storage/transmit) ASTM D4169, DC1 Vibration point-to-point constant displacement (operation) 0.76 mm, 5 to 14 Hz 0.3 g, 14 to 200 Hz Vibration (storage/transport) ASTM D999 B 3-100 Hz 0.5 g Voltage Range 24 V to 26 V Corrosion ISA S71.04, airborne contaminates G3 for 10 years. Ripple ≤ 200 mVp-p ESD IEC 801-2 8.
Section 1. Introduction 53SL6000 Instruction Manual Input Ranges (cont) Analog Output 1 RTD - 3 or 4 wire connection (see list) Thermocouple (see list) (referenced to power common) High/Low Level Input Specifications Number 1 Rated Signal Range 0/4 to 20 mA Control Range 0 to 21.5 mA No-Load Voltage ≤ 24 V Load Range 0 to 750 ohms Filter Time Constant 50 ms Output Measurement Error ≤ ± 0.02 mA Temperature Effects ≤ ± 0.
53SL6000 Instruction Manual (-320° to 1560° F) Copper RTDs Copper 10 Ohm RTD α = 0.00427 -200° to +260° C (-320° to 500° F) Copper 53 Ohm RTD α = 0.00427 -50° to +150° C (-55° to 300° F) Copper 100 Ohm RTD α = 0.00427 -100° to + 260° C (-150° to 500° F) Nickel RTDs Nickel 100 Ohm RTD α = 0.00618 -60° to +180° C (-80° to 350° F) Section 1.
Section 1. Introduction 53SL6000 Instruction Manual cal 24 V/4 A ohmic Amp switching operations Spark Suppressor In series 5nF/51 ohm with varistor 420 Veff in parallel Electrical Isolation 1000 V contact coil 1000 V contact-contact 1000 V between relays CPU Cycle Time Input Sample Rate 50 ms Output Update Rate 50 ms Display Update Rate 50 ms Control Ranges Proportional (P) 1000% - 2% Integral (I) 200 min/repeat - 0.02 min/repeat, 0 is off. Derivative (D) 8 min - 0.
Section 2. Installation and Power-Up Procedures 53SL6000 Instruction Manual 2.0 Installation and Power-Up Procedures 2.1 Inspection rear of the controller so that it butts against the display flange. This step is optional and not required. The applicable option modules can be installed before each controller is mounted in the panel cutout, or after mounting.
53SL6000 Instruction Manual 2-2 Section 2. Installation and Power-Up Procedures Figure 2-1.
Section 2. Installation and Power-Up Procedures 53SL6000 Instruction Manual 3. Connect the chassis safety ground lug of the power plug to the ground wire. NOTE: DO NOT APPLY POWER TO THE CONTROLLER. (Applying power is performed in Section 2.9.) 2.4.2 AC Power Connections Figure 2-2. Power Plug 2.4.1 24 V DC Power Connections Figure 2-4. AC Power Connections Refer to Figure 2-4 to make the following connections: 1. For 110/120/220 V ac, connect the phase and neutral inputs to the power plug.
53SL6000 Instruction Manual Section 2. Installation and Power-Up Procedures 2.5.1 Analog Inputs AI1 and AI2 In Figure 2-6, AI1 is connected to a transmitter that requires power from the controller. Both, AI1 and/or AI2 can be connected to transmitters that require controller power provided the total required power does not exceed the specifications stated for the transmitter supply in Section 1.3.
Section 2. Installation and Power-Up Procedures 2.6 Universal Analog Input Module This information applies to only those controllers with an optional universal analog input module. 2.6.1 Universal Analog Input Module Backplane Installation Figure 2-7 illustrates the universal analog input module location on the controller backplane. The universal input module is socket mounted and is secured to the backplane with two screws.
53SL6000 Instruction Manual Section 2. Installation and Power-Up Procedures 2.7 2DI/2DO Module This information applies to only those controllers with the optional 2DI/2DO module. 2.7.1 2DI/2DO Backplane Installation Figure 2-9 illustrates the 2DI/2DO module location on the controller backplane. The 2DI/2DO module is socket mounted and is secured to the backplane with two screws.
Section 2. Installation and Power-Up Procedures Signal input connections for the 2DO six terminal plug are illustrated in Figure 2-11. Both, DO1 and DO2 are Form C relays. The contact load capacities are 250 V ac or 250 V dc maximum switching voltage; 5 A switching current; 1250 VA-ac maximum, and 30 W at 250 V-DC maximum or 100 W at 24 V-DC maximum switching power. 53SL6000 Instruction Manual 2.8.1 RS-232 Plug Connections Signal connections to the RS-232 module plug are illustrated in Figure 2-13.
53SL6000 Instruction Manual Section 2. Installation and Power-Up Procedures controller powers up in the last state it was in before power was removed. 2.9.1 Power-up Sequence The power-up sequence is as follows: 1. 2. At power-up, the controller performs a poweron self test which includes lighting all faceplate LEDs for three seconds to show they are working. After completing the power-on self test, status information is presented in the dros.
Section 3. Display Panel 53SL6000 Instruction Manual 3.0 Display Panel 3.1 Display Panel Overview As shown in Figure 3-1, the controller display panel contains three digital read-out (dro) fields, two vertical bar indicators, twelve function specific status indicators, and seven push buttons (pbs). The display panel is used to alter controller settings (which in turn affect process operation), to monitor process operation, and to configure controller functionality.
53SL6000 Instruction Manual Item/LED Off 8-R 9-L 3 - A1 4 - A2 24 - Watchdog 21 - Loop 1 22 - Loop 2 23 - EasyTune 14 - Auto 15 - Manual 18, 19 MS1, MS2 Item Section 3. Display Panel On BlinkDescription ing X Remote/Ratio. X Remote requested, but not granted (Remote Enable [RE] not true). X Local Setpoint. X Setpoint is tracking the SP tracking signal. X No alarm. X Alarm active. X Normal operation. X Out of service. X Loop 1 selected (cASc, L.LiM, h.LiM). X Loop 2 selected (cASc, L.LiM, h.LiM).
Section 3. Display Panel Table 3-1. Operator Mode Display Items Item 1 Call-Out PV dro 2 PV bar 3 PV Alarm 1 Status 4 5 6 7 PV Alarm 2 Status Setpoint dro Setpoint bar R/L Push Button 8 Remote Setpoint Status 9 Local Setpoint Status 10 Setpoint Up Push Button Description It is the process variable value in engineering units. It indicates the process variable percent of control range. When active, it indicates alarm 1 of the selected alarm index limits (e.g.
53SL6000 Instruction Manual Section 3. Display Panel Table 3-1. Operator Mode Display Items Item 20 21 22 23 24 Call-Out Description Select Mode Pressing this push and Loop 1/2 button in operator Push Button mode with an active two loop control scheme (cASc, L.LiM, or h.LiM) selects the loop under display panel control. It toggles from one loop to the other each time it is pressed. If this push button is held for three seconds, it causes engineer mode to be entered.
Section 3. Display Panel 53SL6000 Instruction Manual 3.5 Engineer Mode 2. The controller parameters and path connections are configured in engineer mode. Engineer mode is also used to initiate the Easy-Tune sequence (see Section 9.8). This mode is entered when the mode push button is held pressed for an extended period of approximately 3 seconds, at which time the oPEr menu prompt appears in the green dro. 3. 3.5.
53SL6000 Instruction Manual Section 3. Display Panel NOTE 1: There is a 12.5 second time-out that occurs if a parameter prompt is not selected in engineer mode. NOTE 2: oPEr and conF parameter changes take affect immediately. If a ProG menu parameter is edited, the controller goes to the offline condition in which no control action is performed. 3.5.2.
Section 3. Display Panel Figure 3-6. Deselecting and Scrolling Backward 53SL6000 Instruction Manual Figure 3-8. Moving the Red dro Decimal Point 3.5.2.4 Editing the Tag Parameter The tAG is one parameter where an alphanumeric, rather than a numeric, can be entered. It occurs when the datalink controller conF-SYS-tAG parameter must be configured.
53SL6000 Instruction Manual Section 3. Display Panel 1. 2. 3. 4. Press the scroll forward pb until the desired number for the first digit appears (assumes first digit is not a zero). Press the position select right pb; the second zero starts blinking. Repeat steps 1 and 2 to enter all four pass-key digits. Press the enter pb; if the pass-key is correct engineer mode functions are permitted for that menu.
Section 3. Display Panel • • If exiting the conF or ProG menus in engineer mode, the controller goes offline and a blinking oFF prompt appears in the red dro immediately after the mode pb is pressed. To put the controller in operator mode, press the scroll forward pb to change the oFF prompt to the run prompt and press the enter pb. The controller may have been powered-down in offline, in which case it will return to offline after the status and power-on self test sequence is complete.
53SL6000 Instruction Manual Section 3. Display Panel Table 3-3. oPEr Menu Selections Prompt Description Adb Alarm Deadband Specifies the hystersis (gap) between alarm trigger and reset. This value is used to eliminate repetitive alarm triggering when the process is fluctuating about a process limit. This value should be set slightly larger then the peak-topeak fluctuations (noise) which are normally present in the process variable signal. (It is enabled with conF-oPr-ALM.E.
Section 3. Display Panel 53SL6000 Instruction Manual Table 3-3. oPEr Menu Selections Prompt Description Easy-Tune Reset Time Etr Resultant reset time value calculated by Easy-Tune. (It is enabled with conF-oPr-EZ.E.) Easy-Tune Derivative Time Etd Resultant derivative time value calculated by Easy-Tune. (It is enabled with conF-oPr-EZ.E.) Table 3-4. Operator Enable (oPr) Prompts Dft 0.0 0.0 Table 3-4. Operator Enable (oPr) Prompts (conF Menu → oPr Module) Prompt Description (see Datalink prompts) di7.
53SL6000 Instruction Manual 3-12 Section 3. Display Panel Figure 3-13.
Section 4. Functional Overview 53SL6000 Instruction Manual 4.0 Functional Overview 4.1 Simplified Block Diagram As shown in Figure 4-1 below, the internal operations of the 53SL6000 Controller can be classified into nine major functional areas. An overview of these functional areas is provided in this section; additional information is provided in Sections 5 through 7.
53SL6000 Instruction Manual 5. 6. ers, which are digital outputs used instead of the continuous 0/4-20 mA signal. Digital output registers DO5-DO8 have no associated hardware, but DO7 and DO8 serve as loopback registers to the math function block or input logic blocks (the loop-back path is not shown in the illustration).
Section 4. Functional Overview selections are path connections to the control scheme block inputs A - F. The digital signal selections ([1] - /do8) are available to characterizer inputs chr.b and chr.c. These inputs are used by the characterizer for the digital-to-analog (dtoA) and programmer (PrGM) modes. The chr digital output is an indicator available to all of the elements that follow the characterizer in the digital path. 4.
53SL6000 Instruction Manual module; otherwise, they will not appear in the oPEr prompt list. 7. Discrete output logic blocks (Logic 3 and 4) p a r a m e t e r in pu ts to bo th lo gi c m od ul es (LG3.A, LG3.b, LG3.A, and LG3.b) have the same parameter prompt list selections ([1] LG2). The outputs of both logic modules can be accessed by the do1.i - do8.i parameters of the discrete output registers 1 - 8 (DO1 - DO8). 8.
Section 4. Functional Overview 53SL6000 Instruction Manual 4-5 Figure 4-2.
Section 5. Inputs/Outputs (I/O) 53SL6000 Instruction Manual 5.0 Inputs/Outputs (I/O) Table 5-1. Analog Input Selections 5.1 I/O Overview This section provides functional descriptions and applicable parameter definitions for all of the controller inputs and outputs to include the following: • Analog Inputs • Universal Analog Input Module • Analog Output • Discrete Inputs • Discrete Outputs (and 2DI/2DO Module) • RS-232 and RS-485 Modules 5.
53SL6000 Instruction Manual 5.3 Universal Analog Input Module The universal analog input module can process one or two inputs, as determined by the type of option installed. A single channel input module processes one analog input (Ai3) and has one connector. A dual channel input module processes two analog inputs (Ai3 and Ai4) and has two connectors. A module can not be field upgraded from single to dual input. Section 5. Inputs/Outputs (I/O) Table 5-3. Input Type Prompts Prompt oFF 1-5V 0-5V 0-80 J.
Section 5. Inputs/Outputs (I/O) 53SL6000 Instruction Manual Table 5-3. Input Type Prompts Prompt dtot (conF Menu → Ai.3, Ai.4 Modules) Description Delta Pulse Totalizer (pulse input, incremental sum) 0-100 kHz Table 5-5. Thermocouple Types See Table 5-7 Table 5-4. Volt/Millivolt Input Types (conF Menu → Ai.3, Ai.4 Modules) Prompt Description Dft tYPE Make prompt selection from Table 1-5V 5-3. Applicable types are: 0-5V, 1-5V, 0-80. SPAn Engineering Span, Engineering Zero 100.0 0.
53SL6000 Instruction Manual Section 5. Inputs/Outputs (I/O) Table 5-7. Frequency/Pulse Input Types (conF Menu → Ai.3, Ai.4 Modules) Prompt Description Dft tYPE Make prompt selection from Table 1-5V 5-3. Applicable types are: FrQ1, FrQ2, FrQ3, dtot. SPAn Engineering Span, Engineering Zero 100.0 0.0 ZEro These values set the engineering unit representation of the input signal over the input range.
Section 5. Inputs/Outputs (I/O) 53SL6000 Instruction Manual Table 5-10. Analog Output Registers Prompt Ao1.i Ao2.i Ao3.i (cont) (ProG Menu → Ao Module) Description Dft Analog Output Connections (cont) out Specifies the input connections for nc the standard analog output Ao1 nc and analog outputs Ao2 and Ao3. Input selections are as follows: Ai8: Analog input 8. Fnc: Function module output.
53SL6000 Instruction Manual Section 5. Inputs/Outputs (I/O) Table 5-12. Discrete Output Selections (ProG Menu → do Module) Prompt Description inV1 - Discrete Output Invert inV8 0-on: it indicates a value of zero in the corresponding do(1-8) registers and generates an inactive output (typically an open contact). 1-on: it indicates a value of one in the corresponding do(1-8) registers and generates an active output (typically a closed contact). Table 5-13. System (SYS) Prompts Dft 1-on 5.
Section 6. Signal Value Modification 53SL6000 Instruction Bulletin 6.0 Signal Value Modification 6.1 Section Overview Signal modification includes the altering, adjusting, selecting, or limiting of the analog input signal values and digital input values. Modification affects the numeric value and not the electrical characterisitcs, which are conditioned prior to being loaded into the analog input registers or digital register.
Micro-DCI 53SL6000 Controller Table 6-1. Characterizer Parameters (ProG Menu → chr Module) Prompt Description K01 - Assignments for K01 through K26 for K26 the three segment (3SEG) characterizer, linear segment (LSEG) characterizer, the setpoint programmer (PGrM), and the digitalto-analog converter (DtoA) are as follows Dft 0.0 3SEG (executes 5 third order polynomials): K01 - K06: Six endpoints that partition the 5 segments. K07 - K10: Segment 1 (equation 1) coefficients.
Section 6. Signal Value Modification To ensure the piecewise approximation specifies a realizable function, the values for the coordinate inputs, which are stored in characterizer constants K1 through K13, must be monotonically increasing (each coordinate value is larger than the preceding one). There is no such dependency for the output coordinate values K14 through K26.
Micro-DCI 53SL6000 Controller • When engineer mode is exited and run is selected, the setpoint will move to the assigned value for the duration of its corresponding time interval. • To view the stepped sequence manually, access the StEP parameter in the oPEr menu in engineer mode. • After StEP is selected, the current time interval number flashes in the red dro. • Use the scroll forward/backward push buttons to select a new time interval.
Section 6. Signal Value Modification 53SL6000 Instruction Bulletin Table 6-2. Math Function Block Parameters Table 6-2. Math Function Block Parameters (ProG Menu → Fnc Module) Prompt Description Fnc.M Math Function Block Mode Select This mode parameter is used to select the function to be performed on the inputs of the math function block. Function selections are as follows: oFF: No functions selected. ALG: Algebraic. SuMM: Summation. PoLY Polynomial. PoWr Exponential. LoG: Logarithmic. LiM: Limiting.
Micro-DCI 53SL6000 Controller 6.3.3 PoLY Mode This is a third order polynomial equation which operates on an algebraic combination of the four analog inputs. The constants K1 through K4 are the coefficients for the equation. The constants K5 and K6 allow for some limited scaling of the four analog inputs. (AB + K5) X = K4 C + K6 3 2 + D + K3 (AB + K5) + D + K2 (AB + K5) + D + K1 C + K6 C + K6 6.3.
Section 6. Signal Value Modification 6.3.7 SEL Mode The selector allows one of four analog input values to be passed to the analog output based on the values of the two digital inputs (E and F). Three of the analog inputs (B, C, and D) can be scaled by the constants K1 through K6. The switching diagram below the equation shows how the digital inputs control the value passed to the analog output.
Micro-DCI 53SL6000 Controller Table 6-3. Logic Block Parameters Prompt LG1.M LG2.M LG3.M LG4.M LG1.A LG1.b LG2.A LG2.b 6-8 (ProG Menu → LG Module) Description Logic Blocks 1 - 4 Mode Select These mode parameters are used to select the logical operation to be performed on the inputs of the logic blocks. Function selections for each block are as follows: oFF: No logical operation performed. or: A OR B. /or: NOT A OR B. And: A AND B. /And: NOT A AND B. Xor: A EXCLUSIVE OR B. /Xor: NOT A EXCLUSIVE OR B.
Section 7. Control Scheme Block 53SL6000 Instruction Manual 7.0 Control Scheme Block 7.1 Control Scheme Block The control scheme block, which is the primary functional element of the controller, provides the capability to select and implement any one of five control schemes. Each control scheme is the basic building block for many control strategies. The five control schemes are described as follows: • SnGl - For control strategies requiring single loop standard PID functional capabilities.
53SL6000 Instruction Manual 7-2 Section 7. Control Scheme Block Figure 7-1.
Section 7. Control Scheme Block Table 7-1. Control Signal Descriptions Signal Aut Description Auto Status For SnGL, cASc, L.LiM, and h.LiM control schemes, Aut selects the PID algorithm result instead of the output push buttons to be directed to the control scheme’s primary output (out). 53SL6000 Instruction Manual Table 7-1. Control Signal Descriptions Signal oVtS.2 In the in.Ld scheme, the B input scaled by conF-cn.1(cn.2)-K1 and conF-cn.1(cn.
53SL6000 Instruction Manual Table 7-1. Control Signal Descriptions Signal SPtS Description Setpoint Track Status For the SnGL, cASc, L.LiM, and h.LiM control schemes, SPtS selects the StV value to be used for the setpoint, thus bypassing the remote setpoint and setpoint push button values. The value of StV follows the A input when process variable tracking (PVt) is selected; otherwise, it is a fixed configurable value.
Section 7. Control Scheme Block 53SL6000 Instruction Manual 7-5 Figure 7-2.
53SL6000 Instruction Manual 7.4 Signal Paths for the SnGL, cASc, L.LiM, and h.LiM Control Schemes Figure 7-3 is a graphical representation of the control scheme block as it applies to the SnGL, cASc, L.LiM, and h.LiM control schemes. The hexagons in the figure are the control signal outputs from Figure 7-2. They enable analog signal switch paths that affect operation of the control scheme. Other analog signal switches are controlled by the conF-cn.1(cn.
Section 7. Control Scheme Block • Figure 7-15. Manual Output Path • Figure 7-16. Auto Digital Output Path 53SL6000 Instruction Manual 7.5 Signal Paths for the in.Ld Control Scheme The indicator/loader (in.Ld) control scheme paths are depicted in Figures 7-17 through 7-20. The hexagons in the figures are the control signal outputs from Figure 7-2. They enable analog signal switch paths that affect operation of the control scheme. Other analog signal switches are controlled by the conF-cn.
53SL6000 Instruction Manual 7-8 Section 7. Control Scheme Block Figure 7-3. SnGL, cASc, L.LiM, and h.
Section 7. Control Scheme Block 53SL6000 Instruction Manual Figure 7-4. Common Setpoint Logic Paths Figure 7-5.
53SL6000 Instruction Manual Section 7. Control Scheme Block Figure 7-6. Remote Ratio Setpoint Path Figure 7-7.
Section 7. Control Scheme Block 53SL6000 Instruction Manual Figure 7-8.
53SL6000 Instruction Manual Section 7. Control Scheme Block Figure 7-9.
Section 7. Control Scheme Block 53SL6000 Instruction Manual Figure 7-10.
53SL6000 Instruction Manual Section 7. Control Scheme Block Figure 7-11.
Section 7. Control Scheme Block 53SL6000 Instruction Manual Figure 7-12.
53SL6000 Instruction Manual Section 7. Control Scheme Block Figure 7-13.
Section 7. Control Scheme Block 53SL6000 Instruction Manual Figure 7-14.
53SL6000 Instruction Manual Section 7. Control Scheme Block Figure 7-15.
Section 7. Control Scheme Block 53SL6000 Instruction Manual Figure 7-16.
53SL6000 Instruction Manual Section 7. Control Scheme Block Figure 7-17. in.
Section 7. Control Scheme Block 53SL6000 Instruction Manual Figure 7-18. in.
53SL6000 Instruction Manual Section 7. Control Scheme Block Figure 7-19. in.
Section 7. Control Scheme Block 53SL6000 Instruction Manual Figure 7-20. in.
53SL6000 Instruction Manual Section 7. Control Scheme Block Table 7-2. Control Scheme Parameters 7.6 Control Scheme Parameters Table 7-2 provides the control scheme ProG-cS module parameters. These parameters set the basic operation of the control scheme block and determine the input signal sources. Whenever these parameters are edited, control operation is turned off as when any other ProG menu parameter is edited. Table 7-2.
Section 7. Control Scheme Block 53SL6000 Instruction Manual Table 7-2. Control Scheme Parameters Prompt cS.h cS.J cS.K cS.L FiX (ProG Menu → cS Module) Description Control scheme cS.h - cS.L Digital Inputs Specifies path connections to the cS.h - cS.L control scheme digital inputs. Selections are as follows: (1): Logical one input. (0): Logical zero input. di1: Discrete input 1 logic value. /di1: Inverted di1 logic value. di2: Discrete input 2 logic value. /di2: Inverted di2 logic value.
53SL6000 Instruction Manual Section 7. Control Scheme Block Table 7-3. Control Selections Table 7-3. Control Selections (conF Menu → cn.1, cn.2 Modules) Prompt Description Dft tr 0.0 Reset Time (see Section 9.3) Specifies the time in minutes required for additional corrective response equivalent to the proportional response (integral action). For a detailed discussion on control and tuning, see Section 9. Values should be limited between 0.02 and 200 minutes /repeat. A value of 0.
Section 7. Control Scheme Block 53SL6000 Instruction Manual Table 7-3. Control Selections (conF Menu → cn.1, cn.2 Modules) Prompt Description SSr Setpoint Slew Rate Specifies in engineering units per second the maximum allowable rate of setpoint change (or PV2 rate of change for the in.Ld control scheme). When employed, the green bar represents the setpoint as it is applied to control (slew limited), while the green dro represents the target setpoint value. A value of 0.
53SL6000 Instruction Manual Section 7. Control Scheme Block Table 7-3. Control Selections (conF Menu → cn.1, cn.2 Modules) Prompt Description rSv Reverse Valve (cn.1 Specifies whether 100% output only) should be displayed in the output (yellow) dro as 100% or 0%. This allows the output dro to be set to correspond to a preferred valve representation of output. Selections: 100% control output = 100% dir: displayed. 100% control output = 0% rEV: displayed. MMt Minimum Manual Jog Time (cn.
Section 7. Control Scheme Block 53SL6000 Instruction Manual 7-29 Figure 7-21.
Section 8. Eight Control Strategies 53SL6000 Instruction Manual 8.0 Eight Control Strategies This section provides information to implement eight commonly used control strategies: • Single Loop Control with Remote Setpoint. • Analog Back-up Control. • Ratio Control. • Auto/Manual Selector. • Single Station Cascade Control. • Single Station Override Control. • Dual Indicator with Re-Transmitted PV.
53SL6000 Instruction Manual 8.1.1 AI1 - Process Variable Input This analog input signal value is compared to the control setpoint to determine the control output value. Applicable parameters that may require configuration changes: Section 5.2, conF-Ai.1-(SPan, ZEro, SQrt, bASE, dFLt). For PV alarms: Section 7.7, conF-cn.1-(AiX, PL1, PL2, Adb). 8.1.
Section 8. Eight Control Strategies 53SL6000 Instruction Manual 8.2 Analog Back-Up Control The direct digital control/analog back-up strategy is used in operations where a remote computer is normally controlling the final element directly. It is implemented with the controller default settings, the SnGL control scheme, and the path connections provided on the next page in Section 8.2.8. A control/analog back-up strategy is illustrated in Figure 8-3.
53SL6000 Instruction Manual 8.2.1 AI1 - Process Variable Input This analog input signal value is compared to the control setpoint to determine the control output value. Applicable parameters that may require configuration changes: Section 5.2, conF-Ai.1-(SPan, ZEro, SQrt, bASE, dFLt). For PV alarms: Section 7.7, conF-cn.1-(AiX, PL1, PL2, Adb). 8.2.2 AI2 - Control Element Feedback This is a feedback signal from the diverter circuit to the controller that indicates the position of the final element (e.g.
Section 8. Eight Control Strategies 53SL6000 Instruction Manual 8.3 Ratio Control Ratio control is used where one variable, called the controlled variable, must be automatically maintained in definite proportion to another variable, called the wild variable. Ratio control is implemented with the controller default settings, the SnGL control scheme, and the ratio setpoint K-SP selected from the setpoint mode (ConF-cn.1-SPM) parameter. A ratio control strategy is illustrated in Figure 8-6.
53SL6000 Instruction Manual Applicable parameter that may require configuration change: Section 5.6, ProG-do-inV2. 8.3.5 DI1 - Force Control Output Contact Input This is a closed contact or low active signal (0-1 V dc). When a closed contact or 0-1 V dc signal is present on this input, the control output value is applied to the value of Ai7 (the control scheme D input accepts the force control value and cS.d is defaulted to select Ai7).
Section 8. Eight Control Strategies 8.4 Auto/Manual Selector An auto/manual selector application is illustrated in Figure 8-8. This application is implemented with the controller default settings and the in.Ld control scheme. The auto/manual selector default settings allow auto-throughput when Auto is selected with the A/M push button. In automatic, the signal on AI2 is passed through to the station’s output (AO1). Manual operation occurs when M is selected with the A/M push button.
53SL6000 Instruction Manual 8.4.4 D02 - PV1 Low Alarm Contact Out D02 is closed (on) when the alarmed process variable value, PV1, is not within the process alarm limit 2 (PL2) setting. Applicable parameter that may require configuration change: Section 5.6, ProG-do-inV2. 8.4.5 DI1 Force Output Contact Input This is a closed contact or low active signal (0-1 V dc).
Section 8. Eight Control Strategies 53SL6000 Instruction Manual 8.5 Single Station Cascade Control A single station cascade control strategy is illustrated in Figure 8-10. This control strategy is implemented with the controller default settings and cASc control scheme. With single station cascade control, two standard PID control loops function together as a primary (loop 2) and secondary (loop 1).
53SL6000 Instruction Manual 8.5.4 DO2 - Secondary PV Low Alarm Contact Out D02 is closed (on) when the secondary process variable value is not within the loop 1 process alarm limit 2 (PL2) setting. Applicable parameter that may require configuration change: Section 5.6, ProG-do-inV2. 8.5.5 DI1 - Force Control Output Contact Input This is a closed contact or low active signal (0-1 V dc).
Section 8. Eight Control Strategies 8.6 Single Station Override Control 53SL6000 Instruction Manual provided in the sections that follow. These sections also contain the applicable display prompts that may require configuration changes. With Single Station Override Control, two standard PID control loops function as two interdependent variables, primary and limiting, to control a single final element (e.g., valve). Neither variable may exceed a safe limit.
53SL6000 Instruction Manual Applicable parameter that may require configuration change: Section 5.6, ProG-do-inV1. 8.6.4 DO2 - Primary PV Low Alarm Contact Out D02 is closed (on) when the primary process variable value is not within the loop 1 (cn.1) process alarm limit 2 (PL2) setting. Applicable parameter that may require configuration change: Section 5.6, ProG-do-inV2. 8.6.5 DI1 - Force Control Output Contact Input This is a closed contact or low active signal (0-1 V dc).
Section 8. Eight Control Strategies 8.7 Dual Indicator with Re-Transmitted PV The Dual Indicator allows two process variables to be displayed and either one to be selected as the output at AO1. The process variables are input into AI1 and AI2. A dual indicator application is illustrated in Figure 8-14. This application is implemented with the controller default settings and the in.Ld control scheme. 53SL6000 Instruction Manual For PV alarms: Section 7.7, conF-cn.1-(AiX, PL1, PL2, Adb). 8.7.
53SL6000 Instruction Manual Section 8. Eight Control Strategies 8.8 Proportional Speed Floating Control This control output is suitable for any of the control schemes where the final control element is usually a motorized valve. The controller output is provided at two discrete outputs, rather than the analog output AO1. One discrete output drives the motor in one direction and the other discrete output drives the motor in the opposite direction.
Section 8. Eight Control Strategies control element, the period should be set to match the end-to-end travel time of the element. To operate the digital outputs in a time proportioning manner, much shorter cycle times are required. Because each cycle period is divided into 0.05 second pieces, the resolution of the output is determined by the length of the cycle period. For example: If dcP is 10 seconds, then the period will contain 200 pieces (10/0.05 = 200), each being 0.5% of the 10 second period.
53SL6000 Instruction Manual 8.8.3 Speed Factor Adjusting 1. 2. 3. 4. 5. If a slide wire is connected to AI2 instead of the remote setpoint, ensure the remote/local push button is set to local for setpoint adjustment or that remote enable (ProG-di-di2) is set to 0. Adjust the controller for zero deviation with the setpoint push buttons or with the manual control output push buttons. Switch the controller to auto by pressing the auto/manual push button. The auto indicator activates.
Section 9. Commissioning 53SL6000 Instruction Manual 9.0 Commissioning 9.1 Overview Commissioning is an iterative process of refining the proportional band - Pb (Pb.2), integral or reset time - tr (tr.2), and derivative time - td (td.2) parameter values for each active control module. Collectively, these three control action parameters are called the PID and can be accessed from the oPEr menu if they are enabled for display with the conF-OPr-Pid.E parameter or they can be accessed from the conF-cn.1(cn.
53SL6000 Instruction Manual process control element would be moved until temperature increased an additional 9° from 410° to 419°. Integral action would continue at each repetition interval until setpoint was reached. In this way integral action sneaks-up on setpoint. The time between repetition intervals can be set from 0.02 minutes/repeat (maximum integral action) to 200 minutes/repeat (minimum integral action); 0 is off. 9.4 Derivative Action (td) Derivative action (conF-cn.1[cn.
Section 9. Commissioning 3. 4. 5. 6. nitude of the step in percent of full signal span A. Also plot a graph of the resulting transient curve traced by the controlled variable. Draw a straight line tangent to a point on the curve having the greatest slope (most linear). Measure the apparent dead time Wp in minutes as shown in Figure 9-1. Measure Tp, the product of the slope and dead time as shown in Figure 9-1. This value should be expressed in percent of full scale span.
53SL6000 Instruction Manual Section 9. Commissioning Figure 9-3. Preliminary Step Response Actual Curve Figure 9-4. Preliminary Step Response Approximated Curve Figure 9-2.
Section 9. Commissioning 9.8.1 Executing Easy-Tune Easy-Tune is executed from the conF-EZ module parameters. A typical controller display illustrating Easy-Tune being executed is provided in Figure 9-5. Easy-Tune execution can be aborted at any time by first pressing either output push button and then by pressing the mode/select push button. After the output push button is pressed, outX appears in the SP dro and the Easy-Tune LED remains on but stops blinking.
53SL6000 Instruction Manual Section 9. Commissioning Figure 9-5.
Section 9. Commissioning 53SL6000 Instruction Manual Table 9-2. Easy-Tune Parameters conF → EZ Prompt Description Control Mode cM Select the desired control action(s) for the process: P, PI, PID, PD If previous Easy-Tune results indicated the ratio of process dead time - Wp (WP) to the process time lag - Tp (tP) was greater than 0.5, then PID should be selected for control mode.
53SL6000 Instruction Manual 9.8.3.1 out Response This response indicates the controller output was initially at extreme maximum or minimum when the preliminary step change was attempted. Restore the controller operating band to mid-range; if the controller must operate at saturated output, then Easy-Tune can not be successfully executed. 9.8.3.2 dout Response This response indicates saturation would have occurred if Easy-Tune had continued.
Appendix A. Glossary 53SL6000 Instruction Manual Appendix A: Glossary Additive Feed Forward (FF) This analog input signal is added to the PID result to form the control scheme output value when auto operation is active. Analog Back-up Control A control strategy whereby the controller acts as an automatic back-up device in the event a host computor controlling the process fails.
53SL6000 Instruction Manual requiring standard single loop functionality. cASc - for control strategies requiring cascade functionality. Appendix A. Glossary DigitaltoAnalog Converter Mode An operating mode of the characterizer whereby values are entered into chr paramet er c on st an ts K 1 and K2, which are used as multipliers for the digital inputs at chr.b and chr.c respectively. The product of (chr.
Appendix A. Glossary 53SL6000 Instruction Manual the logic blocks are primarily for the discrete inputs (DIs) and two are for the discrete outputs (DOs). The discrete output logic blocks can be connected with path selections to accept logic decisions from the discrete input logic blocks. optimal PID characteristic constants. Faceplate The entire visable front of the controller casework that contains the push buttons and LEDs.
53SL6000 Instruction Manual Appendix A. Glossary setpoint and process variable values. Proportional action is set as a percentage of the proportional band (%PB) from 2% (narrow band - maximum action) to 1000% (wide band minimum action). Also, a prompt that can be invoked on the display in engineer mode (e.g., cn.1); if selected, it provides scrolling capabilities through a series of parameter prompts for configuration purposes.
Appendix A. Glossary 53SL6000 Instruction Manual is in control unless its output tries to exceed the high or low limit defined by the limiting loop. If the high limit is exceeded, the controller will select the lower of the two output values (low override). If the low limit is exceeded, the controller will select the higher of the two output values (high override). The low limit control strategy is implemented with the factory default settings and by selecting the L.LiM for the ProG-cSSchM parameter.
53SL6000 Instruction Manual Linear Mode An operating mode of the characterizer whereby values are entered into ProG-chr-K1 through K26 parameter constants as 13 ordered pairs (A input, analog output) to specify a 12 segment linear appr ox im ation of the analog input signal. Constants K1K13 are the A input variables, and constants K14-K26 are the analog output variables. Pairs are matched K1, K14; through K13, K26. The input variables must be monotonically increasing.
Appendix B. Maintenance and Parts List 53SL6000 Instruction Manual Appendix B: Maintenance and Parts List B.1 Overview B.2 Parts List This section provides a parts list and maintenance procedures to replace the display assembly and power supply board, to execute the self-test, and to initialize the database. Also provided is calibration information for the controller analog inputs and outputs.
53SL6000 Instruction Manual Appendix B. Maintenance and Parts List WARNING: Always remove power before attempting to install, disassemble, or service the controller. Failure to remove power may result in serious personal injury and/or equipment damage. CAUTION: - Use a grounded wrist strap to prevent damage to integrated circuit devices when handling circuit boards.
Appendix B. Maintenance and Parts List cable to new display assembly. To maintain environmental seal, ensure the rectangular gasket is placed on the bezel. Slide bezel tabs into case and push the assembly forward until tabs latch in case detents. 53SL6000 Instruction Manual 3. Communications Jack (J13): If no communication module is installed, the conF-SYS-dLE parameter should be set to oFF. If an RS-485 Module is installed, then jumper the following module terminal pins: Jumper between R+ and T+.
53SL6000 Instruction Manual Appendix B. Maintenance and Parts List B.4.2 Starting the Controller Confidence Test via the Faceplate Push Buttons The confidence test is started by simultaneously pressing both the left and right output (bottom) push buttons while cycling power to the controller from off to on.
Appendix B. Maintenance and Parts List B.4.4 Controller Confidence Test Suite During confidence test execution, both vertical bars are and all annunciator LEDs except WD are lit, the red dro indicates the number of times all the selected tests in the suite have been executed, rolling over after 9999 passes. The green dro contains the mnemonic of the test currently being executed. The complete test suite contains the following tests that execute in the order given in Table B-2: Table B-2.
53SL6000 Instruction Manual B.5 Defaulting the Database The database can be restored to the factory set default values by entering a 098 into the ProG-cSFiX parameter using the following procedure: NOTE: Pass-keys will not be preserved if the database is defaulted. 1. 2. 3. 4. 5. 6. 7. 8. 9. 10. 11. 12. 13. 14. Enter engineer mode by pressing and holding the mode pb. OPEr appears in the green dro. Press the scroll forward pb until ProG appears in the green dro.
Appendix C. Datalink Protocol 53SL6000 Instruction Manual Appendix C: Datalink Protocol Table C-1. System (SYS) Prompts (Datalink) C.1 Overview Thirty-two addressable controllers (0-31) can be connected to a datalink for information transfer to/from a host, which initiates all transactions.
53SL6000 Instruction Manual Appendix C. Datalink Protocol 3. Table C-2. Datalink Protocol Symbol Description CMD Command It is the operation to be performed or a description of the message that follows the Command-I.A. byte. The CommandI.A. byte has two fields: the Command field (3 bits) and the I.A. field (5 bits). There are five commands as follows: Interrogate, Change, Change Bits, Acknowledge, and Response. NUM Number The number of data bytes transferred or requested.
Appendix C. Datalink Protocol 53SL6000 Instruction Manual Table C-3. Datapoint Types 2. Controller sends Response message. 01111110 00100011 00000010 00000000 SOH Cmd + I.A. NUM LO ADD DataPoint F Size 5 A text string that is 5 characters bytes maximum. Type F datapoints are a subset of the type A datapoints and therefore have the same memory assignment area. 00010000 00001000 00001100 01001001 HI ADD Data 1 Data 2 LRC 3. Host sends Acknowledge message. 01111110 10000011 SOH Cmd + I.A. 4.
53SL6000 Instruction Manual Appendix C. Datalink Protocol Table C-5. Datapoint Addresses Table C-5. Datapoint Addresses Type Type H 20 2-1 2-2 2-3 2-4 2-5 2-6 2-7 2-8 2-9 2-10 2-11 2-12 2-13 2-14 2-15 2-16 2-17 2-18 2-19 2-20 2-21 2-22 2-23 2-24 2-25 2-26 2-27 2-28 2-29 2-30 2-31 2-32 Base Address Addr Calculation 09CFH Address = H Base + (5 X H Number) = 9CFH + (5 X H Number) Address example: H001 location 9CFH + (5 X 1) = 9CFH + 5D = 9CFH + 5H = 9D4H. sign bit 0.5 0.25 0.125 0.0625 0.03125 0.
Appendix C. Datalink Protocol 53SL6000 Instruction Manual C.4.3 Database Prompt-to-Datapoint Cross Reference Table C-6 is provided as a parameter prompt-todatapoint cross reference. Table C-6. Prompt-to-Datapoint Cross Reference DBase Module chr (cont) Table C-6.
53SL6000 Instruction Manual Appendix C. Datalink Protocol Table C-6. Prompt-to-Datapoint Cross Reference DBase Module cn.1 C-6 DBase Parameter Adb AE AiX Aut b1 [co] ctc cZ dcP [dn] dv dP FF hML iLr ir K1 MFd MMt Mr oh oL oSr otE otV out oVtS PA1 PA2 Pb PL1 PL2 [Pn] PV rE rF rMt [rn] Network Reference C005 L034 B011 L027 C012 C023 L043 C014 C030 H001 C021 B009 C022 L042 C016 C015 C013 L040 C031 C011 C009 C010 C018 L039 C029 C002 L025 L030 L031 C006 C003 C004 C024 C000 L035 C027 L028 H000 Table C-6.
Appendix C. Datalink Protocol 53SL6000 Instruction Manual Table C-6. Prompt-to-Datapoint Cross Reference DBase Module cn.2 DBase Parameter Adb AE AiX Aut b1 [co] ctc cZ [dn] dv dP FF hML iLr ir K1 MFd Mr oh oL oSr otE otV out oVtS PA1 PA2 Pb PL1 PL2 [Pn] Network Reference C037 L058 B014 L051 C044 C055 L067 C046 H003 C053 B012 C054 L066 C048 C047 C045 L064 C043 C041 C042 C050 L063 C061 C034 L049 L054 L055 C038 C035 C036 C056 Table C-6. Prompt-to-Datapoint Cross Reference DBase Module cn.
53SL6000 Instruction Manual Appendix C. Datalink Protocol Table C-6. Prompt-to-Datapoint Cross Reference DBase Module EZ Fnc oPr PrG C-8 DBase Parameter [Abrt] APLd cM dout dPV dPPV EPb Etd Etr KP LPS nrun PLiM run StS tLiM tP WP K01 K02 K03 K04 K05 K06 Ai.E ALM.E di7.E di8.E EZ.E hLc.E Pid.E StP.E Ao1.i Ao2.i Ao3.i chr.M chr.A chr.b chr.c do1.i do2.i do3.i do4.i do5.i do6.i do7.i do8.
Appendix D. Prompt List 53SL6000 Instruction Manual Appendix D: Prompt List [0]: Logic level zero. 0.0: The value zero. 0.05: Digital filter in seconds. 0.1: Digital filter in seconds. 0.3: Digital filter in seconds. 0.6: Digital filter in seconds. 0.7: Digital filter in seconds. 0 to 13: Characterizer step mode list. 0-20: 0-20 mA input. 0 to 31: Instrument addresses 0 to 31. 0-80: 0-80 millivolt universal Ai option. 0-5V: 0-5 volts analog input. [1]: Logic level one. 1.0: The value one. 1.
53SL6000 Instruction Manual cSE: Control scheme analog E input. cSF: Control scheme analog F input. cSh: Control scheme digital H input. cSJ: Control scheme digital J input. cSK: Control scheme digital K input. cSL: Control scheme digital L input. c.tc: Thermocouple type C. cZ: Control zone. dcP: Duty cycle period. dEV: Alarm deviation from setpoint. dFLt: Analog input digital filter. di: Digital input module. di1: Discrete input 1 status. /di1: Discrete input 1 inverted. di2: Discrete input 2 status.
Appendix D. Prompt List K11: Characterizer constant 11. K12: Characterizer constant 12. K13: Characterizer constant 13. K14: Characterizer constant 14. K15: Characterizer constant 15. K16: Characterizer constant 16. K17: Characterizer constant 17. K18: Characterizer constant 18. K19: Characterizer constant 19. K20: Characterizer constant 20. K21: Characterizer constant 21. K22: Characterizer constant 22. K23: Characterizer constant 23. K24: Characterizer constant 24. K25: Characterizer constant 25.
53SL6000 Instruction Manual \S.tc: Thermocouple type CH_S. Std: Standard setpoint mode. StEP: Programmer step. StoP: Stop. StP.E: Enable oPEr prog step access. StV: Setpoint track value. SWA: Auto push button. SWr: Remote push button. SuMM: Summation function. SYS: System module. tAG: Unit tagname. td: Derivative time. tLiM: Easy-Tune settling time limiting. tP: Easy-Tune first order time constant. tr: Reset time. t.tc: Thermocouple type t. u.tc: Thermocouple type u. Vdn: Control valve down signal.
The Company’s policy is one of continuous product improvement and the right is reserved to modify the information contained herein without notice, or to make engineering refinements that may not be reflected in this bulletin. Micromod Automation assumes no responsibility for errors that may appear in this manual. © 2004 MicroMod Automation, Inc. Printed in USA MicroMod Automation, Inc. 75 Town Centre Drive Rochester, NY USA 14623 Tel. 585-321-9200 Fax 585-321-9291 www.micromodautomation.