
Operating instructions


TM 11574A-OI
2-42
2-15. Pre-Trip Diagnosis
CAUTION
Pre-trip Inspection should not be performed with critical temperature cargoes in the
container.
Pre-Trip diagnosis provides automatic testing of the unit components using internal measurements and
comparison logic. The program will provide a “PASS” or “FAIL” display to indicate test results. The
testing begins with access to a pre-trip selection menu. The user may have the option of selecting one of
three automatic tests (depending on software revision installed). These tests will automatically perform a
series of individual pre-trip tests. The user may also scroll down to select any of the individual tests. The
contents of the menus are as follows:
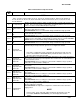
Table 2-12. Pre-Trip Selection Menu
Auto or Auto 1 Auto 2 Auto 3
P1, P2, P3, P4, P5, P6,
rSLts
P, P1, P2, P3, P4, P5,
P6, P7, P8, P9, P10,
rSLts
P, P1, P2, P3, P4, P5,
P6, P7, P8, rSLts
A detailed description of the pre-trip test codes is listed in Table 2-7. If no selection is made, the pre-trip
menu selection process will terminate automatically. Scrolling down to the “rSLts” code and pressing
ENTER will allow the user to scroll through the results of the last pre-trip testing run. If no pre-testing has
been run (or an individual test has not been run) since the unit was powered up, “--------” will be displayed
a. To start a pre-trip test, do the following:
NOTE
Prior to starting tests, verify that unit voltage (Function Code Cd 07) is within tolerance
and unit amperage draw (Function Codes Cd04, Cd05, Cd06) is within expected limits.
Otherwise, tests may fail incorrectly.
All alarms must be rectified and cleared before starting tests.
(a) Press the PRE-TRIP key. This accesses a test selection menu.
(b) TO RUN AN AUTOMATIC TEST: Scroll through the selections by pressing the UP
ARROW or DOWN ARROW keys to display AUTO, AUTO 2 or AUTO 3 as desired and
then press the ENTER key.
1. The unit will execute the series of tests without any need for direct user interface.
These tests vary in length, depending on the component under test.
2. While tests are running, “P#-#” will appear on the left display, where the #’s indicate
the test number and sub-test. The right display will show a countdown time in
minutes and seconds, indicating how much time there is left remaining in the test.