
Operating instructions


TM 11574A-OI
3-22
(c) Expansion valve removal. To remove the expansion valve perform the following:
NOTE
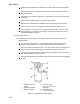
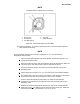
The TXV is a hermetic valve and does not have adjustable superheat (Figure 3-10).
All connections on the hermetic TXV are bi-metallic, copper on the inside and stainless on the
outside.
All joints on the hermetic TXV (inlet, outlet and equalizer lines) are brazed.
Bi-metallic connections heat up very quickly.
1
Pump down the unit per Pumping the unit down paragraph 3-10b(2)(d).
2
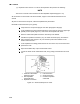
If TXV replacement is to be performed from the front of the unit, open the upper right
(EFM#1) access panel (Figure 2-1) and remove the evaporator fan motor.
3
Remove cushion clamp that secures the valve body to the bracket.
4
Unbraze the equalizer connection (1/4”), the outlet connection (5/8”), and then the
inlet connection (3/8”) (Figure 3-10). Be careful to protect the insulation on the
heaters and their wires.
5
If TXV replacement is being performed from the front of the unit, remove the access
panel for the bulb.
6
Open the insulation flap. Flap is secured with Velcro.
7
Loosen the thumb screw and slide the bulb, out by pulling it towards the front of the
unit.
1. Hermetic Thermostatic 4. Inlet Connection
Expansion Valve 5. Outlet Connection
2. Non-adjustable 6. Hermetic Expansion
Superheat Stem Valve Bulb
3. Equalizer Connection
Figure 3-9. Thermostatic Expansion Valve.