
Operating instructions


TM 11574A-OI
3-18
4
Replace liquid line filter with one size larger in capacity than the unit being worked
on.
5
Add suction line filter of appropriate size, mounted vertically with pressure taps on
both inlet and outlet.
6
Depending on the severity of the burnout, components may need to be changed put
or cleaned.
7
Triple evacuate as discussed in the mild burnout procedure.
8
Recharge unit compensating for additional volume in larger liquid line filter drier.
9
Run for one hour minimum. Change liquid line and suction line filter plus oil.
10
Run a minimum of two more hours and change liquid filter again. Remove suction
line filter entirely. Acid check oil and change. Depending on acid check, you may
require an additional oil change.
(6) High Pressure Switch.
(a) Replacing high pressure switch. To replace the high pressure switch, perform the
following steps:
1
Turn unit start-stop switch OFF. Front seat both suction and discharge service
valves to isolate compressor. Remove the refrigerant from the compressor.
2
Disconnect wiring from defective switch. The high pressure switch is located on the
center head and is removed by turning counterclockwise (refer to Figure 2-3).
3
Install a new high pressure switch after verifying switch settings (refer to Checking
high pressure switch in section 3-10b(6)).
4
Evacuate and dehydrate the compressor per Evacuation and Dehydration paragraph
3-10b(3).
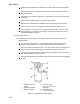
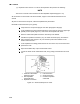
1. Cylinder Valve and 4. Pressure Gauge
Gauge (0 to 36 kg/cm² = 0 to
2. Pressure Regulator 400 psig)
3. Nitrogen Cylinder 5. Bleed-Off Valve
6. 1/4 Inch Connection
Figure 3-7. High Pressure Switch Testing