
Operating instructions


TM 11574A-OI
3-15
6
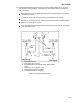
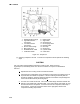
Remove compressor and mounting plate. Refer to Refrigeration system data table 1-
1 for weight of compressor.
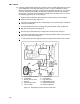
7
Remove high pressure switch (HPS) from compressor and check operation of switch
(refer to Checking high pressure switch section 3-10b(6)).
8
Remove compressor mounting bolts from mounting plate and install mounting plate
on replacement compressor.
9
Install replacement compressor terminal wiring kit, following instructions included with
kit.
10
Install high pressure switch on compressor.
11
Install compressor and mounting plate in unit.
12
Connect junction box(es) to compressor and connect all wiring per wiring diagram.
Install junction box cover(s).
13
Install new gaskets on service valves.
14
Install mounting bolts in service valves and torque to 20-30 ft/lb (2.77 to 4.15 mkg).
15
Attach two hoses (with hand valves near vacuum pump) to the suction and discharge
service valves. Dehydrate and evacuate compressor for 2 hours. Turn off valves on
both hoses to pump.
16
Fully open (backseat) both suction and discharge service valves.
17
Remove vacuum pump lines.
18
Start unit and check refrigerant charge (refer to Refrigeration charge paragraph 3-
10b(4)).
19
Check moisture-liquid indicator for wetness. Change filter-drier if necessary (refer to
Filter drier paragraph).
20
Check compressor oil level per Compressor Oil Level paragraph 3-10b(5)(e). Add oil
if necessary.