
Instruction Manual


EN
9
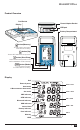
WatchBP Office
Selecting the correct cuff
A variety of different cuff sizes are available. M and L size cuffs are provided with the
device. Use the cuff marker to select the cuff size that best matches the circumference of
the patient’s upper arm.
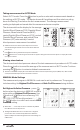
Fitting the cuff properly
1 Place the cuff over the upper arm so that the air
tube and artery mark arrow point towards the lower
arm. The artery mark on the cuff must be placed
over the brachial artery.
2 Lay the cuff on the arm. Make sure that the lower
edge of the cuff lies approximately 2 to 3 cm ( ¾ to 1
inch) above the elbow.
3 Wrap and tighten the cuff around the arm.
4 Leave free space with the size of 2 fingers between
the arm of the patient and the cuff. Excessive
tightness may cause venous congestion and
discoloration of the limb. If the cuff is wrapped
too loosely, it cannot be inflated properly, and the
measured values may be inaccurate. Remove all
clothing covering or constricting the measurement
arm. Clothing may interfere with measurement
accuracy.
5 Cuffs that do not fit properly may lead to inaccurate
readings. Use a different size cuff if the range index
at the end of the cuff does not fall into the range
specified by the range stripes.
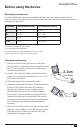
Before using the device
Each cu is provided with 130 cm air tube.
*
Contact Microlife or its authorized distributor to purchase cus.
*
Use only cus provided by Microlife!
*
M and L size cus are included as standard accessories.
*
Cuff Size Circumference (cm) Circumference (inch)
S
14-22 5.5-8.7
M
22-32 8.7-12.6
L
32-42 12.6-16.5
L-XL
32-52 12.6-20.5
2–3cm
(¾ to 1 inch)