
Instruction Manual


8
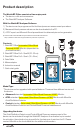
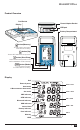
Attaching the power plug to the power adapter
Select a suitable plug attachment and attach to the
power adapter as shown here.
Charge the battery completely
When using the device for the first time, charge the
battery until the recharge indicator on the device turns
green.
Power ON/OFF
Press button to switch on the device.
Press and hold button for 3 seconds to switch off
the device and turn off the LCD screen. The device
displays ‘oFF’ before turning off.
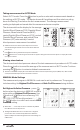
Initial set up
Set the date, time and the safeguard pressure
Set the year - Press and hold the button for 3 seconds to enter setting mode.
The year number flashes in the display. Use the or button to select the year. Use
the button to confirm your selection and move on to month setting.
Set the month – Use the or but ton to selec t the m onth. U se the bu t ton to
confirm your selection and move on to day setting.
Set the day – Press the o r but ton to selec t the d ay. Us e the but ton to
confirm your selection and move on to time setting.
Set the time
– Once you have set the hour and minutes and pressed the button,
the date and time are set, and the current time is displayed.
Set the safeguard pressure - Use the or button to select the highest inflation
pressure or AUTO mode. Use the button to confirm and finish the settings. Once
you have finished the setting mode the current time is displayed.
The date and time on the device automatically synchronizes with the date and time on the computer when connected
with the WatchBP Analyzer.
*
The “highest ination pressure” can be programmed to the device. The suggested Ination Pressure is 30 to 40 mmHg
above the expected systolic value of the patient. You can select 160, 180, 200, 220 or, 240mmHg or use the default
(device Displays “- - -’) then the device will automatically inate the cu to the optimal cu pressure. If the selected
Highest Ination Pressure selected is too low to measure a patient’s blood pressure it may result in re-pumping or an
error (“Err “) will be shown.
*