
Instruction Manual
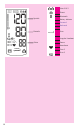
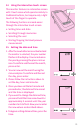
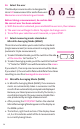

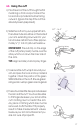

Table Of Contents
- Important Product and Safety Information Follow Instructions for Use. This document provides important product operation and safety information regarding
- This blood pressure monitor IS intended to be used:
- This blood pressure monitor IS NOT intended for use with:
- WARNING – Potentially hazardous situation that if not avoided may result in serious injury or death.
- DO NOT:
- CAUTION – Potentially hazardous situation that if not avoided may result in minor/moderate injury, property damage, and/or damage to the device
- DO NOT: (1)
- STANDARDS
- TYPE
- Expected Life
- Trademark Usage:
- Federal Communications Commission (FCC) Statement
- Premium Automatic Blood Pressure Monitor
- 1. Introduction
- 2. Components of your blood pressure monitor
- 3. How do I get started?
- 4. How do I take a measurement?
- 5. Bluetooth functions and application (App)
- 6. Error messages/troubleshooting 7. How is blood pressure measured?
- 8. Care and maintenance 9. Limited warranty 10. Technical specifications 11. How to contact us
- 1.2. Diabetes validation
- 2. Components of your blood pressure monitor (1)
- 2.2. Wide Range Cuff:
- Anti-Slip Cuff:
- Cuff Sizing:
- Note:
- 3. How do I get started? (1)
- 3.2. Inserting the batteries
- Attention!
- 3.3. Power switch / screen lock
- 3.4. Using the interactive touch screen
- 3.5. Setting the date and time
- 3.6. Select the user
- Before taking a measurement, be certain that the correct user has been selected.
- 3.7. Select measuring mode: standard or Microlife Averaging Mode (MAM)
- 3.8. Microlife Averaging Mode (MAM)
- 3.9. Connecting the cuff and monitor
- 3.10. Using the AC power adapter
- Note: (1)
- 4. How do I take a measurement? Please note: You should always be seated before and during measurement.
- 4.2. Common errors
- 4.3. Using the cuff
- Comment
- 4.4. Taking a measurement
- 4.5. Memory: Reviewing readings
- Viewing the stored values
- Memory full
- Clear all values
- 4.6. Stopping a measurement
- 4.7. Hypertension risk indicator
- 4.8. Irregular heartbeat detector
- Information on frequent appearance of the irregular heartbeat symbol
- 4.9. Battery change indicator
- Note: (2)
- 5. Bluetooth functions and application (App)
- Compatibility:
- Questions?
- 5.1. Bluetooth® icon indicator (on monitor)
- Troubleshooting: Bluetooth® connection:
- 5.2. iOS devices:
- Connecting the devices for the first time:
- Setting up your blood pressure monitor:
- Automatic measurement transfer (iOS):
- Manual measurement transfer (iOS):
- Saving readings stored on your monitor (iOS):
- 5.3 Android OS Phones
- Saving readings to your Android phone:
- 6. Error messages/troubleshooting
- Error No. Possible cause(s)/Solutions
- *If this or any other problem occurs repeatedly, please consult your doctor.
- Malfunction Remedy
- Please note: Blood pressure fluctuates continually so succes- sive measurements will show some variability.
- Please note: Individuals visiting their doctor frequently experi- ence anxiety which can result in a higher reading than at home under resting conditions.
- 7. How is blood pressure measured?
- 7.2. Measurement Guidelines
- Additional information
- 7.3. What can I do to change my blood pressure?
- 1) Eating habits
- 2) Previous illnesses
- 3) Habits
- 4) Physical constitution
- 8. Care and maintenance
- 10. Technical specifications:
- 11. How to contact us

17
4.3.
Using the cuff
a)
Pass the end of the cuff through the flat
metal ring so that a loop is formed. The
hook and loop material must be facing
outward. (Ignore this step if the cuff has
already been prepared.)
b)
Slide the cuff onto your upper left arm.
The rubber tube should be on the inside of
your arm extending downward to your
hand. Make certain the cuff lies approxi-
mately ½” (1 to 2 cm) above the elbow.
IMPORTANT:
The red strip on the edge
of the cuff (Artery Mark) must lie over the
artery which runs down the inner side of
the arm.
TIP:
Align red artery mark to pinky finger.
c)
To secure the cuff, wrap it around your
arm and press the hook and loop material
together. Check the position of the green
SIZING SEAM on the cuff. Ensure green
sizing seam overlaps green size range bar.
d)
There should be little free space between
the arm and the cuff. You should be able
to fit 2 fingers between your arm and the
cuff. Clothing must not restrict the arm.
Any piece of clothing which does must be
removed. Cuffs that don’t fit properly
result in false measurement values.
Measure your arm circumference if you
are not sure of proper fit.
8.7” - 16.5”
Brachial Artery
½
”