
Operation Manual


Table Of Contents
- 1. Important Facts about Blood Pressure and Self- Measurement
- 2. Using the Instrument for the First Time
- 3. Taking a Blood Pressure Measurement using this Instrument
- 4. Appearance of the Heart Arrhythmia Indicator for early Detection
- 5. Data Memory
- 6. Replacing the Slot-in Card
- 7. Battery Indicator and Battery change
- 8. Using a Mains Adapter
- 9. Error Messages
- 10. Safety, Care, Accuracy Test and Disposal
- 11. Guarantee
- 12. Technical Specifications
- 1. Informations importantes sur la tension et l'auto- mesure
- 2. Première mise en service de l'instrument
- 3. Prise de tension avec cet instrument
- 4. Apparition de l'indicateur d'arythmie cardiaque pour une détection précoce
- 5. Mémoire
- 6. Remplacement de la carte
- 7. Indicateur d'état de charge des piles et de remplacement
- 8. Utilisation d'un adaptateur secteur
- 9. Messages d'erreurs
- 10. Sécurité, entretien, test de précision et élimination de l'équipement
- 11. Garantie
- 12. Caractéristiques techniques
- 1. Belangrijke feiten over bloeddruk en het zelf opnemen hiervan
- 2. Eerste gebruik van het instrument
- 3. Bloeddruk opnemen met behulp van dit instrument
- 4. Weergave van de hart aritmie indicator voor vroegtijdige detectie
- 5. Datageheugen
- 6. Vervangen van de insteekkaart
- 7. Batterij-indicator en batterijvervanging
- 8. Gebruik van een hoofdadapter
- 9. Foutmeldingen
- 10. Veiligheid, onderhoud, nauwkeurigheidstest en verwijdering
- 11. Garantie
- 12. Technische specificaties
- 1. Viktiga fakta om blodtryck och blodtrycksmätning hemma
- 2. Användning av instrumentet första gången
- 3. Att göra en blodtrycksmätning med instrumentet
- 4. Hjärtslag-mätaren meddelar om rytmstörningar i tid
- 5. Dataminne
- 6. Ersättning av inmatningsbar kort
- 7. Indikatorer på att batteriet håller på att ta slut och batteribyte
- 8. Användning av adapteranslutning
- 9. Felmeddelanden
- 10. Säkerhet, underhåll, noggrannhetstest och avfallshantering
- 11. Garanti
- 12. Tekniska data
- 1. Tärkeitä faktoja verenpaineesta ja omatoimisesta mittaamisesta
- 2. Laitteen käyttäminen ensimmäistä kertaa
- 3. Verenpaineen mittaus laitteen avulla
- 4. Sydämen rytmihäiriön osoitin ilmoittaa rytmihäiriöstä ajoissa
- 5. Tietomuisti
- 6. Sisään työnnettävän kortin vaihtaminen
- 7. Paristojen osoitin ja paristojen vaihtaminen
- 8. Verkkoadapterin käyttäminen
- 9. Virheilmoitukset
- 10. Laitteen huolto, tarkkuustesti ja hävittäminen
- 11. Takuu
- 12. Tekniset tiedot
- 1. Vigtige fakta om blodtryk og hjemme måling
- 2. Brug af instrumentet for første gang
- 3. Blodtryksmåling ved hjælp af dette instrument
- 4. Visning af hjertearytmi-detektoren til tidligt varsel
- 5. Datahukommelse
- 6. Udskiftning af indstikningskort
- 7. Batteri-indikator og batteriskift
- 8. Brug af stikkontaktadapter
- 9. Fejlmeddelelser
- 10. Sikkerhed, vedligeholdelse, præcisionstest og bortskaffelse
- 11. Garanti
- 12. Tekniske specifikationer
- 1. Viktige fakta om blodtrykk og egenmåling
- 2. Første gangs bruk av apparatet
- 3. Måling av blodtrykk med dette apparatet
- 4. Tidlig påvisning med indikator for hjertearytmi
- 5. Dataminne
- 6. Bytte av innstikkskort
- 7. Batteriindikator og bytte av batteri
- 8. Bruk av nettadapter
- 9. Feilmeldinger
- 10. Sikkerhet, stell, nøyaktighetstest og avfallshåndtering
- 11. Garanti
- 12. Tekniske spesifikasjoner
- 1. Svarīgi fakti par asinsspiedienu un tā noteikšanu, pašam veicot mērījumu
- 2. Instrumenta izmantošana pirmo reizi
- 3. Asinsspiediena mērīšana, izmantojot šo instrumentu
- 4. Sirds aritmijas indikatora parādīšanās savlaicīgas atklāšanas nolūkā
- 5. Datu atmiņa
- 6. Ievietošanas kartes nomaiņa
- 7. Bateriju rādītājs un bateriju nomaiņa
- 8. Tīkla adaptera izmantošana
- 9. Kļūdas ziņojumi
- 10. Drošība, kopšana, precizitātes tests un likvidēšana
- 11. Garantija
- 12. Tehniskās specifikācijas
- 1. Svarbi informacija apie kraujospūdį ir savarankišką jo matavimą
- 2. Naudojimasis prietaisu pirmą kartą
- 3. Kraujospūdžio matavimas
- 4. Širdies aritmijos indikatorius
- 5. Atminties funkcija
- 6. Informacinės kortelės keitimas
- 7. Baterijų būklės indikatorius ir baterijų keitimas
- 8. Maitinimo adapterio naudojimas
- 9. Klaidų pranešimai
- 10. Atsargumo priemonės, priežiūra, tikslumo patikrinimas, utilizavimas
- 11. Garantija
- 12. Techninės specifikacijos
- 1. Oluline teave vererõhu ja iseendal vererõhu mõõtmise kohta
- 2. Aparaadi esmakordne kasutus
- 3. Selle aparaadiga vererõhu mõõtmine
- 4. Südamerütmihäire indikaatori ilmumine varaseks hoiatuseks
- 5. Andmemälu
- 6. Sisestatava kaardi vahetus
- 7. Patarei indikaator ja patareide vahetus
- 8. Vooluadapteri kasutus
- 9. Veateated
- 10. Ohutus, hooldus, täpsustest ja käitlus
- 11. Garantii
- 12. Tehnilised andmed
- 1. Важная информация об артериальном давлении и самостоятельное измерение
- 2. Использование прибора в первый раз
- 3. Выполнение измерений артериального давления при помощи прибора
- 4. Появление индикатора аритмии сердца на ранней стадии
- 5. Память для хранения данных
- 6. Замена сменной карты
- 7. Индикатор разряда батарей и их замена
- 8. Использование блока питания
- 9. Сообщения об ошибках
- 10. Техника безопасности, уход, проверка точности и утилизация
- 11. Гарантия
- 12. Технические характеристики
- 1. Wichtige Informationen zum Blutdruck und der Selbstmessung
- 2. Erste Inbetriebnahme des Gerätes
- 3. Durchführung einer Blutdruckmessung mit diesem Gerät
- 4. Anzeige der Herz-Arrhythmie Früherkennung
- 5. Messwertspeicher
- 6. Austausch der Einschubkarte
- 7. Batterieanzeige und Batteriewechsel
- 8. Verwendung eines Netzadapters
- 9. Fehlermeldungen und Probleme
- 10. Sicherheit, Pflege, Genauigkeits-Überprüfung und Entsorgung
- 11. Garantie
- 12. Technische Daten
- 1. Informazioni importanti sulla pressione arteriosa e l'automisurazione
- 2. Utilizzo dello strumento per la prima volta
- 3. Misurazione della pressione arteriosa
- 4. Comparsa dell'indicatore di aritmia cardiaca
- 5. Memoria dati
- 6. Sostituire la scheda inseribile
- 7. Indicatore e sostituzione batteria
- 8. Utilizzo del trasformatore
- 9. Messaggi di errore
- 10. Sicurezza, cura, test di precisione e smaltimento
- 11. Garanzia
- 12. Specifiche tecniche
3BP A100
EN
How do I evaluate my blood pressure?
The higher value is the one that determines the evaluation.
Example: a readout value between 150/85 or 120/98 mmHg indi-
cates «blood pressure too high».
The slot-in card 3 on the front of the instrument shows ranges
1-6 in the Table.
2. Using the Instrument for the First Time
Activating the fitted batteries
Pull out the protective strip from the battery compartment 7.
Selecting the correct cuff
Microlife offers 3 different cuff sizes: S, M and L. Select the cuff
size to match the circumference of your upper arms (measured by
close fitting in the centre of the upper arm). M is the correct size for
most people.
Only use Microlife cuffs.
Contact Microlife Service if the enclosed cuff 8 does not fit.
Connect the cuff to the instrument by inserting the cuff
connector 9 into the cuff socket 4 as far as it will go.
3. Taking a Blood Pressure Measurement using this
Instrument
Checklist for taking a reliable measurement
1. Avoid activity, eating or smoking immediately before the
measurement.
2. Sit down for at least 5 minutes before the measurement and relax.
3. Always measure on the same arm (normally left).
4. Remove close-fitting garments from the upper arm. To avoid
constriction, shirt sleeves should not be rolled up - they do not
interfere with the cuff if they are laid flat.
5. Always ensure that the correct cuff size is used (marking on the
cuff).
Fit the cuff closely, but not too tight.
Make sure that the cuff is positioned 2 cm above the elbow.
The artery mark located on the cuff (ca. 3 cm long bar) must
lie over the artery which runs down the inner side of the arm.
Support your arm so it is relaxed.
Ensure that the cuff is at the same height as your heart.
6. Press the ON/OFF button 1 to start the measurement.
7. The cuff will now pump up automatically. Relax, do not move
and do not tense your arm muscles until the measurement
result is displayed. Breathe normally and do not talk.
8. When the correct pressure is reached, the pumping stops and the
pressure falls gradually. If the required pressure was not reached,
the instrument will automatically pump some more air into the cuff.
9. During the measurement, the heart symbol AN flashes in the
display and a beep sounds every time a heartbeat is detected.
10.The result, comprising the systolic
AT
and the diastolic
AK
blood
pressure and the pulse
AL
is displayed and longer beep is heard.
Note also the explanations on further displays in this booklet.
11.When the measurement has finished, remove the cuff and pack
it into the instrument as shown in Fig. II.
12.Enter the result in the enclosed blood pressure pass and switch
off the instrument. (The monitor does switch off automatically
after approx. 1 min.).
You can stop the measurement at any time by pressing the
ON/OFF button (e.g. if you feel uneasy or an unpleasant
pressure sensation).
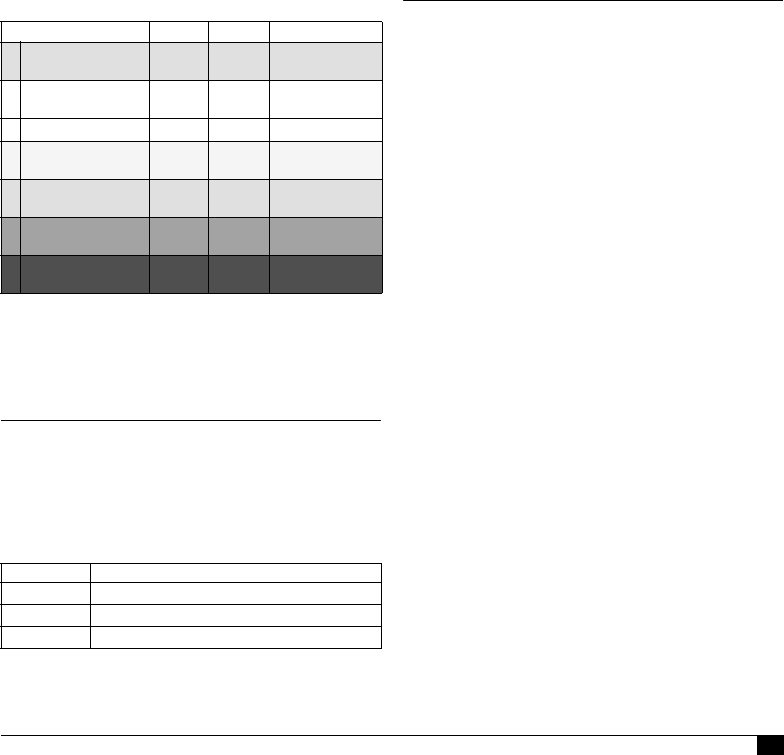
Table for classifying blood pressure values in adults in accordance
with the World Health Organisation (WHO) in 2003. Data in mmHg.
Range Systolic Diastolic Recommendation
blood pressure too low
100
60
Consult your
doctor
1. blood pressure
optimum
100 - 120 60 - 80
Self-check
2. blood pressure normal
120 - 130 80 - 85
Self-check
3. blood pressure slightly
high
130 - 140 85 - 90
Consult your
doctor
4. blood pressure too
high
140 - 160 90 - 100
Seek medical
advice
5. blood pressure far too
high
160 - 180 100 - 110
Seek medical
advice
6. blood pressure
dangerously high
180
110
Urgently seek
medical advice!
Cuff size for circumference of upper arm
S 17 - 22 cm (6.75 - 8.75 inches)
M 22 - 32 cm (8.75 - 12.5 inches)
L 32 - 42 cm (12.5 - 16.5 inches)