
Specifications


microHAM © 2008 All rights reserved
4 - INSTALLATION
Installing DIGI KEYER consists of several steps:
1) prepare DIGI KEYER to work with your radio
2) install microHAM USB Device Router (the control and interface software)
3) configure the Windows USB Audio Device
4) configure Router
Preparing DigiKeyer for Use
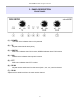
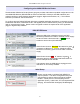
1. Remove the top cover from the DIGI KEYER and set the CAT jumpers as shown in the following chart.
The CAT interface jumpers must be configured to select the proper level for each radio type.
RS-232 levels:
Elecraft: K2, K3, Icom: 7800, JRC: JST-245,
Kenwood TS-480, 570, 870, 2000,
TenTec: all radios with DB9 or DB25 connectors
Yaesu: FT-450, FT-847, FT-920, FT-950, FT-1000MP, Mark V, Mark V Field, FT-2000, FT-9000
IF-232 levels:
Kenwood: TS-140, 440, 450, 680, 690, 711, 790,
811, 850, 940, 950
FIF-232 levels:
Yaesu FT-100, 736, 747, 757GXII, 767, 817, 840,
857, 890, 897, 900, 980, 990, 1000, 1000D
CI-V levels:
Icom: all radios except 7800 with RS-232
TenTec: all radios with 3.2 mm connector
NOTE: the CAT interface is not configured at the factory.
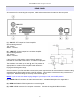
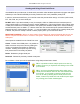
2. Plug the DB15M on the radio cable set into the DB15 connector on the rear panel of the DIGI KEYER
and plug ALL connectors from the cable set to the appropriate jacks at the rear panel of your transceiver.
Each connector on the radio interface cable is marked same as the matching jack on your transceiver.
3. If the radio cable ends with leads for external power, connect these leads to a 12-16V DC power supply.
Be sure to observe the proper polarity.
4. Locate but do not connect the USB cable from DigiKeyer to your computer.
6
IF232
CI-V
FIF232
RS232