
Specifications


microHAM © 2008 All rights reserved
CAT PORT & 2
nd
CAT PORT
The CAT channel is used by application software to control transceiver frequency, mode, T/R switching and
many other parameters using a serial (CAT) protocol. Most modern radios implement some form of CAT but
almost every radio implementation is different. The functionscontrolled by the computer depend on the
particular application and radio.
NOTE: The port number assigned in Router MUST match the port number assigned in the host application.
First configure the virtual COM ports in Router then configure the application.
When a COM port is assigned in the Router but not
in the aplication (or the application is not running)
Router will indicate the channel is closed.
When an application opens the COM port assigned for control (usually at start-up), Router shows the
channel as open and displays baud rate, data bits, parity and number of stop bits used by the applicaiton.
For example, 4800 8N2 means: 4800 baud, 8 bits data length, parity = none, and two stop bits.
Data flowing through the CAT channel is indicated by two arrows. A green arrow indicates data flow from
the application to the radio and a red arrow indicates data flow from the radio to the application.
TIP: If the application provides for PTT (T/R) keying by radio control (CAT) turn this function OFF. PTT
by CAT is not reliable because RFI can prevent the radio from switching back to receive. In addition,
microKEYER II cannot control an amplifier when the application uses PTT by CAT since it has no way to
sense that the the application has placed the transceiver into transmit. There is a dedicated T/R
switching channel for this purpose called PTT.
NOTE: The virtual COM port does not use
handshaking signals. Configure DTR and RTS
settings in your application program (logger) to
OFF. Do not select “Handshake.”
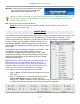
In order for Router to support two CAT ports, it
needs to know what transceiver (CAT protocol)
is being used so it can direct the transceiver's
responses to the proper application. To select
the radio, click the Set button.
Choose your radio in the Radio combo box.
Then select communication speed in the Baud
rate box.
Note: The baud rate must match your radio.
All Icom and some TenTec radios require the
correct CI-V address. If everything is
configured properly, the current operating
frequency and mode should be displayed.
TIP: Disable the Autobaud function in
any Icom transceiver used with Router.
Configure the radio, Router, and your
application software to operate at 9600
or 19200 baud.
Disable router queries – When this box checked, Router will not poll the radio for frequency and mode when
that information is not available from the communication between the application and radio.
17