
Data Sheet


Examples:
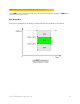
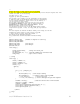
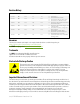
Set to detect object in 100 to 200mm range with LED indicator showing when measurements are taken and
when it is triggered. Take measurements every 500ms.
Note: measurement type should be setup prior to this (i.e. high accuracy mode, etc.)
Enter command on Terminal GUI as:
B 1 100 200 500 1
Command 'B': Autonomous IoT Mode.
The values you entered were –
Operation Mode = Lower/Upper thresholds for Object Detection
Low side limit = 100mm
High side limit = 200mm
Delay between measurements = 500ms
LED indicator = ON
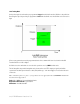
Set to trigger the SDA pin (active low) when and object is brought closer than 50mm and then release this pin
when it is removed past 75mm with LED indicator showing when measurements are taken and when it is
triggered. Take measurements every 100ms.
Note: measurement type should be setup prior to this (i.e. high accuracy mode, etc.)
Enter command on Terminal GUI as:
B 0 50 75 100 1
Command 'B': Autonomous IoT Mode.
The values you entered were –
Operation Mode = Trigger/Release for State Tracking
Low side limit = 50mm
High side limit = 75mm
Delay between measurements = 100ms
LED indicator = ON
Additional Steps to END this mode:
To bring the tinyLiDAR board out of this autonomous mode you only need to issue the AZ command (via the
I2C bus). The proper sequence is as follows:
1) Type AZ on the Terminal GUI and press enter.
2) If successful, you will see the LED on tinyLiDAR give a short rapid blinking pattern for about 1.5
seconds to show it understood your AZ command. If it didn’t work then please repeat from step 1.
3) At this point the board is functioning as normal and can be controlled by the I2C bus again.
tinyLiDAR Reference Manual rev1.26 31