
Data Sheet


Example:
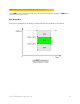
Set to detect object in 10 to 200mm range and output a pulse width of 1sec
with LED indicator showing when measurements are taken and when it is
triggered. Take measurements every 3 seconds. Note: measurement type
should be setup prior to this (i.e. high accuracy mode, etc.)
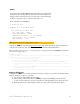
Enter command on Terminal GUI as:
A 10 200 30 10 1
Command 'A': Autonomous Mode.
The values you entered were -
Low side limit = 10mm
High side limit = 200mm
Repetition interval = 30 for 3000ms
Pulse Width = 10 for 1000ms
LED indicator = ON
AZ Autonomous mode end (updated in FW: 1.4.0)
Stops the tinyLiDAR autonomous mode under Host control and enables the I2C port again for normal host
controller based operation. This command is provided in the Arduino Terminal GUI sketch.
This command requires a sequence of steps which are best applied from the tinyLiDAR Terminal GUI
sketch shown in Appendix A.
Additional Steps: (in FW:1.3.8)
To bring the tinyLiDAR board out of this autonomous mode you need to issue the AZ command (via the I2C bus) while also pressing
the RESET button on the tiny board. The proper sequence is as follows:
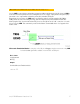
1) Type AZ on the Terminal GUI but do not press enter yet.
2) Click and hold the RESET button on the tinyLiDAR board.
3) Press enter for the GUI Terminal to execute the command while releasing the RESET button on the tinyLiDAR board. A
counter is shown counting down from 10 to 0. You must release the RESET button on the board before 0 is reached on this
counter.
4) If successful, you will see the LED on tinyLiDAR turn on solid for about 3 seconds to show it understood your AZ command. If
it didn’t work then please repeat from step 1.
5) At this point the board is functioning as normal and can be controlled by the I2C bus again.
Update as of FW 1.4.0/1.4.1:
To bring the tinyLiDAR board out of the autonomous modes you only need to issue the AZ command (via the
I2C bus). The proper sequence is as follows:
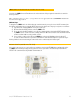
1) Type AZ on the Terminal GUI and press enter.
2) If successful, you will see the LED on tinyLiDAR give a short rapid blinking pattern for about 1.5
seconds to show it understood your AZ command. If it didn’t work then please repeat from step 1.
3) At this point the board is functioning as normal and can be controlled by the I2C bus again.
tinyLiDAR Reference Manual rev1.26 26