
User Guide


12/29/2017 Open Source WiFi Weather Station System - Microduino Wiki
http://wiki.microduinoinc.com/Open_Source_WiFi_Weather_Station_System 9/10
Step5
Connect the sensors below to Microduino-Sensorhub.
Temperature and humidity sensorMicroduino-Temp&Hum
Air quality detectorMicroduino-Air Quality
Light sensorMicroduino-Light
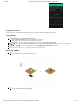
Refer to the picture below, stack all sensors on the slot of Structure-B1 and Structure-B2.
After that, connect Structure-A1 and Structure-A2 at the top and bottom of the system respectively.
Step6
Complete the steps above, then fixate with Structure-B0 and plug in a USB cable. Congratulations! You just finished the buildup of the
Weather Station.
Step7
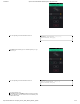
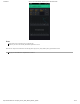
You can see sensor data on Microduino-OLED after setting.
At the same time, you can also see uploaded data of the Weather Station on your phone Blynk.