
User`s guide


Projects and Workspaces
© 2006 Microchip Technology Inc. DS51519B-page 69
4.7 SETTING UP/CHANGING A PROJECT
You can use the following steps to create a new project manually (using the Project
Setup Wizard is recommended) or change an existing project's settings.
• Create a New Project
• New Project Window
• Setting Up a Project – Set Up Language Tools
• Setting Up a Project – Choose Toolsuite
• Setting Up a Project – Add Files
• Setting Up a Project – Set Build Options
• Setting Up a Project – Save and Build
4.7.1 Create a New Project
To create a new project in the current workspace:
• Using Windows Explorer, create a directory for your project (e.g. C:\Proj1).
• In MPLAB IDE, select Project>New
. The New Project dialog will open asking you
the name and location of the new project.
• Enter the Project name, e.g., Proj1.
• Enter the path to your new project. Click Browse to locate your directory.
•Hit OK. The Save Workspace As dialog will open.
To save the workspace with the new project in it:
• Enter the Workspace name, i.e., cnt452.
•Hit OK.
MPLAB IDE will create a project file with the extension .mcp and a workspace file with
the extension .mcw.
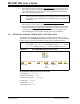
4.7.2 New Project Window
If it is not already open, open the Project window by selecting View>Project. The
workspace name should be visible in the top bar of the Project window. The name of
the project should be visible inside the Project window at the top of the display. A tree
structure listing file types will appear below.
FIGURE 4-2: EXAMPLE PROJECT WINDOW