
User`s guide


MPLAB
®
IDE User’s Guide
DS51519B-page 62 © 2006 Microchip Technology Inc.
4.2 USING THE PROJECT WIZARD
The project wizard consists of several dialogs which will walk you through setting up
your project.
• Project Wizard – Welcome
• Project Wizard – Select Device
• Project Wizard – Select a Language Toolsuite
• Project Wizard – Name Your Project
• Project Wizard – Add Files
• Project Wizard – Summary
4.2.1 Project Wizard – Welcome
Select Project>Project Wizard to begin the setup wizard for projects.
Follow the dialogs in the Project Wizard to set up your new project.
You may also use the browse sequence in the Help viewer to view the steps in the
wizard.
Click Next to continue.
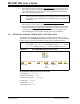
4.2.2 Project Wizard – Select Device
Step 1: Select a Device – The value shown will be either the default MPLAB IDE device
or a device that was previously selected using the Select Device dialog. Select a device
for your project from the list or start typing in a device name.
Click Next to continue.
4.2.3 Project Wizard – Select a Language Toolsuite
Step 2: Select a Language Toolsuite
• Select a language toolsuite for your project from the “Active Toolsuite” drop-down
menu. Although third-party language tools may be shown regardless of the device
selected, only those Microchip language toolsuites that are installed and work with
the selected device are available from this menu. To see all available (installed)
toolsuites, check “Show all installed toolsuites.”
If you still don't see the desired toolsuite in this list, click Help! My Toolsuite Isn't
Listed! for more information.
• A list of tools in the selected toolsuite are shown in a box under “Toolsuite Con-
tents”. A tool with a red “X” preceding it is not installed or the path to the execut-
able is not known to MPLAB IDE. To assign or check assignments of tools to
executable files, click on the tool to show the executable and path under “Location
of Selected Tool”. Type in this text box to enter or change the assignment, or click
Browse to find the executable.
Click Next to continue.