
User`s guide


Walk-Through and Detailed Tutorial
© 2006 Microchip Technology Inc. DS51519B-page 53
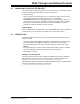
3.11 VIEWING THE PROJECT WINDOW
If it is not already open, open the Project window by selecting View>Project. The
workspace name should be visible in the top bar of the Project window. The name of
the project should be visible inside the Project window at the top of the display. A tree
structure listing file types and any added files will appear below.
For more on this window, see Section 12.4 “Project Window”.
Tutorial Step 10:
Your project window should look like Figure 3-1.
• Right click on tree items to view various pop-up menus.
• Right click on “Source Files” and you will see “Add Files”, which means you can
add more source files to your project after you have initially set it up. Right click on
the file cnt8722.asm and you will see “Remove”, which is how you can delete
files from your project.
• Right click in an open area of the window and select “Preferences” from the
pop-up menu. This will open the Project-Display Preferences dialog.
• Although you will not be changing any preferences for this tutorial, notice the
Version Control section. For more on using version control files in your projects,
see Section 4.6 “Using A Version Control System (VCS)”.
•Click Cancel to close the dialog.
FIGURE 3-1: EXAMPLE PROJECT WINDOW
3.12 SETTING BUILD OPTIONS
MPLAB IDE has default settings for tools and files contained in a project. However, you
may want or need to modify these settings.
To set build options, select Project>Build Options>Project
or right click on the project
name in the Project window and select Build Options from the pop-up menu.
• The Build Options dialog will open.
• Click the General tab and enter or Browse to paths for output files, include files
library files or linker script files.
• Click a specific language tool tab (e.g., MPASM Assembler) and set up
operational features for that tool.
•Click OK.
Note: These are MPLAB IDE paths. Not all language tools use this information.