
User`s guide


A Basic Tutorial for MPLAB IDE
© 2006 Microchip Technology Inc. DS51519B-page 31
2.8 ADDING FILES TO THE PROJECT
Step Four of the Project Wizard allows file selection for the project. A source file has
not yet been selected, so we will use an MPLAB IDE template file. The template files
are simple files that can be used to start a project. They have the essential sections for
any source file, and contain information that will help you write and organize your code.
There is one template file for each Microchip PICmicro MCU and dsPIC DSC device.
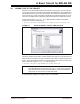
Choose the file named 8722tmpo.asm. If MPLAB IDE is installed in the default
location, the full path to the file will be:
C:\Program Files\Microchip\MPASM Suite\Template\Object\8722tmpo.asm
FIGURE 2-6: PROJECT WIZARD – SELECT TEMPLATE FILE
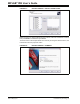
Press Add>> to move the file name to the right panel, and click on the checkbox at the
start of the line with the file name to enable this file to be copied to our project directory.
Next, add the second file for our project, the linker script. There is a linker script for each
device. These files define the memory configuration and register names for the various
parts. Use the file named 18F8722.lkr. The full path is:
C:\Program Files\Microchip\MPASM Suite\LKR\18F8722.lkr
To copy this linker script into our project, click on the checkbox.
Note: There is also a linker script named 18F8722i.lkr, for use with this device
when MPLAB ICD 2 is being used (hence the “i” in the name). That linker
script reserves areas in memory for MPLAB ICD 2. Since the simulator is
being used, we don’t need to use that linker script.