
User`s guide


Using Stimulus – PIC17 Devices
© 2006 Microchip Technology Inc. DS51519B-page 243
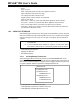
19.2.3 Pin Stimulus Display
Select Debugger>Stimulus and then click the Pin Stimulus tab to set up pin stimulus.
Closing the Stimulus dialog disables stimulus.
Buttons – Row Edit
• Add Row – allows you to add a new pin stimulus. A default pin row at the bottom
of the pin list will be created and the cursor will be moved there for editing.
• Delete Row – removes the row at the cursor from the list.
• Edit Complete – turns off the display of any list boxes, so all the data appear
clearly.
Buttons – Pin Stimulus File
• Load – allows you to specify a previously saved pin stimulus file and add its
contents to the stimulus list.
• Save – allows you to save the current contents of the stimulus list to a pin stimulus
file of your choice.
Table Entries
• Type – has a choice list containing “Asynch” and “Synch”. The Type you select
determines what is available in some of the remaining cells in that row.
• Enable – has a checkbox for Synch stimulus, a Fire button for Asynch Stimulus.
This is not a data cell.
• Pin – contains the names of the available pins. The actual names depend on the
device selected in the IDE.
Note 1: If any files are changed externally while in use by this dialog tab, the
changes will NOT be reflected in the stimuli passed to the simulator.
Changing stimulus files outside the Stimulus dialog is NOT
recommended.
2: Unsaved changes will be lost without notice when you close this dialog.