
User`s guide


MPLAB
®
IDE User’s Guide
DS51519B-page 242 © 2006 Microchip Technology Inc.
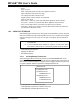
Asynchronous Setup
a) Click on “Pin” to select or change the pin on which stimulus will be applied.
Available pin names are listed. The actual names depend on the device
selected in MPLAB IDE.
b) Click on “Action” to select or change a stimulus action. You may choose
Pulse, High, Low or Toggle.
c) Click on “Comments” to specify or change a comment which will be saved
and restored in the pin stimulus file.
Synchronous Setup
a) Click on “Pin” to select or change the pin on which stimulus will be applied.
Available pin names are listed. The actual names depend on the device
selected in MPLAB IDE.
b) Click on “High Cycles” to set or change the number of Clock cycles till the
high state is applied. Then click on “Low Cycles” to set or change the number
of Clock cycles till the low state is applied.
c) Click on “Invert” to set or change whether high and low cycles are inverted.
d) Click on “Comments” to specify or change a comment which will be saved
and restored in the pin stimulus file.
4. When you have completed adding or editing data in a row, click Edit Complete.
5. Continue adding or editing other rows of data till your pin stimulus is complete. If
you wish to remove a row, click on a cell in the row to select the row and then
click Delete Row.
6. When you are done, click Save and save the pin stimulus file (.psti).
19.2.2 Applying Pin Stimulus
Once you have created/edited a pin stimulus file, you may apply the stimulus as
follows:
• Asynchronous stimulus (Type = Asynch): Press the Fire button. The designated
event occurs on the designated pin.
• Synchronous stimulus (Type = Synch): Check the enable field. A message is sent
to MPLAB SIM to update the stimuli. Thus whatever is displayed is current.
Note: The Stimulus dialog must be open for stimulus to be active.