
User`s guide


Using Stimulus
© 2006 Microchip Technology Inc. DS51519B-page 239
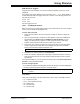
18.3 STIMULUS CONTROLLER DIALOG
Use the Stimulus Controller dialog to control how stimulus is used by MPLAB SIM.
The Stimulus Controller dialog allows you to set up what stimulus is used and saves
this information in a scenario. To open a new scenario, select Debugger>Stimulus
Controller>New Scenario. To open an existing scenario for editing, select Debugger>
Stimulus Controller >Open Scenario.
When setting up SCL file input as well as asynchronous stimulus, be aware of Stimulus
Input Interaction.
18.3.1 Stimulus (SCL) File
If you have developed a synchronous stimulus file using the SCL Generator Dialog,
click Attach to search for the file and location, and attach it to the controller.
To remove an SCL file from the controller, click Detach.
If you wish to merge two SCL files into one, click Import/Merge.
18.3.2 Asynchronous Stimulus
Enter any asynchronous, or user-fired, stimulus here, row by row. To remove a row,
select the row and then click Delete Row.
There are two types of asynchronous stimulus: regular stimulus, for most pins/SFRs,
and message-based stimulus, for USART/UART pins/SFRs.
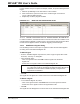
Note: This dialog must be open for stimulus to be active.
Item Definition
Fire Click the button in this column corresponding to the row for which you want
to trigger stimulus. Obviously, you must set up all other row items before
you can use “Fire”.
Pin/SFR Select or change the pin/SFR on which stimulus will be applied. Available
pin names are listed in a drop-down list. The actual names depend on the
device selected in the MPLAB
®
IDE.
Action Select or change a stimulus action.
Regular Stimulus:
Choose “Pulse”, “High”, “Low” or “Toggle”.
Message-Based Stimulus:
Choose “File Message” or “Direct Message”. “File Message” means you will
use a file containing message packets. For a file with more than one packet,
comments will delineate the packets. Each click of “Fire” will inject one
packet, until the end-of-file is reached, where the file will automatically
rewind. (For file format information, see Section 18.2.5.2 “Message-Based
Data File Description”.)
“Direct Message” means you will use the Comments/Message cell to define
a one-line message packet.
Width If “Pulse” was chosen for the Action, then you may specify or change a
pulse width value here. Enter the units for this value in the next cell of the
row.
Units If “Pulse” was chosen for the Action, then you may specify or change a
pulse width unit here. Enter the value for this unit in the previous cell of the
row.
Comments /
Message
Regular Stimulus:
Specify or change a comment about the stimulus.
Message-Based Stimulus:
Specify or change the stimulus message.
Note: This message must be pure data, i.e., no wait time allowed.