
User`s guide


MPLAB
®
IDE User’s Guide
DS51519B-page 12 © 2006 Microchip Technology Inc.
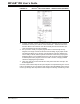
FIGURE 1-4: PICmicro
®
MCU DATA SHEET – INSTRUCTIONS (EXCERPT)
2. Compile, assemble and link the software using the assembler and/or compiler
and linker to convert your code into “ones and zeroes” – machine code for the
PICmicro MCUs. This machine code will eventually become the firmware (the
code programmed into the microcontroller).
3. Test your code. Usually a complex program does not work exactly the way
imagined, and “bugs” need to be removed from the design to get proper results.
The debugger allows you to see the “ones and zeroes” execute, related to the
source code you wrote, with the symbols and function names from your program.
Debugging allows you to experiment with your code to see the value of variables
at various points in the program, and to do “what if” checks, changing variable
values and stepping through routines.
4. “Burn” the code into a microcontroller and verify that it executes correctly in the
finished application.
Of course, each of these steps can be quite complex. The important thing is to concen-
trate on the details of your own design, while relying upon MPLAB IDE and its compo-
nents to get through each step without continuously encountering new learning curves.