
User's Manual


Before connection RN4020 to Apple device, users may need to setup RN4020 by
following way:
1. Set GPIO 3 to low to enter command mode
2. Open a terminal emulator that connects to the serial port of RN4020 with
following parameters:
a. baud rate: 115200
b. data bits: 8
c. parity: none
d. stop bits: 1
3. Issue command “+” to turn on echo
4. Issue command “SF,1” to reset to factory default configuration
5. Issue command “SS,C0000000” to enable support of Device Information and
Battery services
6. Issue command “SR,4000” to enable buffered read feature
7. Issue command “R,1” to reboot the module and make the new configurations
effective.
8. After RN4020 powering up and “CMD” is displayed on terminal emulator,
issue command “LS” to display current services that RN4020 enumerates and
support as server role.
The output of command “LS” should look like following:
180A
2A25,000B,V
2A27,000D,V
2A26,000F,V
2A28,0011,V
2A29,0013,V
2A50,0015,V
2A24,0017,V
180F
2A19,001A,V
2A19,001B,C
END
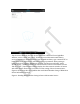
9. Issue command “A” to start advertisement.
Now launch the LightBlue app. At the bottom of the window, tap “Central” to make
Apple device as central device. RN4020 should show up as “MCHP_LE” by default
and ready to be connected. (Sometimes, device name “MCHP_LE” won’t show up
until later. If that is the case, device name will be shown as “Peripheral”.) See figure
3 for the snapshot.
Figure 3: Discovering RN4020