
User manual


MCP9800 Temperature Data Logger Demo Board 2 User’s Guide
DS22027A-page 10 © 2007 Microchip Technology Inc.
5. Insert the MCP9800 Temperature Data Logger Demo Board 2 into to SEEVAL
®
32 evaluation board. To do this, flip the board upside down making sure the ICSP
pins are facing the right side of the SEEVAL
®
32 evaluation board. Place the 8
header pins in the rear (right side) of the ZIF socket. Close the socket.
6. Select Read>Entire Device
to read the 24LC16B.
7. Your data (hexadecimal) will be displayed on the SEEVAL
®
32 evaluation tool
software GUI.
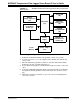
FIGURE 1-3: SEEVAL
®
32 Evaluation Tool GUI Window on the PC
2.3.3 Storing your Data
Select File>Export>Hex File and store your data to your PC (filename.hex).
2.3.4 Displaying Temperature Data
1. Open file Temperature Graph.xls (Provided on the CD). Choose enable
macros if prompted. (May need to adjust security settings here if you are unable
to launch the file.)
2. Press the Import Data button.
3. Find your data file on your PC (filename.hex), Press Open Button.
4. Enter “1” for sample period when asked and press OK. If you have changed the
sample period in the firmware you will need to adjust the sample period here,
default is approximately 1 sample/sec.
5. Temperatures both positive and negative will be displayed on the graph. Tabs at
the bottom of the graph will show either °F or °C.