
User manual


MCP9800 Temperature Data Logger Demo Board 2 User’s Guide
DS22027A-page 8 © 2007 Microchip Technology Inc.
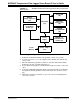
FIGURE 1-1: MCP9800 Temperature Data Logger Demo Board 2 Functional
Block Diagram
2.3.1 Programming the PIC10F202
1. Download and Install the PICkit™ 2 programmer software onto your PC.
2. Copy the SEEVALDM-DL.hex file (supplied on the CD that came with this kit)
onto your PC.
3. When the PICkit™ 2 programmer software is started the main window will be
displayed on the PC, as indicated in Figure 1-2.
4. Be sure that the battery (BT1) is installed and the jumper for Power is connected
(JP1).
5. Connect the MCP9800 Temperature Data Logger Demo Board 2 to the PICkit™
2 programmer (both programmer and board should be face up when connect-
ing).
6. PICkit™ 2 programmer should have a green led on the front indicating that no
errors have occurred.
PIC10F202
(U3)
24LC16B
Serial EEPROM
(U2)
MCP9800
Temp. Sensor
(U4)
SEEVAL
®
32
Evaluation Tool
Header (U1)
MCP101
Voltage Supervisor
(U5)
Status LED
(D2)
PICkit™ 2
Programmer
Power
Battery Jumper
(JP1)
Supply
3.3 VDC
(Battery)
Header (J1)