
User manual


Installation and Operation
© 2010 Microchip Technology Inc. DS51929A-page 31
22. On the PICkit Serial Analyzer command bar, click the Reset button.
23. Select the “MCP4661W0WR” script in the User I2CM Scripts column and then
click on the Execute Script button.
24. Select the “MCP4661W0RD” script in the User I2CM Scripts column and then
click on the Execute Script button.
25. Select the “MCP4661W0DEC” script in the User I2CM Scripts column and then
click on the Execute Script button three times.
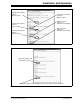
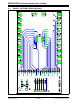
26. Select the “MCP4661W0RD” script in the User I2CM Scripts column and then
click on the Execute Script button. The Transaction window shows the scripts
that were executed and the current value of the Wiper 0 (see Figure 2-18).
27. In the Transaction window, click the Clear button.
28. On the PICkit Serial Analyzer command bar, click the Reset button.
29. Select the “MCP4661W0WR” script in the User I2CM Scripts column and then
click on the Execute Script button.
30. Select the “MCP4661W0RD” script in the User I2CM Scripts column and then
click on the Execute Script button.
31. Select the “MCP4661W0INC” script in the User I2CM Scripts column and then
click on the Execute Script button three times.
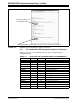
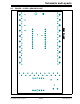
32. Select the “MCP4661W0RD” script in the User I2CM Scripts column and then
click on the Execute Script button. The Transaction window shows the scripts
that were executed and the current value of the Wiper 0 (see Figure 2-19).
33. You can repeat the sequence of writing values to the wiper register or writing then
reading the values back.
NOTICE
If at any time during script execution, an error message is generated in the transaction
window, it is good practice to reset the PICkit™ Serial Analyzer (PKSA). The PKSA can
be reset using the “Reset” toolbar icon. Verify that subsequent script operations do not
generate errors.