
User`s guide


MPLAB Starter Kit for dsPIC
®
DSCs User’s Guide
DS51700A-page 16 © 2008 Microchip Technology Inc.
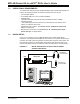
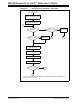
3.2 SETTING UP AN EXAMPLE APPLICATION FOR DEBUG
The MPLAB IDE software that is installed on your PC by the starter kit CD-ROM auto-
matically opens an example application that you may use to examine debug features
of the starter kit.
To prepare the application for debug:
1. Launch MPLAB IDE. The example application project and related workspace will
open. For information on projects and workspaces, see the MPLAB IDE
documentation mentioned at the beginning of this chapter.
2. Select Project>Build All
to build the application code. The build’s progress will be
visible in the Build tab of the Output window.
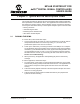
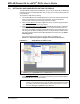
3. Select Debugger>Select Tool>Starter Kits
. MPLAB IDE will change to add starter
kit debug features (Figure 3-1): (1) the status bar will show Starter Kits as the
debug tool, (2) a Starter Kit debug toolbar will be added, (3) the Debugger menu
will change to add Starter Kit debug functions and (4) the Output window will dis-
play communication status between MPLAB IDE and the stater kit on the Starter
Kit Debugger tab.
Also, several device resources are used for debug. For details, see
Section 3.7 “Determining Device Support and Reserved Resources”.
FIGURE 3-1: STARTER KIT AS DEBUG TOOL
4. Select Debugger>Program
to program the application code into the dsPIC33F
DCS device on the starter kit. The debug programming progress will be visible in
the Starter Kit tab of the Output window.
1
3
4
2
Note: Debug executive code is automatically programmed in the upper program
memory of the starter kit device when the starter kit is selected as a debug-
ger. Debug code must be programmed into the target device to use the
in-circuit debugging capabilities of the starter kit.