
User`s guide


MPLAB STARTER KIT FOR
dsPIC
®
DIGITAL SIGNAL CONTROLLERS
USER’S GUIDE
© 2008 Microchip Technology Inc. DS51700A-page 15
Chapter 3. Develop an Application
The MPLAB Starter Kit for dsPIC
®
Digital Signal Controllers may be used with MPLAB
IDE, the free integrated development environment available on Microchip’s website.
MPLAB IDE allows the starter kit to be used as an in-circuit debugger as well as a
programmer for the featured device.
In-circuit debugging allows you to run, examine and modify your program for the device
embedded in the starter kit hardware. This greatly assists you in debugging your
firmware and hardware together.
Special starter kit software interacts with the MPLAB IDE application to run, stop and
single-step through programs. Breakpoints can be set and the processor can be reset.
Once the processor is stopped, the register’s contents can be examined and modified.
For more information on how to use MPLAB IDE, reference the following
documentation:
• MPLAB
®
IDE User’s Guide (DS51519)
• MPLAB
®
IDE Quick Start Guide (DS51281)
• MPLAB
®
IDE On-line Help
This chapter includes the following:
• Installing the Hardware and Software
• Setting Up an Example Application for Debug
• Running the Example Application
• Debugging the Example Application
• Programming the Debugged Application
• Creating Other dsPIC DSC Applications
• Determining Device Support and Reserved Resources
• Troubleshooting
• Settings Dialog, Info Tab
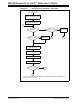
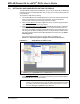
3.1 INSTALLING THE HARDWARE AND SOFTWARE
To install the hardware:
If you have not already set up the hardware to run the demo, follow these steps:
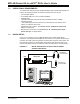
1. Connect a microphone to socket J9. Connect a headphone to socket J8. Ensure
that potentiometer R56 is set to the factory setting, i.e., the arrow on the
potentiometer points to the arrow on the board.
2. Power up the starter kit by connecting the board to the USB port of a computer.
You should briefly see a pop-up balloon in the system tray (lower right of desktop)
that states (1) new hardware has been found, (2) drivers are being installed, and
(3) new hardware is ready for use. If you do not see these messages and then
the starter kit does not work, try reconnecting the USB. If this does not work, see
Section 3.8 “Troubleshooting”.
3. When powered up, the application will repeatedly play back an introductory
message.
To install the software:
Run CD-ROM enclosed with the starter kit and install software as directed.