
User`s guide


MPLAB STARTER KIT FOR
dsPIC
®
DIGITAL SIGNAL CONTROLLERS
USER’S GUIDE
© 2008 Microchip Technology Inc. DS51700A-page 9
Chapter 2. Speech Record and Playback Demo
This chapter describes the Speech Record and Playback Demonstration application
that is preloaded on the dsPIC33F device. This application demonstrates how to use
the starter kit for speech capture, speech playback, speech encoding and decoding,
and using the serial Flash memory to store speech samples. Topics covered include:
• Running the Demo
• Understanding the Demo
• Examining Demo Software Flow
• Other Demo Code Examples
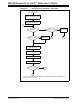
2.1 RUNNING THE DEMO
To run the demo, follow these basic steps:
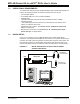
1. Connect a microphone to socket J9. Connect a headphone to socket J8. Ensure
that potentiometer R56 is set to the factory setting, i.e., the arrow on the
potentiometer points to the arrow on the board.
2. Power up the starter kit by connecting the board to the USB port of a computer.
You should briefly see a pop-up balloon in the system tray (lower right of desktop)
that states (1) new hardware has been found, (2) drivers are being installed, and
(3) new hardware is ready for use. If you do not see these messages and then
the starter kit does not work, try reconnecting the USB. If this does not work, see
Section 3.8 “Troubleshooting”.
3. When powered up, the application will repeatedly play back an introductory
message.
To use the application, follow these steps:
1. To record speech, press switch S1 and wait till the Red LED turns off (the serial
Flash memory is being erased) and the Yellow LED turns on. The application will
now record the microphone audio signals and store them in the serial Flash
memory.
2. Press switch S2 to playback and listen to the stored speech samples. The Green
LED turns on during playback.
3. Pressing switch S1 again erases the serial Flash memory and prepares the
system for another recording.