
User manual


Getting Started with the PICDEM.net 2 Development Board
2011 Microchip Technology Inc. DS51623D-page 17
2.4.1 Connecting to a Network
This configuration is the basic method of networking the PICDEM.net 2 Development
Board. This assumes there is a stable Ethernet network using TCP/IP for
communications and that at least one DHCP server is present on the network.
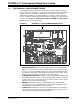
To set up the board for direct networking (see Figure 2-1):
1. Unbox and unwrap the board, and set it on a non-conductive surface near the
host computer.
2. Connect the straight-through Ethernet cable to the board at Ethernet connector,
J1, then to the Ethernet network. This can be at a network port or an available
port on a network device (such as a hub, switch or router).
3. Apply power to the board (9 V
DC) at J7.
FIGURE 2-1: CONNECTING THE PICDEM.net 2™ DEVELOPMENT BOARD
TO A NETWORK
Note: Do NOT use the provided crossover cable if you are directly connecting the
board to a network or network device. The crossover cable is intended only
for connecting the board directly to a computer.
Note: The Development Kit does not include a power supply. An unregulated
2.5 mm center-positive DC supply of 7V to 12V (preferably 9V) with a
current capability of 500 mA is sufficient. If an external supply is needed,
use either Microchip part number AC002014 or AC162039.
9VDC from
Power Supply
PICDEM.net™ 2 Development Board
Network Cable
Ethernet Port
Ethernet Network Device
or
Network Port
Straight-Through
(J1)
PICDEM.net™ 2
Development
Board
PICtail™
Daughter
Board