
Datasheet

GettingupandrunningwithchipKIT™Pi
chipKIT™PireliesontheopensourceMPIDEintegrateddevelopmentenvironment,aversionof
whichhasbeenportedtoanoperatingsystemthatrunsonRaspberryPi.
Itisrecommended,foreaseandforfirsttimeuse,thatusersdownloadthecompleteoperating
systemandMPIDEasacompletepackage.
Thiscanbedownloadedat
http://downloads.element14.com/downloads/chipkit_pi.zip
,andshouldbesavedtoyourcomputer.
Thefilewillbequitelarge(2GB),andwillrequireunzippingonceithasbeendownloaded.Once
unzipped,youwillbeleft witha.ISOimagefile,readyforflashingtoyouremptySDCard.
ChooseanSDCardofatleast4GB
capacity.UseaflashingutilitylikeWin32DiskImager(available
forfree,fromhttp://sourceforge.net/projects/win32diskimager/)toflashthe.ISOimagetoyourSD
Card.Whencomplete,insertthefullyflashedSDCardtoyourRaspberryPi.
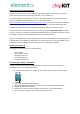
PlugyournewchipKIT™PiboardintoRaspberryPi,andpowerup.AsMPIDEis
alreadyinstalled,you
shouldbeabletostartMPIDEfromthedesktop.Forreliableoperation,donotplugchipKIT™Piinto
aRaspberryPithatisalreadypoweredup.Alwayspowerupbothdevicestogether.
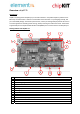
PoweringthechipKIT™Pi
ThechipKITPicanbepow eredin thefo llowingways:
‐ OvertheUSB
‐ ViatheICSPConnection
‐ ThroughtheVininput
‐ FromtheRaspberryPi
‐ Throughthepowerjack
ProgrammingthechipKITPifromMPIDE
InordertoprogramthechipKITPifromMPIDEwithyoursketch,theboardmustbesetto
bootloadermode.Toenterbootloadermode:
1. EnsurethatbothJumpersJP1andJP4areconnectedtoupper‐mostpinsoftheirheader
2. PressandholdtheBOOTLOAD‐ENbutton.
3.
WhiletheBOOTLOAD‐ENbuttonisstillpressed,pressandreleasetheRESETbutton.
4. ReleasetheBOOTLOAD‐ENbutton.
5. BootloadermodewillbeconfirmedwhentheTX1LEDisonandtheRX1flashes.
6. Afterthesketchisuploaded,theTX1andRX1LEDswillturnoff.