Atmel AVR 8-bit Microcontrollers ATtiny104 Xplained Nano USER GUIDE Preface ® The Atmel ATtiny104 Xplained Nano evaluation kit is a hardware platform to evaluate the ATtiny104 microcontroller. Supported by the Atmel Studio integrated development platform, the kit provides easy access to the features of the Atmel ATtiny104 and explains how to integrate the device in a custom design.
Table of Contents Preface............................................................................................................................ 1 1. Introduction................................................................................................................ 3 1.1. 1.2. Features....................................................................................................................................... 3 Kit Overview.............................................................
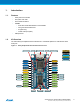
1. Introduction 1.1. Features • • • • • 1.2. ATtiny104 microcontroller One yellow user LED One mechanical button mEDBG – Auto-ID for board identification in Atmel Studio – One green board status LED – Programming – Virtual COM port (CDC) USB powered Kit Overview The Atmel ATtiny104 Xplained Nano evaluation kit is a hardware platform to evaluate the Atmel ATtiny104. Figure 1-1.
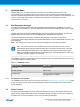
2. 2.1. Getting Started Xplained Nano Quick Start Steps to start exploring the Atmel Xplained Nano platform: 1. Download Atmel Studio 2. Launch Atmel Studio 3. Connect a USB cable (Standard-A to Micro-B or Micro-AB) between the PC and the USB port on the kit When the Xplained Nano kit is connected to your computer for the first time, the operating system will ® perform a driver software installation.
3. Xplained Nano Xplained Nano is an evaluation platform that provides a set of small boards with access to all microcontoller I/O's. The platform consists of a series of low pin-count Microcontroller (MCU) boards, which are integrated with Atmel Studio to present relevant user guides, application notes, datasheets, and example code through Atmel Studio. The platform also features a Virtual COM port for serial communication to a host PC. 3.1.
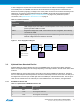
If other voltages are required, the kit must be disconnected from the USB to avoid damage or contention to the USB power. The mEDBG must also be disconnected from the target section of the board. The board can be power by applying a voltage to one of the power connections on the board according to the table below. To avoid any power leakage through the mEDBG, this should also be disconnected by removing the resistors shown in Figure 3-3 Kit Modifications on page 8.
Pin number Name Description 4 NC No Connect 5 VREG Regulated voltage or VUSB if no regulator present. 6 UART RX mEDBG UART RX line 7 UART TX mEDBG UART TX line 8 CLK mEDBG clock output 9 GND Ground 10 VUSB USB voltage Figure 3-2. Xplained Nano Standard Pin-Out for TPI Power disconnect 3.4.
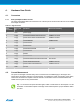
Figure 3-3.
4. Hardware User Guide 4.1. Connectors 4.1.1. ATtiny104 Xplained Nano Pin-Out The ATtiny104 Xplained Nano has a direct fan-out of the I/O pins of the device and all I/O's are accessible at the edge connectors. Table 4-1.
Caution: Removing the resistor while the kit is powered without an ammeter or jumper may cause the ATtiny104 to be powered through its I/O pins. This may cause permanent damage to the device. Figure 4-1. Current Measurement VREG VCC Power disconnect 4.3. Peripherals 4.3.1. LED There is one yellow LED available on the ATtiny104 Xplained Nano board that can be turned ON and OFF. The LED can be activated by driving the connected I/O line to GND. Table 4-2. LED Connection 4.3.2.
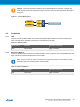
5. Embedded Debugger Implementation ATtiny104 Xplained Nano contains a Mini Embedded Debugger (mEDBG) that can be used to program the ATtiny104 using Tiny Program Interface (TPI). The mEDBG also include a Virtual Com port interface over UART. Atmel Studio can be used as a front end for the Mini Embedded Debugger. 5.1. Tiny Program Interface The Tiny Program Interface (TPI) uses two pins to communicate with the target.
6. Hardware Revision History and Known Issues 6.1. Identifying Product ID and Revision The revision and product identifier of Xplained Nano boards can be found in two ways; either through Atmel Studio or by looking at the sticker on the bottom side of the PCB. By connecting an Xplained Nano board to a computer with Atmel Studio running, an information window will pop up. The first six digits of the serial number, which is listed under kit details, contain the product identifier and revision.
7. Document Revision History Doc. rev. Date Comment 42671A 02/2016 Initial document release.
8. Evaluation Board/Kit Important Notice This evaluation board/kit is intended for use for FURTHER ENGINEERING, DEVELOPMENT, DEMONSTRATION, OR EVALUATION PURPOSES ONLY. It is not a finished product and may not (yet) comply with some or any technical or legal requirements that are applicable to finished products, including, without limitation, directives regarding electromagnetic compatibility, recycling (WEEE), FCC, CE or UL (except as may be otherwise noted on the board/kit).
Atmel Corporation © 1600 Technology Drive, San Jose, CA 95110 USA T: (+1)(408) 441.0311 F: (+1)(408) 436.4200 | www.atmel.com 2016 Atmel Corporation. / Rev.: Atmel-42671A-ATtiny104-Xplained-Nano_User Guide-02/2016 ® ® ® Atmel , Atmel logo and combinations thereof, Enabling Unlimited Possibilities , AVR and others are registered trademarks or trademarks of Atmel Corporation in ® U.S. and other countries. Windows is a registered trademark of Microsoft Corporation in U.S. and or other countries.