
User manual


AVR370
7
8374A-AVR-04/11
5 Programming the kit
5.1 Programming via the bootloader
The preprogrammed bootloader on the Atmel ATmega1284P offers the possibility to
program the device via the UART interface. Since the default firmware of the board
controller acts as UART to USB bridge the ATmega1284P can be programmed from
the PC via the USB connection to the kit.
The bootloader on the ATmega1284P is evoked by pushing the mechanical switch
(SW0) during reset. Programming can be performed by using the command line tool
from the AVROSP package. More information about AVROSP can be found in the
application note that is available for this package. The executable file avrosp.exe
is the only file required to use AVROSP. It is contained in the avr911.zip file that
comes with this application note. The zip-file also contains the complete source code
and a copy of the part description files from an Atmel AVR Studio 4 installation.
5.1.1 Step-by-step guide
To program the device, follow these steps:
1. Connect the USB cable from the PC to the kit
2. Press the reset button and the SW0 button
3. Release the reset button while still pressing the SW0 button
4. Release the SW0 button
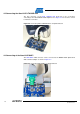
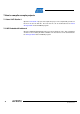
5. Open the device manager and locate the COM port used by the kit, it should be
listed as “XPLAINED Virtual Com Port” as shown in Figure 5-1
Figure 5-1. Xplained kit COM port.
6. The communication port settings (baud rate, parity control etc.) must be set
manually before using AVROSP. The needed settings are 57600bps, no parity
control and eight data bits. Therefore the following command must be executed
on the DOS command interpreter assuming the kit is listed under COM6, as
shown in Figure 5-1: mode com6 baud=57600 parity=n data=8