AVR370: MEGA-1284P Xplained Getting Started Guide Features 8-bit Microcontrollers • Easy to reprogram with just a USB cable and a preprogrammed bootloader • Easy to debug code with JTAG based debugger/emulator 1 Introduction Application Note ® The Atmel MEGA-1284P Xplained evaluation kit is a hardware platform to evaluate the Atmel ATmega1284P microcontroller.
What is needed to get started To be able to run the preprogrammed code, you need the Atmel MEGA-1284P Xplained evaluation kit and a USB cable (standard A to mini-B or mini AB) to connect the board to a PC. To modify the example code or write new code and compile it, you need a toolchain for the Atmel AVR® microcontrollers and an IDE to edit and debug code. Atmel provides both the AVR Studio® 4 and the AVR GNU toolchain. Other IDEs and toolchains are also available like the IAR Embedded Workbench®.
AVR370 2.4 Toolchain In order to build an application from the source code a toolchain is needed, which includes the required tools like assembler, compiler, and linker. The code for this kit is compatible with the AVR GNU and IAR™ AVR toolchains. 2.4.1 AVR GNU toolchain The AVR GNU toolchain is a free toolchain that can be downloaded from the Atmel webpage. It includes all necessary tools like a C/C++ compiler, assembler and linker, which are necessary for the AVR application development.
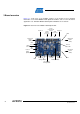
3 Board overview Figure 3-1 shows most of the available features on the board. For more detailed information on the Atmel MEGA-1284P Xplained hardware, take a look at the Atmel application note “AVR364: MEGA-1284P Xplained Hardware User’s Guide”. Figure 3-1. Overview of the MEGA-1284P Xplained kit.
AVR370 4 Connecting the board Connect a USB cable between the board and a PC or a USB power supply to power it up. This is all that is needed. When power is applied the power/status LED will light up in green. WARNING Do not power the board without having the jumper next to the USB connector or an ammeter mounted. Otherwise, the device may be damaged. When connecting the Atmel MEGA-1284P Xplained to a PC, the operating system will request a driver file for installing the serial communication driver.
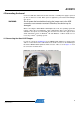
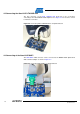
4.2 Connecting the Atmel AVR JTAGICE mkII The grey connector on the AVR JTAGICE mkII probe has to be used when connecting to the Atmel MEGA-1284P Xplained. See Figure 4-2 for reference of how to make the connection. Figure 4-2. Connecting AVR JTAGICE mkII to an Xplained board. 4.3 Connecting of the Atmel AVR ONE! The AVR ONE! JTAG connector can be connected to the MEGA-1284P Xplained kit with a standoff adapter as shown in Figure 4-3. Figure 4-3. Connecting AVR ONE! to a Xplained board.
AVR370 5 Programming the kit 5.1 Programming via the bootloader The preprogrammed bootloader on the Atmel ATmega1284P offers the possibility to program the device via the UART interface. Since the default firmware of the board controller acts as UART to USB bridge the ATmega1284P can be programmed from the PC via the USB connection to the kit. The bootloader on the ATmega1284P is evoked by pushing the mechanical switch (SW0) during reset.
7. Now the AVROSP application can be started to program the kit with the application. Following command can be used assuming that the kit uses COM6: avrosp –dATmega128 –cCOM6 –pf –vf ifmega_1284p_xplained_example.hex –e 8. Your firmware should now be running NOTE AVROSP only supports comports COM1 through COM8. Connecting to a higher comport than this will not work. 5.2 Restoring the bootloader When the bootloader has been erased it can be restored with any of the previously mentioned programming tools.
AVR370 6 Example applications 6.1 Preprogrammed firmware The preprogrammed firmware in the Atmel ATmega1284P is set up with an example code that demonstrates some of the basic features of the MEGA-1284P Xplained kit. This includes sleep modes, reading the light sensor and the ntc sensor. The example application has two main modes, demo mode or terminal mode. For more information please refer to the doxygen documentation (readme.html) found in the zip file associated with this application note.
7 How to compile example projects 7.1 Atmel AVR Studio 4 Open the AVR Studio 4 project and compile the project. The compiler will generate an Intel hex file and an ELF file. The Intel hex file can be downloaded to the Atmel ATmega1284P via the AVROSP program. 7.2 IAR Embedded Workbench Open the IAR Embedded Workbench project and compile the code. After compilation an Intel hex and a debug file will be available. The Intel hex file can be downloaded to the ATmega1284P via the AVROSP program.
AVR370 8 EVALUATION BOARD/KIT IMPORTANT NOTICE This evaluation board/kit is intended for use for FURTHER ENGINEERING, DEVELOPMENT, DEMONSTRATION, OR EVALUATION PURPOSES ONLY. It is not a finished product and may not (yet) comply with some or any technical or legal requirements that are applicable to finished products, including, without limitation, directives regarding electromagnetic compatibility, recycling (WEEE), FCC, CE or UL (except as may be otherwise noted on the board/kit).
9 Table of contents Features ............................................................................................... 1 1 Introduction ...................................................................................... 1 2 What is needed to get started ......................................................... 2 2.1 Documentation for MEGA-1284P Xplained ......................................................... 2 2.2 AVR Studio 4 ......................................................................
Atmel Corporation 2325 Orchard Parkway San Jose, CA 95131 USA Tel: (+1)(408) 441-0311 Fax: (+1)(408) 487-2600 www.atmel.com Atmel Asia Limited Unit 01-5 & 16, 19F BEA Tower, Milennium City 5 418 Kwun Tong Road Kwun Tong, Kowloon HONG KONG Tel: (+852) 2245-6100 Fax: (+852) 2722-1369 Atmel Munich GmbH Business Campus Parkring 4 D-85748 Garching b. Munich GERMANY Tel: (+49) 89-31970-0 Fax: (+49) 89-3194621 Atmel Japan 9F, Tonetsu Shinkawa Bldg.