MX Disc Publisher For Mac OS X Users Manual Microboards Technology LLC Version 2.
MICROBOARDS TECHNOLOGY, LLC MX Disc Publisher TABLE OF CONTENTS Introduction .......................................................................................................................... 5 What’s Included................................................................................................................. 5 System Requirements ....................................................................................................... 6 Assembly and Installation..........................
Any unauthorized modification to this equipment may result in the revocation by the FCC of the user’s authority to operate this equipment. NOTE: This equipment has been tested and found to comply with the limits for a Class B digital device, pursuant to Part 15 of the FCC Rules. These limits are designed to provide reasonable protection against harmful interference in a residential installation.
MICROBOARDS TECHNOLOGY, LLC MX Disc Publisher Introduction The MX Disc Publisher is a robust automated inkjet CD and DVD disc publishing solution. The MX Disc Publisher Series includes the MX-1 and the MX-2. The MX-1 has a single recording drive, while the MX-2 has 2 recording drives for added throughput. Both MX Disc Publisher models have a 100-disc capacity, making the task of burning and printing large numbers of discs fast, easy and hands-free.
System Requirements The Microboards MX Disc Publisher has the following minimum requirements and compatibilities: Operating System Mac OS 10.5 or 10.6. Processors Intel Processor is required System Memory Minimum 512 MB of system memory; 1GB minimum recommend for DVD Duplication Hard Drive Space Less than 50MB of free space is required on the system hard drive for the applications and drivers. A separate internal 7200 RPM hard drive is recommended for storing your data.
MICROBOARDS TECHNOLOGY, LLC MX DISC PUBLISHER Installing Ink Cartridges and Print Heads Supported Ink Cartridges The MX Disc Publisher uses 3 color and 1 black ink cartridges. The part numbers for these cartridges are PFP-HC-CYAN, PFP-HC-MAGENTA, PFP-HC-YELLOW, and PFP-HC-BLACK. If other cartridges are installed, the MX Disc Publisher will not function. These cartridges are available from any Microboards reseller.
Loading Discs The next step is to load your MX Disc Publisher with output discs. The system will accept CD or DVD 120 mm (12 cm) inkjet printable discs. If the disc does not have an inkjet printable surface, the ink will not adhere to the surface of the disc. The MX Disc Publisher will only accept 12 cm discs. Business card or 8 cm discs are not supported by this system. Figure 1 Figure 2 Load the first 5 or 6 discs flat, as seen in figure 1.
MICROBOARDS TECHNOLOGY, LLC MX DISC PUBLISHER Installation of Drivers and Software Driver and Microboards PrintWrite Installation Drivers and Microboards PrintWrite must be installed on a hard disc. Once you have installed the software, store the original installer disc in a safe place. 1. Insert the Installation CD in your system’s disc drive. Open the disc icon when it appears on the desktop. 2. Double-click on the Microboards Installer.mpkg icon in the correct directory.
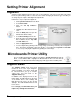
Setting Printer Alignment Alignment Verify the printer alignment the first time you use the Publisher. You may need to align your printer before the printed images will be centered on the media. Changing the brand or type of media you are using may also require small alignment adjustments. Follow these steps to adjust the alignment: • Click System Preferences in the Dock. • Select Print & Fax. • Click the button. • Highlight the Microboards PF-Pro icon.
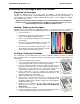
MICROBOARDS TECHNOLOGY, LLC MX DISC PUBLISHER Device Information This page shows the Firmware version and Serial Number of the print engine. Clicking the Print Configuration Page button will print out a test disc. Clean The Clean page allows you to run a cleaning cycle on the ink cartridge. Click the Clean button once a disc has been loaded into the input hopper. If the resulting disc shows streaks similar to those shown in the image on this page, you may need to run the Clean utility again.
Manual Pen Alignment Pen Alignment should be performed when a new printhead is installed. If you experience a decrease in print quality with an installed printhead, you may need to perform this service. • Load 4 pieces of blank, unprinted media into the input hopper. • Click the Align button, and 2 discs will load to the belts and be printed. • Select the Alignment Speed. 20ips is the recommended setting.
MICROBOARDS TECHNOLOGY, LLC MX DISC PUBLISHER The MX Disc Publisher and PrintWrite Microboards PrintWrite is required to control the Burn and Print functionality of the Microboards MX Disc Publisher. It is able to set up publishing jobs, load the MX , burn to the loaded disc, unload the disc, and then print the image you have selected. PrintWrite will automatically find your MX Disc Publisher the robotics and printer when the application is opened.
Changing Print Diameters Different media types and brands may vary in the size of the printable surface. When the print surface changes, you will need to set the printer to the correct sizes. Always make sure the images are printing centered on the disc before changing the diameter settings. If the image is not centered, please refer to page 10 for information on the alignment process. To change the diameter of the printed area, click the Advanced button on the Print screen.
MICROBOARDS TECHNOLOGY, LLC Setting your application to open in 32-bit mode is a simple process that only needs to be done one time per application. 1. Close the application you are using to print the image file 2. Open the Applications folder in a Finder window 3. Select the application from which you are printing 4. Select Get Info from the File menu 5. Place a check in the Open in 32-bit mode setting 6. Restart your application 7.
Troubleshooting Printer not printing 1. Confirm the MX Disc Publisher is plugged into a power source and is turned on. The ON/OFF switch is located at the back of the unit, above the power cable connector. 2. Confirm the green LED on the power button is lit on the front panel, as shown below. If AC power is on and the green LED is off, press the power button and wait for several seconds. If the LED still does not come on, contact Microboards Technical Support. Power LED 3.
MICROBOARDS TECHNOLOGY, LLC MX DISC PUBLISHER Technical Support For technical questions or support issues, contact Microboards Technology technical support: United States PH: 952-556-1639 FAX: 952-556-1628 support@microboards.com www.microboards.com Europe PH: +44 (0) 845 230 7800 www.microboards.co.uk Japan PH: 03-3561-2266 www.microboards.co.jp Please have the Model and Serial Number of your PF-3 Print Factory available when contacting Technical Support.