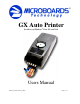
GX Auto Printer For Microsoft Windows® Vista, XP, and 2000 Users Manual Microboards Technology LLC Version 1.
• Introduction
MICROBOARDS TECHNOLOGY, LLC GX AUTO PRINTER TABLE OF CONTENTS INTRODUCTION ..............................................................................................................................................................5 WHAT’S INCLUDED ...........................................................................................................................................................5 SYSTEM REQUIREMENTS ..................................................................................
• Introduction
MICROBOARDS TECHNOLOGY, LLC GX AUTO PRINTER Introduction The Microboards GX Auto Printer is a CD, DVD, and BD auto-loading disc printer with a 50 disc capacity. Microboards and HP co-developed the printer technology, allowing up to 4800 x 1200 dpi printing. SureThing Disc Labeler is packaged with the GX Auto Printer, providing you with an easy tool for designing and printing your labels.
System Requirements The Microboards GX Auto Printer has the following minimum requirements and compatibilities: Operating System Microsoft Windows 2000 with SP4, Windows XP with SP2, or Windows Vista. Processor Pentium 4 (or equivalent) CPU, running at 2.0 GHz or faster. System Memory Minimum 512 MB of system memory. Hard Drive Space Only 10MB of free space is required on the system hard drive for the applications and drivers. Additional drive space will be required for saved disc labels.
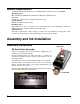
MICROBOARDS TECHNOLOGY, LLC GX AUTO PRINTER Installing Ink Cartridges Supported Ink Cartridges The GX Auto Printer uses a single color ink cartridge. The part number for this cartridge is GX300HC. If other cartridges are installed, the GX Auto Printer will not function. These cartridges are available from any Microboards reseller. Refill kits or non-Microboards ink cartridges are not recommended for use in the GX Auto Printer system. Use of these types of cartridges will cause the printer to fail.
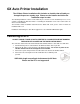
GX Auto Printer Installation The GX Auto Printer installation disk includes an Installer that will walk you through the process step by step. Please use the Installer and follow the installation steps in order. The following installation sections are intended only as a reference for the installation process, not as a guide to installing the GX Auto Printer. Performing the installation out of order could result in an unsuccessful installation.
MICROBOARDS TECHNOLOGY, LLC GX AUTO PRINTER Windows Vista Hardware Installation The Microboards GX Auto Printer Installer should always be run when logged in as user with full Administrator rights. This is required for the driver pre-installation to be successful. Once the GX Auto Printer is plugged into the PC via the USB connection, the hardware will automatically be found and installed on your PC. During the driver pre-installation, you may need to verify that you would like to install the drivers.
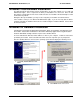
5. Select No, not this time and click Next. 10 9. Select No, not this time and click Next. 6. Click Next. 10. Click Next. 7. Click Continue Anyway. 11. Click Continue Anyway. 8. Click Finish for the next screen. 12. Click Finish.
MICROBOARDS TECHNOLOGY, LLC GX AUTO PRINTER Setting Printer Alignment Alignment The GX Auto Printer system has been aligned at the factory. The factory alignment values are on a label on the back of the GX Auto Printer. Follow these steps to enter the factory values: • Click on the Start Button on your Windows computer. • Select Settings and then Printers. • Right click the Microboards GX Series icon. • Select Printing Preferences. • Select the Alignment Tab. • Click on the .
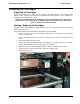
Using the GX Auto Printer Loading Discs The next step is to load your GX Auto Printer with output discs. The system will accept CD or DVD 120 mm (12 cm) inkjet printable discs. If the disc does not have an inkjet printable surface, the ink will not adhere to the surface of the disc. The GX Auto Printer will only accept 12 cm discs. Business card or 8 cm discs are not supported by this system. Load the first 5 or 6 discs flat, as seen in the top image to the right.
MICROBOARDS TECHNOLOGY, LLC GX AUTO PRINTER Printing Preferences Access the Printing Preferences by clicking the Start Button on your Windows computer. Select Settings and then select Printers. Right click on the Microboards GX Series icon, then select Printing Preferences. Print Quality Tab Print Quality • Best • Normal • Fast Print Modes • Text and Graphics • Photo Printing Recommendations Text and Graphics mode is used for printing mainly text information and small, simple graphics.
Color Tab Color Space defines the range of colors that can be printed. sRGB/sYCC will be the setting selected unless your image specifically was created using the AdobeRGB standard. Click the Advanced color settings button on the Color tab to access the controls. Advanced Color Settings Saturation, Brightness and Color Tone allow you to fine tune your print image. The individual colors levels can be manipulated using the Cyan, Magenta, Yellow, and Black slide bars.
MICROBOARDS TECHNOLOGY, LLC GX AUTO PRINTER Ink Tab The Ink Levels show how much remains of all 3 colors, Cyan, Magenta and Yellow. NOTE: If you place a used cartridge in the GX Auto Printer, the ink level may not be reported correctly. If the GX Auto Printer can identify the cartridge, it may report the correct ink levels; if not, it will assume that the ink cartridge is new and will show ink levels of 100%. Before each disc is printed, the ink levels are checked.
Manual Software Re-Installation This section will only apply to a manual re-installation of the SureThing software package. If you have not yet installed the GX Auto Printer using the Installer, it is recommended that you do so. There are 3 methods of reinstalling SureThing should the need arise: A. (Recommended) Insert the Microboards GX Auto Printer Installation CD into the CD/DVD ROM drive on your computer and select the Repair option when the installer starts.
MICROBOARDS TECHNOLOGY, LLC GX AUTO PRINTER Troubleshooting Printer not printing 1. Confirm the GX Auto Printer is plugged into a power source and is turned on. The ON/OFF switch is located at the back of the unit, above the power cable connector. 2. Confirm the green light on the power button is lit on the front panel. If AC power is on and the green light is off, press the power button firmly and wait for several seconds. If the light still does not come on, contact Microboards Technical Support. 3.
Printing Specifications Print Speed: Depends upon percentage of coverage and print mode selected: Photo Normal Mode: Approx. 45 seconds for 100% full-color coverage Text & Graphics Best Mode: Approx. 20 seconds for 100% full-color coverage Text & Graphics Normal Mode: Approx.
MICROBOARDS TECHNOLOGY, LLC 19 GX AUTO PRINTER